一、简介
1、概述
MP官网!
MyBatis-Plus(简称 MP),是一个 MyBatis 的增强工具包,只做增强不做改变. 为简化开发工作、提高生产率而生
我们的愿景是成为 Mybatis 最好的搭档,就像 魂斗罗 中的 1P、2P,基友搭配,效率翻倍。
2、特点
- 无侵入:只做增强不做改变,引入它不会对现有工程产生影响,如丝般顺滑
- 损耗小:启动即会自动注入基本 CURD,性能基本无损耗,直接面向对象操作
- 强大的 CRUD 操作:内置通用 Mapper、通用 Service,仅仅通过少量配置即可实现单表大部分 CRUD 操作,更有强大的条件构造器,满足各类使用需求
- 支持 Lambda 形式调用:通过 Lambda 表达式,方便的编写各类查询条件,无需再担心字段写错
- 支持主键自动生成:支持多达 4 种主键策略(内含分布式唯一 ID 生成器 - Sequence),可自由配置,完美解决主键问题
- 支持 ActiveRecord 模式:支持 ActiveRecord 形式调用,实体类只需继承 Model 类即可进行强大的 CRUD 操作
- 支持自定义全局通用操作:支持全局通用方法注入( Write once, use anywhere )
- 内置代码生成器:采用代码或者 Maven 插件可快速生成 Mapper 、 Model 、 Service 、 Controller 层代码,支持模板引擎,更有超多自定义配置等您来使用
- 内置分页插件:基于 MyBatis 物理分页,开发者无需关心具体操作,配置好插件之后,写分页等同于普通 List 查询
- 分页插件支持多种数据库:支持 MySQL、MariaDB、Oracle、DB2、H2、HSQL、SQLite、Postgre、SQLServer 等多种数据库
- 内置性能分析插件:可输出 SQL 语句以及其执行时间,建议开发测试时启用该功能,能快速揪出慢查询
- 内置全局拦截插件:提供全表 delete 、 update 操作智能分析阻断,也可自定义拦截规则,预防误操作
二、继承MP
1、pom.xml
使用MP目前最新版,3.4.3.4!
注意:Mybatis 及 Mybatis-Spring 依赖请勿加入项目配置,以免引起版本冲突!!!Mybatis-Plus 会自动帮你维护!
1
2
3
4
5
6
7
8
9
10
11
12
13
14
15
16
17
18
19
20
21
22
23
24
25
26
27
28
29
30
31
32
33
34
35
36
37
38
39
40
41
42
43
44
45
46
| <dependencies>
<dependency>
<groupId>com.baomidou</groupId>
<artifactId>mybatis-plus</artifactId>
<version>3.4.3.4</version>
</dependency>
<dependency>
<groupId>junit</groupId>
<artifactId>junit</artifactId>
<version>4.9</version>
</dependency>
<dependency>
<groupId>log4j</groupId>
<artifactId>log4j</artifactId>
<version>1.2.17</version>
</dependency>
<dependency>
<groupId>mysql</groupId>
<artifactId>mysql-connector-java</artifactId>
<version>8.0.23</version>
</dependency>
<dependency>
<groupId>com.mchange</groupId>
<artifactId>c3p0</artifactId>
<version>0.9.5.5</version>
</dependency>
<dependency>
<groupId>org.springframework</groupId>
<artifactId>spring-context</artifactId>
<version>4.3.10.RELEASE</version>
</dependency>
<dependency>
<groupId>org.springframework</groupId>
<artifactId>spring-orm</artifactId>
<version>4.3.10.RELEASE</version>
</dependency>
</dependencies>
|
2、log4j.xml
便于看到SQL语句情况!
1
2
3
4
5
6
7
8
9
10
11
12
13
14
15
16
17
18
19
20
21
| <?xml version="1.0" encoding="UTF-8" ?>
<!DOCTYPE log4j:configuration SYSTEM "log4j.dtd">
<log4j:configuration xmlns:log4j="http://jakarta.apache.org/log4j/">
<appender name="STDOUT" class="org.apache.log4j.ConsoleAppender">
<param name="Encoding" value="UTF-8" />
<layout class="org.apache.log4j.PatternLayout">
<param name="ConversionPattern" value="%-5p %d{MM-dd
HH:mm:ss,SSS} %m (%F:%L) \n" />
</layout>
</appender>
<logger name="java.sql">
<level value="debug" />
</logger>
<logger name="org.apache.ibatis">
<level value="info" />
</logger>
<root>
<level value="debug" />
<appender-ref ref="STDOUT" />
</root>
</log4j:configuration>
|
3、spring.xml
关键点:只需要SqlSessionFactoryBean替换为MP的MybatisSqlSessionFactoryBean即可!
1
2
3
4
5
6
7
8
9
10
11
12
13
14
15
16
17
18
19
20
21
22
23
24
25
26
27
28
29
30
31
32
33
34
35
36
37
38
39
40
41
42
43
44
45
46
47
48
49
50
51
52
53
54
55
56
57
58
59
60
61
62
63
64
65
66
67
68
69
70
71
72
73
74
75
76
77
78
79
80
81
82
83
84
85
86
87
| <?xml version="1.0" encoding="UTF-8"?>
<beans xmlns="http://www.springframework.org/schema/beans"
xmlns:xsi="http://www.w3.org/2001/XMLSchema-instance"
xmlns:context="http://www.springframework.org/schema/context"
xmlns:tx="http://www.springframework.org/schema/tx"
xmlns:mybatis-spring="http://mybatis.org/schema/mybatis-spring"
xsi:schemaLocation="http://mybatis.org/schema/mybatis-spring
http://mybatis.org/schema/mybatis-spring-1.2.xsd
http://www.springframework.org/schema/beans
http://www.springframework.org/schema/beans/spring-beans.xsd
http://www.springframework.org/schema/context
http://www.springframework.org/schema/context/spring-context-4.0.xsd
http://www.springframework.org/schema/tx
http://www.springframework.org/schema/tx/spring-tx-4.0.xsd">
<context:property-placeholder location="classpath:jdbc.properties"/>
<bean id="dataSource" class="com.mchange.v2.c3p0.ComboPooledDataSource">
<property name="driverClass" value="${jdbc.driver}"></property>
<property name="jdbcUrl" value="${jdbc.url}"></property>
<property name="user" value="${jdbc.username}"></property>
<property name="password" value="${jdbc.password}"></property>
</bean>
<bean id="dataSourceTransactionManager" class="org.springframework.jdbc.datasource.DataSourceTransactionManager">
<property name="dataSource" ref="dataSource"></property>
</bean>
<tx:annotation-driven transaction-manager="dataSourceTransactionManager"/>
<bean id="sqlSessionFactoryBean" class="com.baomidou.mybatisplus.extension.spring.MybatisSqlSessionFactoryBean">
<property name="dataSource" ref="dataSource"/>
<property name="typeAliasesPackage" value="com.itnxd.bean"/>
<property name="configuration" ref="configuration"/>
<property name="globalConfig" ref="globalConfig"/>
</bean>
<bean id="configuration" class="com.baomidou.mybatisplus.core.MybatisConfiguration">
<property name="mapUnderscoreToCamelCase" value="true"></property>
</bean>
<bean id="globalConfig" class="com.baomidou.mybatisplus.core.config.GlobalConfig">
<property name="dbConfig" ref="dbConfig"/>
</bean>
<bean id="dbConfig" class="com.baomidou.mybatisplus.core.config.GlobalConfig.DbConfig">
<property name="idType" value="AUTO"></property>
<property name="tablePrefix" value="tbl_"></property>
</bean>
<bean class="org.mybatis.spring.mapper.MapperScannerConfigurer">
<property name="basePackage" value="com.itnxd.mapper"></property>
</bean>
</beans>
|
4、jdbc.properties
1
2
3
4
| jdbc.driver=com.mysql.cj.jdbc.Driver
jdbc.url=jdbc:mysql://localhost:3306/mp
jdbc.username=root
jdbc.password=123456
|
三、简单CRUD
1、MyBatis VS MyBatis-Plus
基于 Mybatis:
- 需要编写 EmployeeMapper 接口,并手动编写 CRUD 方法
- 提供 EmployeeMapper.xml 映射文件,并手动编写每个方法对应的 SQL 语句.
基于 MP:
- 只需要创建 EmployeeMapper 接口, 并继承 BaseMapper 接口.这就是使用 MP
- 需要完成的所有操作,甚至不需要创建 SQL 映射文件。
1
2
3
| public interface EmployeeMapper extends BaseMapper<Employee> {
}
|
2、一些注解
- @TableName:JavaBean到表名的映射
- @TableId:主键注解,可以指明是自增主键
- @TableField:字段名到列名映射
关于自增主键回显:
- Mybatis:需要通过 useGeneratedKeys 以及 keyProperty 来设置
- MP:自动将主键值回写到实体类中
1
2
3
4
5
6
7
8
9
10
11
12
13
14
15
16
17
18
19
20
21
22
23
24
25
| @TableName(value = "tbl_employee")
public class Employee {
@TableId(value = "id", type = IdType.AUTO)
private Integer id;
@TableField(value = "last_name")
private String lastName;
private String email;
private Integer gender;
private Integer age;
@TableField(exist = false)
private Double salary;
...
|
也可以在application-context.xml中配置:
1
2
3
4
5
6
7
8
9
10
11
12
13
14
15
16
17
18
19
20
21
22
23
24
25
26
27
28
29
30
31
32
33
34
35
36
37
38
39
40
41
42
43
| <bean id="sqlSessionFactoryBean" class="com.baomidou.mybatisplus.extension.spring.MybatisSqlSessionFactoryBean">
...
<property name="typeAliasesPackage" value="com.itnxd.bean"/>
<property name="configuration" ref="configuration"/>
<property name="globalConfig" ref="globalConfig"/>
</bean>
<bean id="configuration" class="com.baomidou.mybatisplus.core.MybatisConfiguration">
<property name="mapUnderscoreToCamelCase" value="true"></property>
</bean>
<bean id="globalConfig" class="com.baomidou.mybatisplus.core.config.GlobalConfig">
<property name="dbConfig" ref="dbConfig"/>
</bean>
<bean id="dbConfig" class="com.baomidou.mybatisplus.core.config.GlobalConfig.DbConfig">
<property name="idType" value="AUTO"></property>
<property name="tablePrefix" value="tbl_"></property>
</bean>
|
3、简单CRUD
1
2
3
4
5
6
7
8
9
10
11
12
13
14
15
16
17
18
19
20
21
22
23
24
25
26
27
28
29
30
31
32
33
34
35
36
37
38
39
40
41
42
43
44
45
46
47
48
49
50
51
52
53
54
55
56
57
58
59
60
61
62
63
64
65
66
67
68
69
70
71
72
73
74
75
76
77
78
79
80
81
82
83
84
85
86
87
88
89
90
91
92
93
94
95
96
97
| public class TestMp {
private ApplicationContext ioc =
new ClassPathXmlApplicationContext("application-context.xml");
private EmployeeMapper employeeMapper =
ioc.getBean("employeeMapper", EmployeeMapper.class);
@Test
public void test1(){
Employee employee = new Employee(null, null, "nxd@email.com", 0, 23);
int res = employeeMapper.insert(employee);
System.out.println(res);
Integer id = employee.getId();
System.out.println(id);
}
@Test
public void test2(){
int res = employeeMapper.updateById(new Employee(6, "nxd", "nnxxdd@email.con", 1, 22));
System.out.println(res);
UpdateWrapper<Employee> updateWrapper = new UpdateWrapper<>();
updateWrapper.in("age", Arrays.asList(25, 30));
employeeMapper.update(
new Employee(null, "nxd", "nnxxdd@email.con",
1, 22), updateWrapper);
}
@Test
public void test3(){
Employee employee = employeeMapper.selectById(1);
System.out.println(employee);
IPage<Employee> page = employeeMapper.selectPage(new Page<>(2, 3), null);
System.out.println(page);
List<Employee> records = page.getRecords();
System.out.println(records);
}
@Test
public void test4(){
int i = employeeMapper.deleteById(8);
System.out.println(i);
QueryWrapper<Employee> queryWrapper = new QueryWrapper<>();
queryWrapper.eq("age", 23);
int delete = employeeMapper.delete(queryWrapper);
System.out.println(delete);
}
}
|
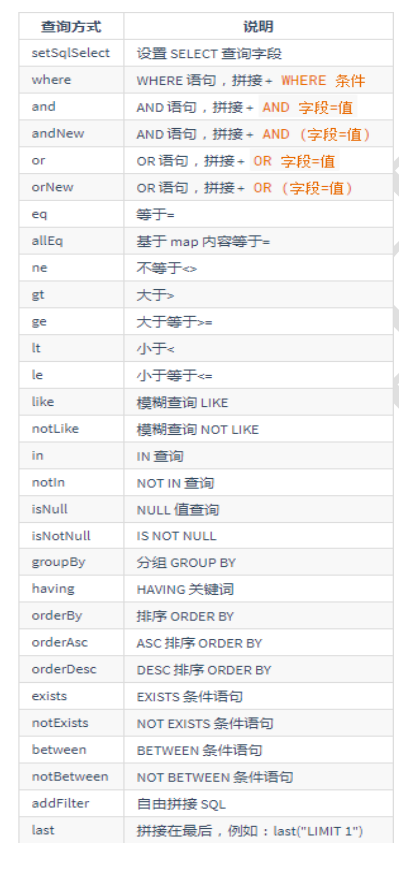
四、Wrapper条件构造器
官方文档条件构造器介绍:https://baomidou.com/guide/wrapper.html
图示如下:
使用如下:
1
2
3
4
5
6
7
8
9
10
11
12
|
@Test
public void test5(){
QueryWrapper<Employee> queryWrapper = new QueryWrapper<>();
....
UpdateWrapper<Employee> employeeUpdateWrapper = new UpdateWrapper<>();
....
}
|
五、AR活动记录
1、简介
Active Record(活动记录),是一种领域模型模式,特点是一个模型类对应关系型数据库中的一个表,而模型类的一个实例对应表中的一行记录。
ActiveRecord 一直广受动态语言( PHP 、 Ruby 等)的喜爱,而 Java 作为准静态语言,对于 ActiveRecord 往往只能感叹其优雅,所以 MP 也在 AR 道路上进行了一定的探索!
2、使用
仅仅需要让实体类继承 Model 类且实现主键指定方法,即可开启 AR 之旅!
1
2
3
4
5
6
| public class Employee extends Model<Employee> {
private Integer id;
....
}
|
测试:
1
2
3
4
5
6
7
8
9
10
11
12
13
14
15
16
17
18
19
20
|
@Test
public void test6(){
Employee employee = new Employee(null, "苍老师", "cjk@email.com", 0, 25);
employee.insert();
}
|
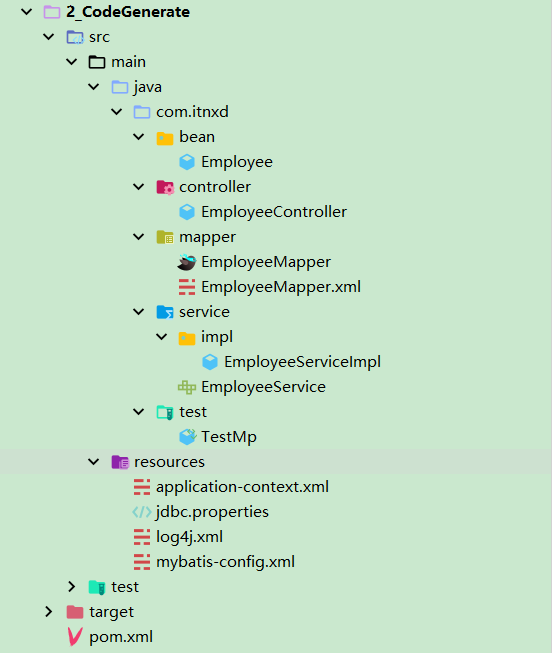
六、代码生成器
比MBG更加强大!
1、简介
MP 的代码生成器都是基于 java 代码来生成。
2、pom.xml
1
2
3
4
5
6
7
8
9
10
11
12
13
14
15
16
17
18
19
20
21
|
<dependency>
<groupId>com.baomidou</groupId>
<artifactId>mybatis-plus-generator</artifactId>
<version>3.4.1</version>
</dependency>
<dependency>
<groupId>org.apache.velocity</groupId>
<artifactId>velocity-engine-core</artifactId>
<version>2.0</version>
</dependency>
<dependency>
<groupId>org.slf4j</groupId>
<artifactId>slf4j-api</artifactId>
<version>1.7.7</version>
</dependency>
<dependency>
<groupId>org.slf4j</groupId>
<artifactId>slf4j-log4j12</artifactId>
<version>1.7.7</version>
</dependency>
|
3、测试
新版本配置:https://baomidou.com/guide/generator-new.html
1
2
3
4
5
6
7
8
9
10
11
12
13
14
15
16
17
18
19
20
21
22
23
24
25
26
27
28
29
30
31
32
33
34
35
36
37
38
39
40
41
42
43
44
45
46
47
48
49
50
51
52
53
54
55
56
57
58
59
60
61
62
63
64
65
66
67
68
69
70
71
72
73
74
75
76
77
78
79
80
81
82
83
84
85
86
87
88
89
|
@Test
public void testGenerator() {
GlobalConfig globalConfig = new GlobalConfig();
String projectPath = System.getProperty("user.dir");
globalConfig.setOutputDir(projectPath + "/src/main/java");
globalConfig.setAuthor("itnxd");
globalConfig.setOpen(false);
globalConfig.setFileOverride(true);
globalConfig.setServiceName("%sService");
globalConfig.setIdType(IdType.AUTO);
globalConfig.setBaseResultMap(true);
globalConfig.setBaseColumnList(true);
globalConfig.setActiveRecord(true);
DataSourceConfig dataSourceConfig = new DataSourceConfig();
dataSourceConfig.setDbType(DbType.MYSQL);
dataSourceConfig.setUrl("jdbc:mysql://localhost:3306/mp");
dataSourceConfig.setDriverName("com.mysql.cj.jdbc.Driver");
dataSourceConfig.setUsername("root");
dataSourceConfig.setPassword("n158903258");
PackageConfig packageConfig = new PackageConfig();
packageConfig.setParent("com.itnxd");
packageConfig.setMapper("mapper");
packageConfig.setController("controller");
packageConfig.setEntity("bean");
packageConfig.setService("service");
packageConfig.setXml("mapper");
StrategyConfig strategy = new StrategyConfig();
strategy.setCapitalMode(true);
strategy.setTablePrefix("tbl_");
strategy.setInclude("tbl_employee");
strategy.setNaming(NamingStrategy.underline_to_camel);
strategy.setColumnNaming(NamingStrategy.underline_to_camel);
strategy.setEntityLombokModel(false);
strategy.setLogicDeleteFieldName("deleted");
TableFill gmtCreate = new TableFill("gmt_create", FieldFill.INSERT);
TableFill gmtModified = new TableFill("gmt_modified", FieldFill.INSERT_UPDATE);
ArrayList<TableFill> tableFills = new ArrayList<>();
tableFills.add(gmtCreate);
tableFills.add(gmtModified);
strategy.setTableFillList(tableFills);
strategy.setVersionFieldName("version");
AutoGenerator autoGenerator = new AutoGenerator();
autoGenerator.setGlobalConfig(globalConfig);
autoGenerator.setStrategy(strategy);
autoGenerator.setDataSource(dataSourceConfig);
autoGenerator.setPackageInfo(packageConfig);
autoGenerator.execute();
}
|
3、效果
七、MP插件拓展
1、简介
所有插件都将基于InnerInterceptor接口来实现功能:
目前已有的功能:
- 自动分页: PaginationInnerInterceptor
- 多租户: TenantLineInnerInterceptor
- 动态表名: DynamicTableNameInnerInterceptor
- 乐观锁: OptimisticLockerInnerInterceptor
- sql性能规范: IllegalSQLInnerInterceptor
- 防止全表更新与删除: BlockAttackInnerInterceptor
注意:几个插件都一起配置了,在分页插件章节!
2、分页插件
application-context.xml:
1
2
3
4
5
6
7
8
9
10
11
12
13
14
15
16
17
18
19
20
21
22
23
24
25
26
27
28
29
30
31
32
33
34
35
36
37
38
39
40
41
42
43
44
45
46
47
| <bean id="sqlSessionFactoryBean" class="com.baomidou.mybatisplus.extension.spring.MybatisSqlSessionFactoryBean">
<property name="dataSource" ref="dataSource"/>
<property name="typeAliasesPackage" value="com.itnxd.bean"/>
<property name="configuration" ref="configuration"/>
<property name="globalConfig" ref="globalConfig"/>
<property name="plugins">
<array>
<ref bean="mybatisPlusInterceptor"/>
</array>
</property>
</bean>
<bean id="mybatisPlusInterceptor" class="com.baomidou.mybatisplus.extension.plugins.MybatisPlusInterceptor">
<property name="interceptors">
<list>
<ref bean="paginationInnerInterceptor"/>
<ref bean="illegalSQLInnerInterceptor"/>
<ref bean="optimisticLockerInnerInterceptor"/>
<ref bean="blockAttackInnerInterceptor"/>
</list>
</property>
</bean>
<bean id="paginationInnerInterceptor" class="com.baomidou.mybatisplus.extension.plugins.inner.PaginationInnerInterceptor">
<constructor-arg name="dbType" value="MYSQL"/>
</bean>
<bean id="illegalSQLInnerInterceptor" class="com.baomidou.mybatisplus.extension.plugins.inner.IllegalSQLInnerInterceptor"/>
<bean id="optimisticLockerInnerInterceptor" class="com.baomidou.mybatisplus.extension.plugins.inner.OptimisticLockerInnerInterceptor"/>
<bean id="blockAttackInnerInterceptor" class="com.baomidou.mybatisplus.extension.plugins.inner.BlockAttackInnerInterceptor"/>
|
使用:
1
2
3
4
5
6
7
8
9
10
11
12
13
14
15
16
17
18
19
20
21
|
@Test
public void test(){
IPage<Employee> iPage = employeeMapper.selectPage(new Page<>(1, 2), null);
List<Employee> records = iPage.getRecords();
System.out.println(records);
Page<Employee> page = new Page<>();
System.out.println(page.getTotal());
System.out.println(page.getCurrent());
System.out.println(page.getPages());
System.out.println(page.getSize());
System.out.println(page.hasPrevious());
System.out.println(page.hasNext());
}
|
3、防全表操作插件
SQL 执行分析拦截器,只支持 MySQL5.6.3 以上版本!
该插件的作用是分析 DELETE UPDATE 语句,防止小白或者恶意进行 DELETE UPDATE 全表操作!
使用:
1
2
3
4
5
6
7
8
9
10
|
@Test
public void test1(){
employeeMapper.delete(null);
}
|
4、乐观锁插件
如果想实现如下需求: 当要更新一条记录的时候,希望这条记录没有被别人更新!
乐观锁的实现原理:
- 取出记录时,获取当前 version 2
- 更新时,带上这个 version 2
- 执行更新时, set version = yourVersion+1 where version = yourVersion
- 如果 version 不对,就更新失败
- @Version 用于注解实体字段,必须要有。
添加版本字段用于判断!
1
2
3
4
5
6
7
8
9
10
| public class Employee extends Model<Employee> {
private Integer id;
private String lastName;
private String email;
private Integer gender;
private Integer age;
@Version
private Integer version;
|
表中同步增加version列!
使用:
1
2
3
4
5
6
7
8
9
10
11
12
13
14
15
16
17
|
@Test
public void test3(){
Employee employee = new Employee(3, "ff", "hh", 1, 33);
employee.setVersion(1);
employeeMapper.update(employee, null);
}
|
5、性能分析插件
性能分析拦截器,用于输出每条 SQL 语句及其执行时间!
SQL 性能执行分析,开发环境使用,超过指定时间,停止运行。有助于发现问题!
使用:
1
2
3
4
5
6
7
8
9
10
11
12
13
14
|
@Test
public void test2(){
employeeMapper.insert(new Employee(null, "jj", "hh", 1, 33));
}
|
八、公共字段自动填充
官方文档:https://baomidou.com/guide/auto-fill-metainfo.html
JavaBean的字段上增加注解 @TableFile(fill = FieldFill.INSERT):
1
2
3
4
5
|
@TableField(fill = FieldFill.INSERT_UPDATE)
private String email;
|
自定义公共字段填充处理器:
1
2
3
4
5
6
7
8
9
10
11
12
13
14
15
16
17
18
19
20
21
22
23
24
25
26
27
28
29
30
31
32
33
34
35
36
37
| package com.itnxd.metaHandler;
import com.baomidou.mybatisplus.core.handlers.MetaObjectHandler;
import org.apache.ibatis.reflection.MetaObject;
public class MyMetaObjectHandler implements MetaObjectHandler {
@Override
public void insertFill(MetaObject metaObject) {
Object fieldName = getFieldValByName("email", metaObject);
if(fieldName == null){
System.out.println("空,进行填充!------------");
setFieldValByName("email", "xxx@email.com", metaObject);
}
}
@Override
public void updateFill(MetaObject metaObject) {
Object fieldName = getFieldValByName("email", metaObject);
if(fieldName == null){
System.out.println("空,进行填充!------------");
setFieldValByName("email", "xxx@email.com", metaObject);
}
}
}
|
九、Idea 快速开发插件
MybatisX 辅助 idea 快速开发插件,为效率而生!在Idea插件市场搜索安装即可!
- 可以实现 java 与 xml 跳转
- 根据 Mapper 接口中的方法自动生成 xml 结构

 微信
微信 支付宝
支付宝