一、AOP概述
1、概述
- Aspect Oriented Programming,面向切面编程,利用 AOP 可以对业务逻辑的各个部分进行隔离,从而使得业务逻辑各部分之间的耦合度降低,提高程序的可重用性,同时提高了开发的效率。
- 通俗描述:不通过修改源代码方式,在主干功能里面添加新功能
2、AOP底层原理
底层自然是通过动态代理实现的!
2.1、JDK动态代理
有接口情况,使用 JDK 动态代理!
创建接口实现类代理对象,增强类的方法!
2.2、CGLIB动态代理
没有接口情况,使用 CGLIB 动态代理!
创建子类的代理对象,增强类的方法!
二、JDK动态代理
1、创建接口,定义方法
1
2
3
| public interface UserDao {
int add(int a, int b);
}
|
2、创建接口实现类,实现方法
1
2
3
4
5
6
7
8
| public class UserDaoImpl implements UserDao {
@Override
public int add(int a, int b) {
System.out.println("add方法执行了!");
return a + b;
}
}
|
3、使用 Proxy 类创建接口代理对象
public static Object newProxyInstance(ClassLoader loader, Class<?>[] interfaces, InvocationHandler h):
- 参数一:类加载器,任何类都可,都是调用的系统类加载器
- 参数二:实现类接口,
Class[]类型,即xxxDao,支持多个接口
- 参数三:
InvocationHandler,实现这个接口 InvocationHandler,创建代理对象,写增强的部分
1
2
3
4
5
6
7
8
9
10
11
12
13
14
15
16
17
18
19
20
21
22
| public class JDKProxy {
public static void main(String[] args) {
Class[] interfaces = {UserDao.class};
UserDao userDao = (UserDao) Proxy.newProxyInstance(JDKProxy.class.getClassLoader(),
interfaces, new UserDaoProxy(new UserDaoImpl()));
int res = userDao.add(2, 5);
System.out.println(res);
}
}
|
代理对象UserDaoProxy类,实现InvocationHandler:
- 将要被代理的类传递过来,通过有参构造传递,一般是接口的实现类
- 重写
invoke方法,实现方法增强
- 可以通过
method.getName()来判断传入的方法,进行区别对待,增强不同方法!
public Object invoke(Object obj, Object... args):
- 参数一:调用增强方法的对象实现类对象
UserDaoImpl
- 参数二:增强方法add的参数
1
2
3
4
5
6
7
8
9
10
11
12
13
14
15
16
17
18
19
20
21
22
23
24
25
26
27
28
29
30
31
32
33
34
35
36
37
38
39
40
41
42
43
44
45
| public class UserDaoProxy implements InvocationHandler {
private Object obj;
public UserDaoProxy(Object obj){
this.obj = obj;
}
@Override
public Object invoke(Object proxy, Method method, Object[] args) throws Throwable {
System.out.println("方法执行之前执行!" + " 方法名:" + method.getName() +
" 参数:" + Arrays.toString(args));
Object res = method.invoke(obj, args);
System.out.println("方法执行之后执行!" + obj);
return res;
}
}
|
三、AOP相关术语
1、连接点
指的是类里面哪些方法可以被增强,这些方法就是连接点!
2、切入点
实际真正被增强的方法称为切入点!
3、通知
实际增强的逻辑部分称为通知!
通知分类:
- 前置通知:执行目标方法之前运行
- 后置通知:目标方法正常执行完之后执行
- 环绕通知:目标方法前后分别执行,需要显式调用目标方法
- 异常通知:目标方法出现异常执行
- 最终通知:一定会执行
4、切面
是一个动作,将通知应用到切入点的过程!
人话:就是将增强的实现逻辑应用到需要被增强方法的过程!
四、AOP使用
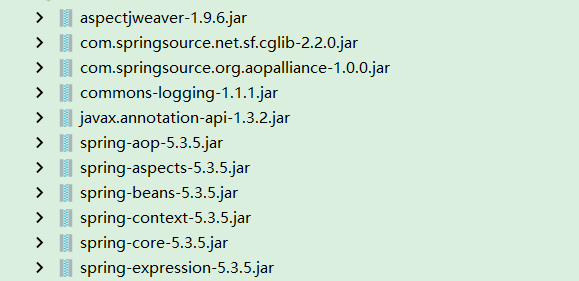
1、导包
从下载的Spring5的包内找到下面几个包,导入即可!
图中几个两个com开头的包不在Spring5包内,需要额外下载!可以从名称看到,他的作用就是支持CGLIB!
AspectJ 不是 Spring 组成部分,独立 AOP 框架,一般把 AspectJ 和 Spirng 框架一起使用,进行 AOP 操作!
注意:旧版本com.springsource.org.aspectj.weaver-1.6.8.RELEASE.jar会报错!新版JDK不兼容,要使用aspectjweaver-1.9.6.jar
下载地址:https://mvnrepository.com/artifact/org.aspectj/aspectjweaver

2、切入点表达式
切入点表达式作用:知道对哪个类里面的哪个方法进行增强
语法结构: execution([权限修饰符] [返回类型] [类全路径] [方法名称]([参数列表]) )
- 权限修饰符可以省略,默认为
public
- 返回类型可以使用通配符
*表示
- 全类名和方法名也可使用通配符代替
- 参数列表,固定写法
(..)
注意点:表示返回类型的*号后面一定要有一个空格
几个例子:
1
2
3
4
5
| execution(* com.atguigu.dao.BookDao.add(..))
execution(* com.atguigu.dao.BookDao.* (..))
execution(* com.atguigu.dao.*.* (..))
|
3、基于AspectJ 注解
3.1、创建增强类和被增强类
1
2
3
4
5
| public class User {
public void add(){
System.out.println("add().............");
}
}
|
1
2
3
4
5
6
7
8
9
10
| public class UserProxy {
@Before(value = "execution(* com.atguigu.aop.anno.User.add(..))")
public void before(){
System.out.println("UserProxy.before()................");
}
}
|
3.2、具体步骤
- 引入context名称空间,开启注解扫描
- 使用注解创建User和UserProxy对象
- 在增强类上面添加注解
@Aspect
- 引入aop名称空间,在 spring 配置文件中开启生成代理对象
- 配置不同类型的通知
User:
1
2
| @Component(value = "user")
public class User {
|
UserProxy:
在增强类的里面,在作为通知方法上面添加通知类型注解,使用切入点表达式配置!
- 前置通知:执行目标方法之前运行
- 后置通知:目标方法正常执行完之后执行
- 环绕通知:目标方法前后分别执行,需要显式调用目标方法
proceedingJoinPoint.proceed()
- 异常通知:目标方法出现异常执行
- 最终通知:一定会执行
1
2
3
4
5
6
7
8
9
10
11
12
13
14
15
16
17
18
19
20
21
22
23
24
25
26
27
28
29
30
31
32
33
34
35
36
37
38
39
40
41
42
43
44
45
46
47
48
49
50
51
52
53
| @Component
@Aspect
public class UserProxy {
@Before(value = "execution(* com.atguigu.aop.anno.User.add(..))")
public void before(){
System.out.println("UserProxy.before()................");
}
@AfterReturning(value = "execution(* com.atguigu.aop.anno.User.add(..))")
public void afterReturning(){
System.out.println("afterReturning()................");
}
@After(value = "execution(* com.atguigu.aop.anno.User.add(..))")
public void after(){
System.out.println("after()................");
}
@AfterThrowing(value = "execution(* com.atguigu.aop.anno.User.add(..))")
public void afterThrowing(){
System.out.println("afterThrowing()................");
}
@Around(value = "execution(* com.atguigu.aop.anno.User.add(..))")
public void around(ProceedingJoinPoint proceedingJoinPoint) throws Throwable {
System.out.println("around()之前................");
proceedingJoinPoint.proceed();
System.out.println("around()之后................");
}
}
|
XML配置:
1
2
3
4
5
6
7
8
9
10
11
12
13
14
15
16
17
18
19
20
| <?xml version="1.0" encoding="UTF-8"?>
<beans xmlns="http://www.springframework.org/schema/beans"
xmlns:xsi="http://www.w3.org/2001/XMLSchema-instance"
xmlns:context="http://www.springframework.org/schema/context"
xmlns:aop="http://www.springframework.org/schema/aop"
xsi:schemaLocation="http://www.springframework.org/schema/beans http://www.springframework.org/schema/beans/spring-beans.xsd
http://www.springframework.org/schema/context http://www.springframework.org/schema/context/spring-context.xsd
http://www.springframework.org/schema/aop http://www.springframework.org/schema/aop/spring-aop.xsd">
<context:component-scan base-package="com.atguigu.aop.anno"></context:component-scan>
<aop:aspectj-autoproxy></aop:aspectj-autoproxy>
</beans>
|
测试:
1
2
3
4
5
6
7
8
| @Test
public void test1(){
ApplicationContext context = new ClassPathXmlApplicationContext("bean1.xml");
User user = context.getBean("user", User.class);
user.add();
}
|
执行结果:
后三个执行顺序或有不同,可能为如此,也可能为完全倒序,原因是spring版本更新后,底层修改了执行顺序!
1
2
3
4
5
6
7
8
9
10
11
12
13
| 执行顺序:
around()之前................
before()................
add().............
afterReturning()................
after()................
around()之后................
有异常的执行顺序:
around()之前................
before()................
afterThrowing()................
after()................
|
3.3、相同切入点抽取
抽取:
1
2
3
4
5
6
7
8
|
@Pointcut(value = "execution(* com.atguigu.aop.anno.User.add(..))")
public void pointCut(){
}
|
使用:
1
2
3
4
| @Before(value = "pointCut()")
public void before(){
System.out.println("UserProxy.before()................");
}
|
3.4、设置增强类优先级
在增强类上面添加注解 @Order(数字类型值),数字类型值越小优先级越高!
1
2
3
4
5
6
7
8
9
10
11
12
13
14
| @Component
@Aspect
@Order(value = 1)
public class UserProxy {
}
@Component
@Aspect
@Order(value = 0)
public class PersonProxy {
}
|
3.5、完全注解开发
创建配置类:
1
2
3
4
5
| @Configuration
@ComponentScan(basePackages = {"com.atguigu.aop.anno"})
@EnableAspectJAutoProxy(proxyTargetClass = true)
public class AOPConfig {
}
|
测试:
1
2
3
4
5
6
7
8
| @Test
public void test3(){
ConfigurableApplicationContext context = new AnnotationConfigApplicationContext(AOPConfig.class);
User user = context.getBean("user", User.class);
user.add();
}
|
4、基于AspectJ 配置文件(了解)
- 创建增强类和被增强类
- 在XML中配置创建两个对象
- 在XML中配置切入点
1
2
3
4
5
6
7
8
9
10
11
12
13
14
15
16
17
18
19
20
21
22
23
24
25
26
27
28
| <?xml version="1.0" encoding="UTF-8"?>
<beans xmlns="http://www.springframework.org/schema/beans"
xmlns:xsi="http://www.w3.org/2001/XMLSchema-instance"
xmlns:context="http://www.springframework.org/schema/context"
xmlns:aop="http://www.springframework.org/schema/aop"
xsi:schemaLocation="http://www.springframework.org/schema/beans http://www.springframework.org/schema/beans/spring-beans.xsd
http://www.springframework.org/schema/context http://www.springframework.org/schema/context/spring-context.xsd
http://www.springframework.org/schema/aop http://www.springframework.org/schema/aop/spring-aop.xsd">
<bean id="book" class="com.atguigu.aop.xml.Book"></bean>
<bean id="bookProxy" class="com.atguigu.aop.xml.BookProxy"></bean>
<aop:config>
<aop:pointcut id="p" expression="execution(* com.atguigu.aop.xml.Book.buy(..))"/>
<aop:aspect ref="bookProxy">
<aop:before method="before" pointcut-ref="p"></aop:before>
</aop:aspect>
</aop:config>
</beans>
|
测试:
1
2
3
4
5
6
7
| @Test
public void test2(){
ApplicationContext context = new ClassPathXmlApplicationContext("bean2.xml");
Book book = context.getBean("book", Book.class);
book.buy();
}
|


