一、Servlet介绍
Servlet 是 JavaEE 规范之一。规范就是接口!
Servlet 就 JavaWeb 三大组件之一。三大组件分别是:Servlet 程序、Filter 过滤器、Listener 监听器。
Servlet 是运行在服务器上的一个 java 小程序,它可以接收客户端发送过来的请求,并响应数据给客户端。
二、Servlet程序创建
1、通过实现Servlet接口创建Servlet程序
1.1、创建步骤
创建Web工程方式,点击这里!
编写一个类去实现 Servlet 接口
实现 service 方法,处理请求,并响应数据
到 web.xml 中去配置 servlet 程序的访问地址
1.2、Servlet创建
注意 :需要导入servlet的jar包,直接去Tomcat安装目录下的lib目录找到servlet-api.jar复制到当前lib目录并Add as Library即可!
包名略有不同:
旧版本包名为为javax.servlet.xxx
新版本包名为jakarta.servlet.xxx
1
2
3
4
5
6
7
8
9
10
11
12
13
14
15
16
17
18
19
20
21
22
23
24
25
26
27
28
29
30
31
32
33
34
35
36
37
38
39
40
41
42
43
44
45
46
47
48
49
50
51
52
53
54
public class HelloServlet implements Servlet public HelloServlet () "1. 构造器方法" );@Override public void init (ServletConfig servletConfig) throws ServletException "2. 初始化方法" );@Override public ServletConfig getServletConfig () return null ;@Override public void service (ServletRequest servletRequest, ServletResponse servletResponse) throws ServletException, IOException "3. service方法 ---- HelloServlet被执行了!" );public void doGet () "Get请求" );public void doPost () "Post请求" );@Override public String getServletInfo () return null ;@Override public void destroy () "4. destroy销毁方法" );
1.3、配置XML
servlet和servlet-mapping标签共同配置一个Servlet程序,一个程序一组配置!
注意:Servlet程序的访问地址区分大小写!
创建servlet标签:表示配置一个Servlet程序
创建servlet-name标签:给Servlet程序起别名(一般为类名)
创建servlet-class标签:Servlet程序的全类名
创建servlet-mapping标签:为Servlet程序配置访问地址
创建servlet-name标签:指明访问地址的配置对象(一般为类名)
创建url-pattern标签:访问地址,以/开始
注意 :/表示 http://ip:port/工程名,全地址为http://ip:端口/工程名 + url-pattern信息
1
2
3
4
5
6
7
8
9
10
11
12
13
14
15
16
17
18
19
20
21
22
23
24
25
26
<?xml version="1.0" encoding="UTF-8"?> <web-app xmlns ="http://xmlns.jcp.org/xml/ns/javaee" xmlns:xsi ="http://www.w3.org/2001/XMLSchema-instance" xsi:schemaLocation ="http://xmlns.jcp.org/xml/ns/javaee http://xmlns.jcp.org/xml/ns/javaee/web-app_4_0.xsd" version ="4.0" > <servlet > <servlet-name > HelloServlet</servlet-name > <servlet-class > com.atguigu.servlet.HelloServlet</servlet-class > </servlet > <servlet-mapping > <servlet-name > HelloServlet</servlet-name > <url-pattern > /hello</url-pattern > </servlet-mapping > </web-app >
1.4、运行Servlet程序
点击运行即可!
注意点: 配置文件,web文件,java源文件更改需要重新部署Redeploy,除了java文件外似乎可以直接使用选项Update classes and resouces,但是似乎好多时候部署的项目都不会自动更新,建议直接使用Redeploy进行重新部署,可解决一切bug问题,当然重启服务器也可解决,但重启耗时属实费事耗时!
1.5、Servlet的生命周期
构造器和初始化:第一次创建Servlet时调用
service方法:每次请求都会调用destroy方法:web工程停止时调用
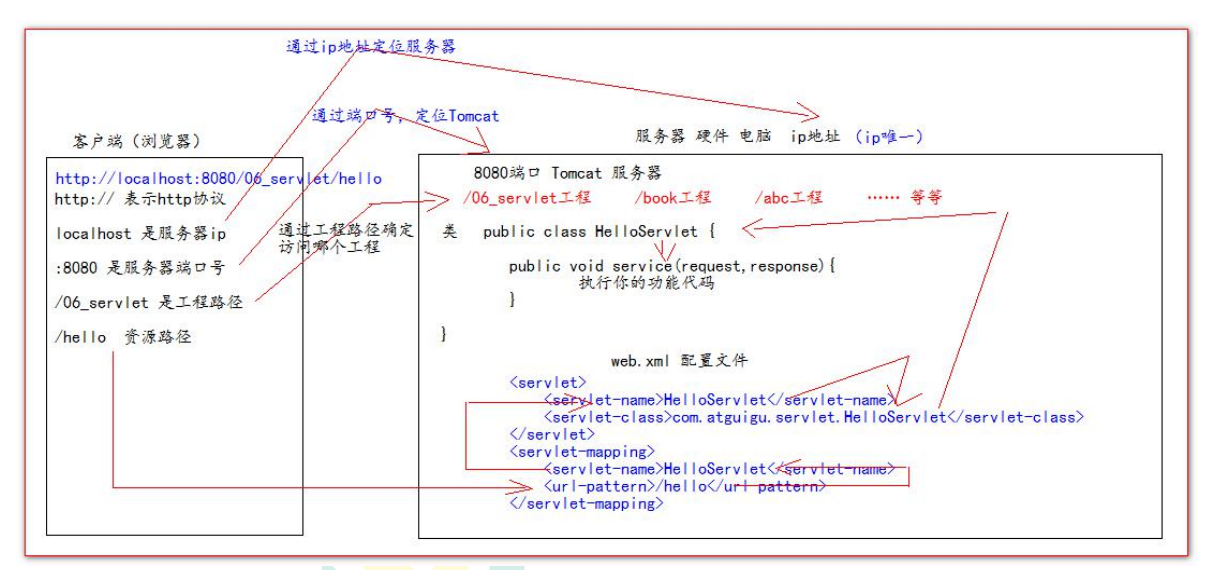
1.6、URL地址访问Servlet过程
1.7、GET和POST请求分发处理
将ServletRequest对象向下转型为HttpServletRequest来调用getMethod()方法获取method类型!
1 2 3 4 5 6 7 8 9 10 11 12 13 14 15 16 17 18 19 20 21 22 23 24 25 26 27 28 29 30 31 32 33 34 35 @Override public void service (ServletRequest servletRequest, ServletResponse servletResponse) throws ServletException, IOException "3. service方法 ---- HelloServlet被执行了!" );if ("GET" .equals(method)){else {public void doGet () "Get请求" );public void doPost () "Post请求" );
2、通过继承HttpServlet创建Servlet程序(推荐)
2.1、创建步骤
一般在实际项目开发中,都是使用继承 HttpServlet 类的方式去实现 Servlet 程序。
编写一个类去继承 HttpServlet 类
根据业务需要重写 doGet 或 doPost 方法
到 web.xml 中的配置 Servlet 程序的访问地址
2.2、Servlet创建
1
2
3
4
5
6
7
8
9
10
11
12
13
14
15
16
17
18
19
20
21
22
23
24
25
26
27
public class HelloServlet2 extends HttpServlet @Override protected void doGet (HttpServletRequest req, HttpServletResponse resp) throws ServletException, IOException "HelloServlet2的doGet方法调用!" );@Override protected void doPost (HttpServletRequest req, HttpServletResponse resp) throws ServletException, IOException "HelloServlet2的doPost方法调用!" );
2.3、配置XML
略:同上一种方式!
3、使用IDEA创建Servlet程序
注意:新版本IDEA并无此选项可直接创建Servlet程序!
3.1、使IDEA支持直接创建Servlet的方法
找到当前web工程下的imi配置文件,例如:07_Servlet.iml
找到如下位置添加如下信息即可!
无需重启即可生效,若无法生效,可重启尝试
1
2
3
4
5
6
7
8
9
10
11
12
13
14
15
16
17
18
19
20
21
22
23
24
25
26
27
28
29
30
31
32
33
34
35
36
37
38
39
40
41
42
<?xml version="1.0" encoding="UTF-8"?>
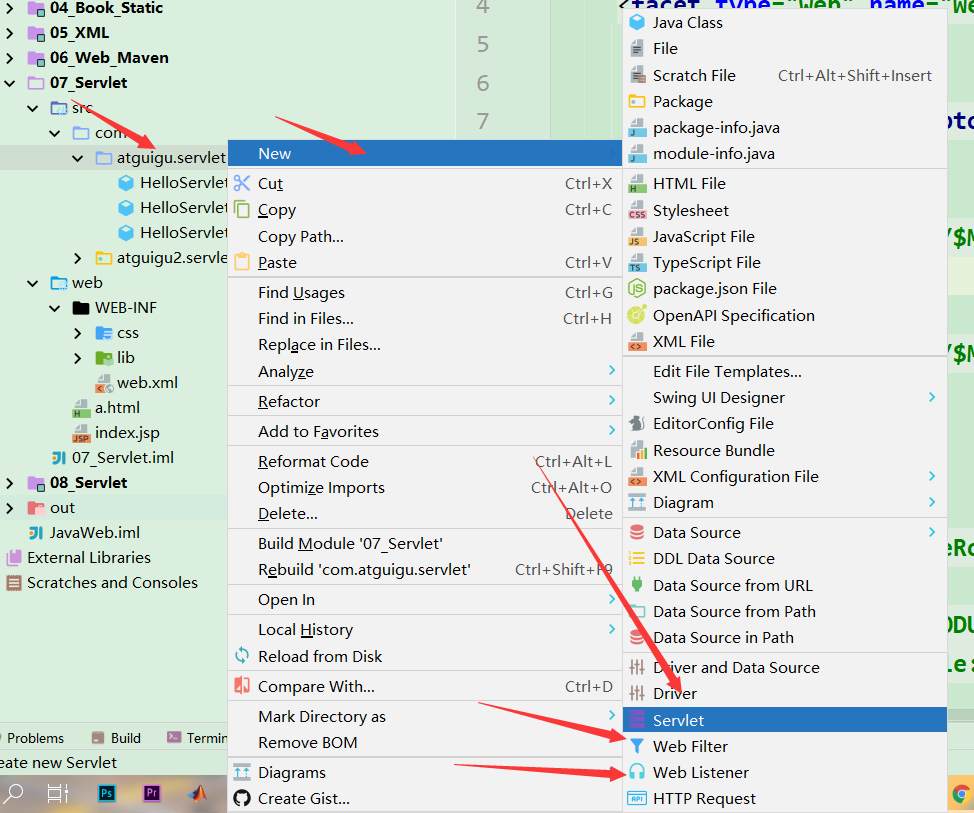
配置生效后,会在右键菜单出现创建选项,如下:
3.2、Servlet创建
通过IDEA创建Servlet特点:
自动生成两个重写方法doGet()、doPost()方法
自动生成一半XML配置文件servelt标签,servlet-mapping标签仍需手动配置
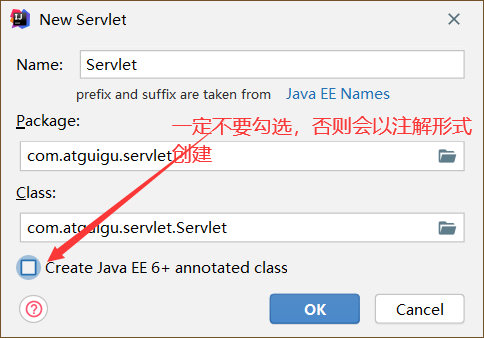
注意: 当前先以XML配置,后续再讲注解配置!先不要勾选如下配置!
生成代码如下:
1
2
3
4
5
6
7
8
9
10
11
public class HelloServlet3 extends HttpServlet @Override protected void doGet (HttpServletRequest request, HttpServletResponse response) throws ServletException, IOException "HelloServlet3的doGet方法调用!" );@Override protected void doPost (HttpServletRequest request, HttpServletResponse response) throws ServletException, IOException "HelloServlet3的doPost方法调用!" );
三、Servlet类继承体系
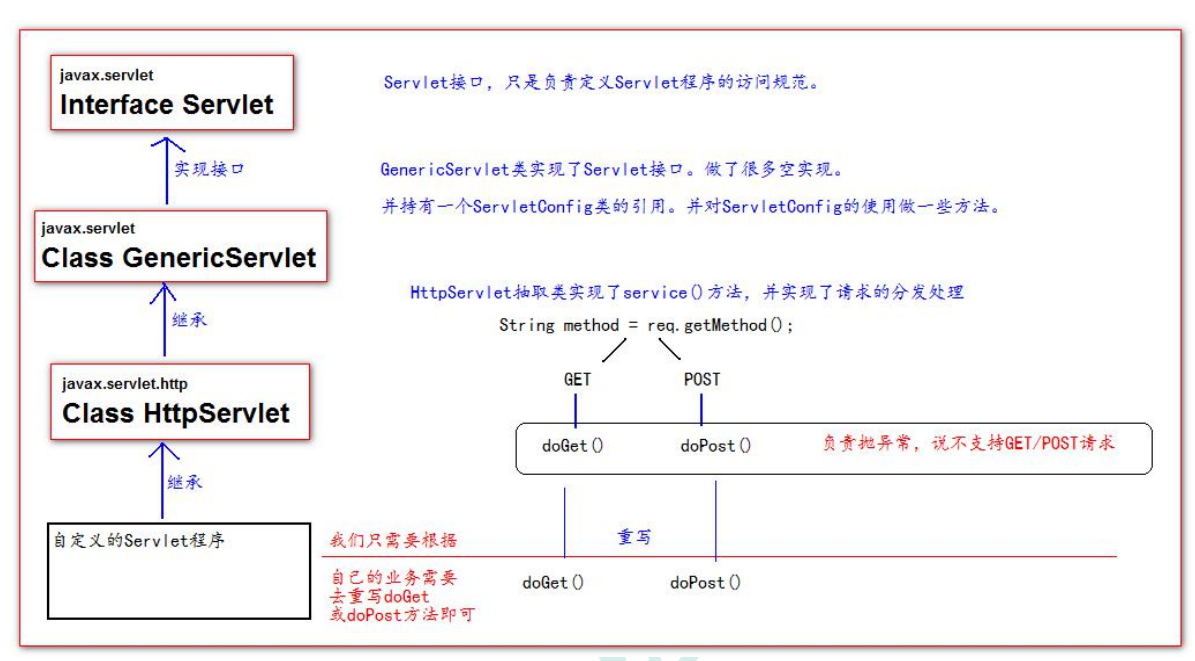
类继承体系如下:
GenericServlet实现了三大接口:Servlet、ServletConfig、java.io.Serializable
四、ServletConfig类介绍
1、概述
简单理解,局部变量,局部配置信息!
ServletConfig 类从类名上来看,就知道是 Servlet 程序的配置信息类 。
Servlet 程序和 ServletConfig 对象都是由 Tomcat 负责创建,我们负责使用。
Servlet 程序默认是第一次访问的时候创建,ServletConfig 是每个 Servlet 程序创建时,就创建一个对应的 ServletConfig 对象 。
2、作用
可以获取 Servlet 程序的别名 servlet-name 的值
获取初始化参数 init-param
获取 ServletContext 对象
3、配置XML
配置位置:servlet标签内部,局部配置,正常!
初始化参数:是一组组键值对!可以多组!
1 2 3 4 5 6 7 8 9 10 11 12 13 14 15 16 17 18 19 20 21 22 23 24 25 26 27 <servlet > <servlet-name > HelloServlet</servlet-name > <servlet-class > com.atguigu.servlet.HelloServlet</servlet-class > <init-param > <param-name > password</param-name > <param-value > xxx</param-value > </init-param > <init-param > <param-name > username</param-name > <param-value > root</param-value > </init-param > <init-param > <param-name > url</param-name > <param-value > jdbc:mysql://localhost:3306/test</param-value > </init-param > </servlet >
4、通过Java程序获取配置
当前ServletConfig对象只能获取当前Servlet程序的配置信息,无法获取其他人的信息!(局部配置只给自己用!)
关于获取servletConfig对象:
可以通过getServletConfig()方法获取servletConfig对象!
在implements Servlet的类中,需要重写public ServletConfig getServletConfig() {}方法才可获取!
在extends HttpServlet的类中,父类的父类GenericServlet有该类实现返回当前ServletConfig对象!
**注意:**该方法需要在重写的init方法中显示调用父类的super.init(config)方法为ServletConfig对象赋值!否则将发生空指针异常!
1 2 3 4 5 6 7 8 9 10 11 12 13 14 15 16 17 18 19 20 21 22 23 24 25 26 27 28 29 30 31 32 33 34 35 36 37 38 39 40 41 42 43 @Override public void init (ServletConfig servletConfig) throws ServletException "2. 初始化方法" );"HelloServlet程序的别名是:" + servletConfig.getServletName());"初始化参数username的值是" + servletConfig.getInitParameter("username" ));"初始化参数password的值是" + servletConfig.getInitParameter("password" ));"初始化参数url的值是" + servletConfig.getInitParameter("url" ));"servletConfig对象为:" + servletConfig.getServletContext());@Override public void init (ServletConfig config) throws ServletException super .init(config);"重写init初始化方法做了一些操作!" );
五、ServletContext类介绍
1、概述
简单理解:就是针对整个web工程的全局配置,任何Servlet程序都可以访问!
ServletContext 是一个接口,它表示 Servlet 上下文对象一个 web 工程,只有一个 ServletContext 对象实例。
ServletContext 对象是一个域对象 。ServletContext 是在 web 工程部署启动的时候创建 。在 web 工程停止的时候销毁 。
什么是域对象?
域对象,是可以像 Map 一样存取数据的对象,叫域对象。这里的域指的是存取数据的操作范围,整个 web 工程。
三个操作全局配置的方法:
setAttribute() getAttribute()removeAttribute()
2、作用
获取 web.xml 中配置的上下文参数 context-param
获取当前的工程路径 ,格式: /工程路径
获取工程部署后在服务器硬盘上的绝对路径
像 Map 一样存取数据
3、配置XML
配置位置:一般放到XML的最前面,表示是针对整个web工程的全局配置!
是一组组键值对,可以由多组!
1
2
3
4
5
6
7
8
9
10
11
12
13
14
15
16
17
18
19
20
21
22
23
24
25
26
27
28
29
<?xml version="1.0" encoding="UTF-8"?> <web-app xmlns ="http://xmlns.jcp.org/xml/ns/javaee" xmlns:xsi ="http://www.w3.org/2001/XMLSchema-instance" xsi:schemaLocation ="http://xmlns.jcp.org/xml/ns/javaee http://xmlns.jcp.org/xml/ns/javaee/web-app_4_0.xsd" version ="4.0" > <context-param > <param-name > username</param-name > <param-value > itnxd</param-value > </context-param > <context-param > <param-name > password</param-name > <param-value > password123</param-value > </context-param > <servlet > <servlet-name > HelloServlet</servlet-name > <servlet-class > com.atguigu.servlet.HelloServlet</servlet-class > </servlet > <servlet-mapping > <servlet-name > HelloServlet</servlet-name > <url-pattern > /hello</url-pattern > </servlet-mapping > </web-app >
4、通过Java程序处理配置
关于获取工程部署后在服务器硬盘上的绝对路径:
/会被服务器解析为http://ip:port/工程名/,然后被映射到IDEA工程下的web目录
斜杠后面可以添加路径及文件名,该路径以web目录为根目录
启动部署后输出的第一行内容:Using CATALINA_BASE: "C:\Users\15890\AppData\Local\JetBrains\IntelliJIdea2020.3\tomcat\a65c5dac-b285-42bc-bb15-73d8c6c7bf83"
该路径为Tomcat服务器在C盘的一个针对IDEA的web项目的配置目录
该路径C:\Users\15890\AppData\Local\JetBrains\IntelliJIdea2020.3\tomcat\a65c5dac-b285-42bc-bb15-73d8c6c7bf83\conf\Catalina\localhost下有一个07_Servlet.xml配置文件
内容为<Context path="/07_Servlet" docBase="E:\Java学习\IdeaProject\JavaWeb\out\artifacts\07_Servlet_war_exploded" />
该路径就是对IDEA的web工程下web目录的一个映射
其实就是之前讲到的一种部署方式:通过Tomcat配置信息进行web项目映射!点击这里!
1
2
3
4
5
6
7
8
9
10
11
12
13
14
15
16
17
18
19
20
21
22
23
24
25
26
27
28
29
30
31
public class ContextServlet extends HttpServlet @Override protected void doGet (HttpServletRequest request, HttpServletResponse response) throws ServletException, IOException "username" );"password" );"context-param参数username值:" + username);"context-param参数password值:" + password);"当前工程路径是:" + servletContext.getContextPath()); "工程部署的路径是:" + servletContext.getRealPath("/" )); "工程下CSS的绝对路径是:" + servletContext.getRealPath("/css" ));"工程下CSS下1.css的路径是:" + servletContext.getRealPath("/css/1.css" ));@Override protected void doPost (HttpServletRequest request, HttpServletResponse response) throws ServletException, IOException
关于像Map一样存取数据:
配置作用时间 :在 web 工程部署启动 的时候创建 。在 web 工程停止 的时候销毁 ,所有由程序创建的属性会在重新部署或重启服务器 后自动被销毁
作用域 :针对整个web工程:所以其他Servlet程序也可以访问到这些属性,并且该servletContext对象地址唯一确定!
1
2
3
4
5
6
7
8
9
10
11
12
13
14
15
16
17
18
19
20
21
22
23
24
25
26
27
public class ContextServlet2 extends HttpServlet @Override protected void doGet (HttpServletRequest request, HttpServletResponse response) throws ServletException, IOException "key1" , "value1" );"key2" , "value2" );"key1" );"key2" );"获取context-param中的域数据(全局数据)key1的值为:" + value1);"获取context-param中的域数据(全局数据)key2的值为:" + value2);"key2" );@Override protected void doPost (HttpServletRequest request, HttpServletResponse response) throws ServletException, IOException
六、HTTP 协议介绍
1、概述
什么是协议?
协议是指双方,或多方,相互约定好,大家都需要遵守的规则 ,叫协议。
HTTP 协议?
就是指,客户端和服务器之间通信时,发送的数据,需要遵守的规则,叫 HTTP 协议。
HTTP 协议中的数据又叫报文 。
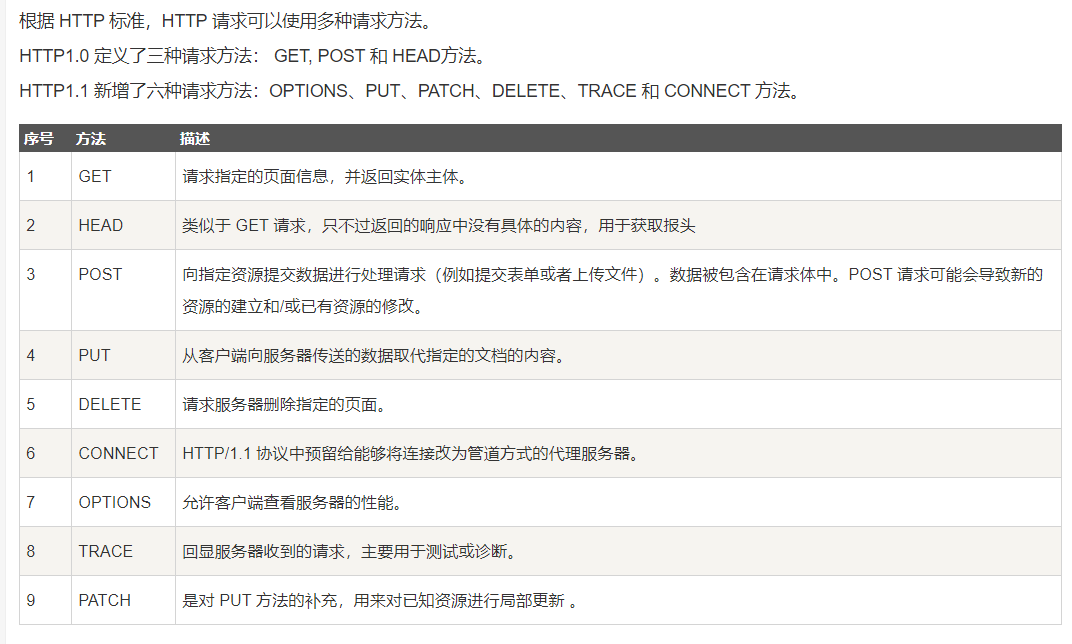
多种请求方法:
2、请求HTTP协议格式
客户端给服务器发送数据叫请求。
服务器给客户端回传数据叫响应。
请求主要分为 GET 请求,和 POST 请求两种
2.1、GET请求
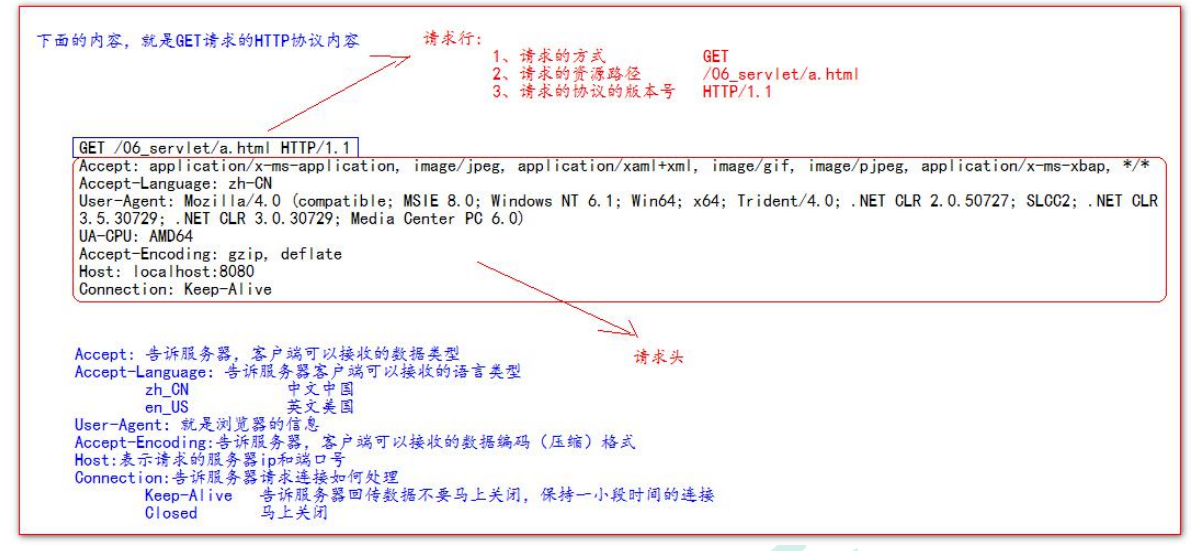
GET请求组成:
请求行
请求的方式 GET
请求的资源路径
请求的协议的版本号 HTTP/1.1
请求头
key : value 组成不同的键值对 ,表示不同的含义。
如下图:
使用GET请求的情景:
form 标签 method=geta 标签link 标签引入 cssScript 标签引入 js 文件img 标签引入图片iframe 引入 html 页面在浏览器地址 栏中输入地址后敲回车
2.2、POST请求
POST请求组成:
请求行:
请求的方式 POST
请求的资源路径[+?+请求参数]
请求的协议的版本号 HTTP/1.1
请求头:
key : value 不同的请求头,有不同的含义空行
请求体:就是发送给服务器的数据
如下图:
使用POST请求的情景:
2.3、常用请求头
Accept: 表示客户端可以接收的数据类型
Accpet-Languege: 表示客户端可以接收的语言类型
User-Agent: 表示客户端浏览器的信息
Host: 表示请求时的服务器 ip 和端口号
2.4、全部请求头一览表
3、响应HTTP协议格式
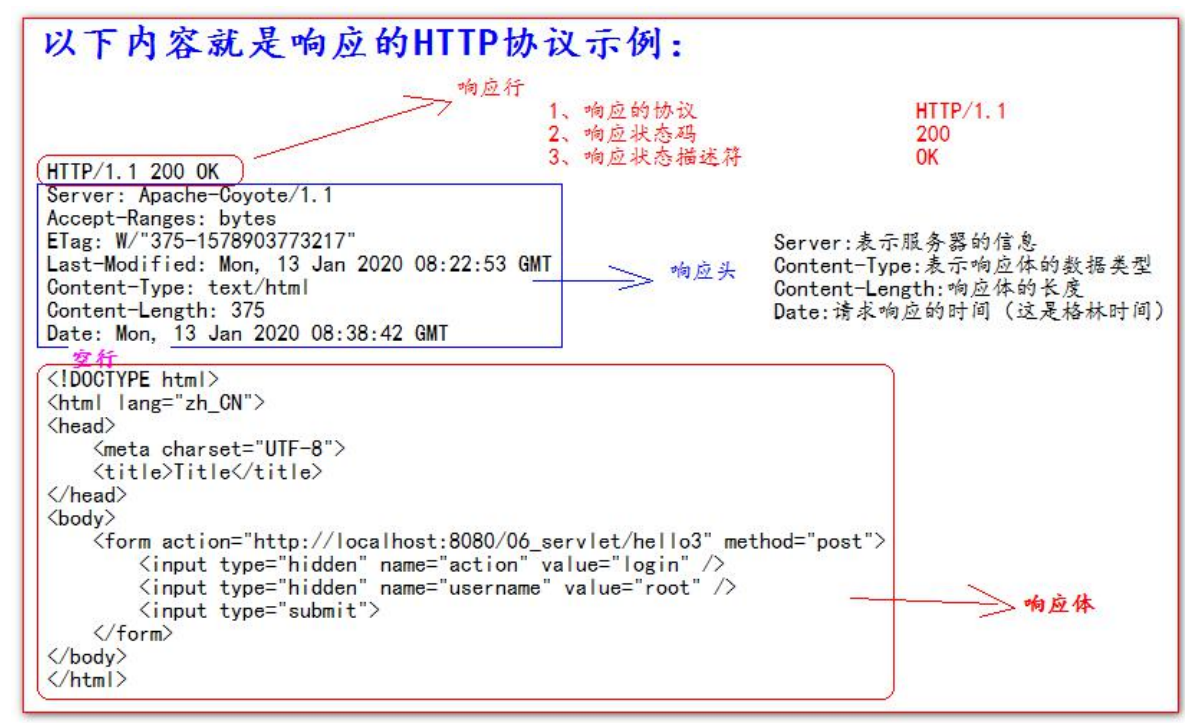
3.1、响应HTTP协议组成
响应行
响应的协议和版本号
响应状态码
响应状态描述符
响应头
key : value 不同的响应头,有其不同含义
空行
响应体:就是回传给客户端的数据
如下图:
3.2、常见响应码
200 表示请求成功
302 表示请求重定向
404 表示请求服务器已经收到了,但是你要的数据不存在(请求地址错误)
500 表示服务器已经收到请求,但是服务器内部错误(代码错误)
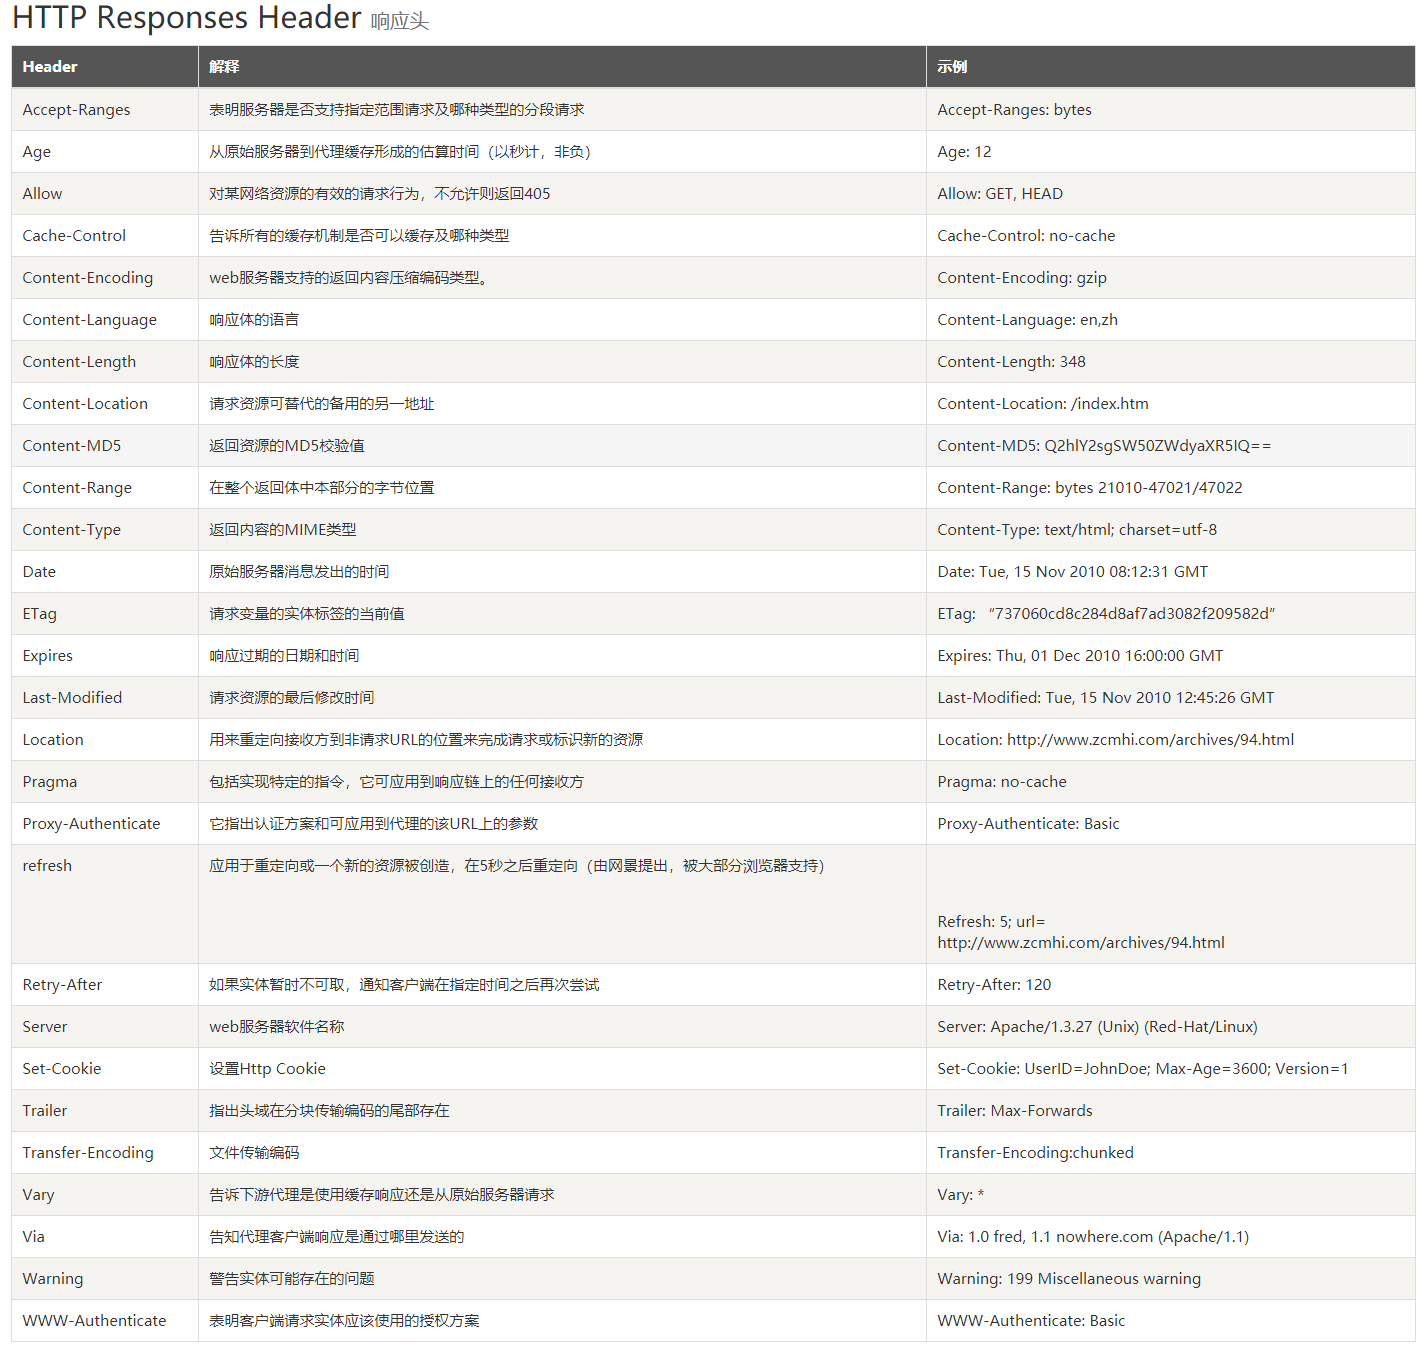
3.3、全部响应头一览表
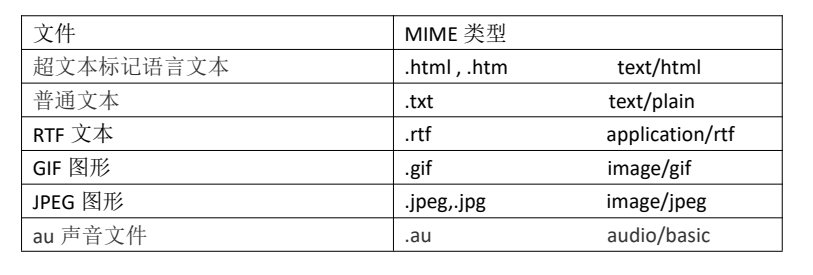
4、MIME格式
MIME 是 HTTP 协议中数据类型。
MIME 的英文全称是"Multipurpose Internet Mail Extensions" 多功能 Internet 邮件扩充服务。MIME 类型的格式是“大类型/小类型”,并与某一种文件的扩展名相对应。
所谓MIME格式:就是请求头和响应头中content-type的值,表示数据类型!
常见MIME类型:
七、HttpServletRequest类介绍
1、概述
每次只要有请求进入 Tomcat 服务器,Tomcat 服务器就会把请求过来的 HTTP 协议信息解析好封装到 Request 对象中。然后传递到 service 方法(doGet 和 doPost)中给我们使用。我们可以通过 HttpServletRequest 对象,获取到所有请求的信息。
2、常用方法
2.1、一般方法
getRequestURI() 获取请求的资源路径getRequestURL() 获取请求的统一资源定位符(绝对路径)getRemoteHost() 获取客户端的 ip 地址
在 IDEA 中,使用 localhost 访问时,得到的客户端 ip 地址是 127.0.0.1,新版本中为:0:0:0:0:0:0:0:1
在 IDEA 中,使用 127.0.0.1 访问时,得到的客户端 ip 地址是 127.0.0.1
在 IDEA 中,使用 真实 ip 访问时,得到的客户端 ip 地址是真实的客户端 ip 地址
getHeader() 获取请求头getMethod() 获取请求的方式 GET 或 POST
1
2
3
4
5
6
7
8
9
10
11
12
13
public class RequestAPIServlet extends HttpServlet @Override protected void doGet (HttpServletRequest req, HttpServletResponse resp) throws ServletException, IOException "User-Agent" ));
2.2、请求参数获取
getParameter() 获取请求的参数getParameterValues() 获取请求的参数(多个值的时候使用)setAttribute(key, value) 设置域数据getAttribute(key) 获取域数据getRequestDispatcher() 获取请求转发对象
操作步骤:
发送请求:访问http://localhost:8080/08_Servlet/form.html勾选选项后点击提交按钮
接收并查看请求:IDEA控制台查看信息
1 2 3 4 5 6 7 8 9 10 11 12 13 14 15 16 17 18 19 20 21 22 <!DOCTYPE html > <html lang ="en" > <head > <meta charset ="UTF-8" > <title > Title</title > </head > <body > <form action ="http://localhost:8080/08_Servlet/PatameterServlet" method ="post" > <input type ="text" name ="username" /> <br /> 码:<input type ="password" name ="password" /> <br /> 趣:<input type ="checkbox" name ="hobby" value ="C++" > C++<input type ="checkbox" name ="hobby" value ="Java" > Java<input type ="checkbox" name ="hobby" value ="Python" > Python<br /> <input type ="submit" value ="提交" /> </form > </body > </html >
1
2
3
4
5
6
7
8
9
10
11
12
13
14
15
16
17
18
19
20
21
22
23
24
25
26
public class PatameterServlet extends HttpServlet @Override protected void doGet (HttpServletRequest request, HttpServletResponse response) throws ServletException, IOException "username" );"password" );"hobby" );"用户名:" + username);"密 码:" + password);"爱 好:" + Arrays.toString(hobbies));@Override protected void doPost (HttpServletRequest request, HttpServletResponse response) throws ServletException, IOException "------------doPost--------------" );"username" );"password" );"hobby" );"用户名:" + username);"密 码:" + password);"爱 好:" + Arrays.toString(hobbies));
3、乱码解决
3.1、GET请求乱码
我目前没发生乱码,先进行一下记录!
1 2 3 4 "username" );new String(username.getBytes("iso-8859-1" ), "UTF-8" );
3.2、POST请求乱码
在doPost最前方设置字符集解决乱码!
注意:必须将该设置放到调用方法之前才会有效
1
2
3
4
5
6
7
8
9
10
11
12
13
14
15
16
17
@Override protected void doPost (HttpServletRequest request, HttpServletResponse response) throws ServletException, IOException "UTF-8" );"------------doPost--------------" );"username" );"password" );"hobby" );"用户名:" + username);"密 码:" + password);"爱 好:" + Arrays.toString(hobbies));
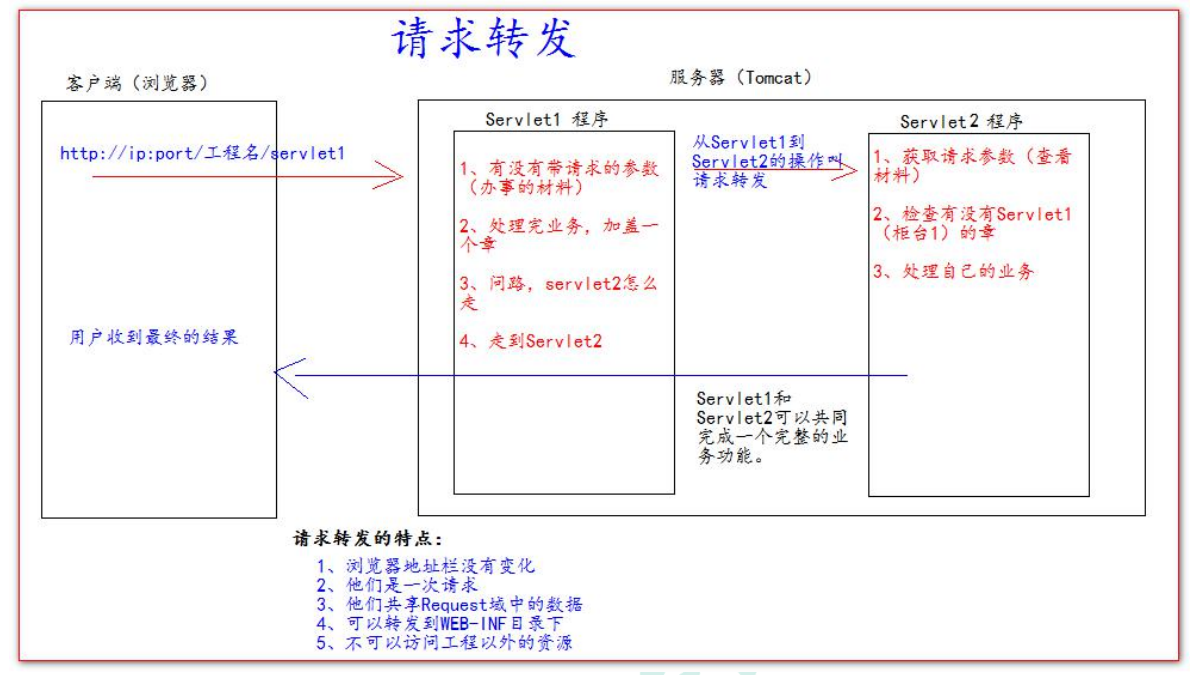
4、请求转发
4.1、概述
请求转发是指,服务器收到请求后,从一次资源跳转到另一个资源的操作叫请求转发。
4.2、请求转发特点
浏览器地址栏没有变化
他们是一次请求
他们共享Request域中的数据
可以转发到WEB-INF目录下**(直接无法访问,只有请求转发可以)**
不可以访问工程以外的资源
4.3、请求转发示例
注意:
请求转发路径必须要以斜杠打头!/ 斜杠表示地址为:http://ip:port/工程名/ , 映射到 IDEA 代码的 web 目录
无法 访问Web工程以外的资源,必须以斜杠开头!
请求转发可以 获取WEB-INF下的文件,具体见下方代码
使用requestDispatcher.forward(req, resp)方法转发到其他地址
1 2 3 4 5 6 7 8 9 10 11 12 13 14 15 16 17 18 19 20 21 22 23 24 25 26 27 28 29 30 31 32 33 34 35 36 37 38 39 40 41 42 43 44 45 46 public class Servlet1 extends HttpServlet @Override protected void doGet (HttpServletRequest req, HttpServletResponse resp) throws ServletException, IOException "username" );"在Servlet1(柜台一)中查看参数(材料):" + username);"key1" , "柜台一的章" );"/Servlet2" );public class Servlet2 extends HttpServlet @Override protected void doGet (HttpServletRequest req, HttpServletResponse resp) throws ServletException, IOException "username" );"在Servlet1(柜台二)中查看参数(材料):" + username);"key1" );"柜台是否有章:" + value1);"处理Servlet2自己业务" );"一次请求转发完成,返回到客户端" );
4.2、base标签使用
base标签可以设置当前页面中所有相对路径工作时,参照哪个路径来进行跳转!
主要用来解决请求转发导致的浏览器地址栏不发生改变,而相对路径却是参考浏览器地址进行判断导致的地址回退错误问题!
运行结果:
不使用请求转发,由于浏览器地址动态改变,并不会产生地址回退错误
使用请求转发(需要在index.html写入a标签的地址为当前Servlet程序,即ForwardC),由于浏览器地址不发生改变,地址回退参考地址是转发前的地址,而不是转发后的地址导致回退错误
使用base标签(在回退的c.html文件写入base标签的地址为当前c.html的绝对路径),相当于针对相对路径的参考路径写死 了!
web目录下的index.html文件
1
2
3
4
5
6
7
8
9
10
11
12
13
14
15
16
17
18
19
<!DOCTYPE html > <html lang ="en" > <head > <meta charset ="UTF-8" > <title > Title</title > </head > <body > <p > 这是web工程下的index.html文件!</p > <a href ="a/b/c.html" > 跳转到a/b/c.html文件!</a > <br /> <a href ="http://localhost:8080/08_Servlet/ForwardC" > 使用请求转发到:a/b/c.html</a > </body > </html >
web下的a下的b下的c.html文件
1
2
3
4
5
6
7
8
9
10
11
12
13
14
15
16
17
18
19
20
21
22
23
24
25
<!DOCTYPE html > <html lang ="en" > <head > <meta charset ="UTF-8" > <title > Title</title > <base href ="http://localhost:8080/08_Servlet/a/b/c.html" > </head > <body > <p > 这是web工程下的a下的b下的c.html文件</p > <a href ="../../index.html" > 跳转到首页index.html!</a > </body > </html >
ForwardC的Servlet程序
1
2
3
4
5
6
7
public class ForwardC extends HttpServlet @Override protected void doGet (HttpServletRequest req, HttpServletResponse resp) throws ServletException, IOException "经过了ForwardC程序转发!" );"a/b/c.html" ).forward(req, resp);
5、Web项目的路径与 / 含义
5.1、相对路径与绝对路径
注意 :在实际开发中,路径都使用绝对路径 ,而不简单的使用相对路径。
5.2、斜杠 / 含义
在 web 中 / 斜杠 是一种绝对路径。
特殊情况 : response.sendRediect(“/”)把斜杠发送给浏览器解析。得到 http://ip:port/
八、HttpServletResponse类介绍
1、概述
HttpServletResponse 类和 HttpServletRequest 类一样。每次请求进来,Tomcat 服务器都会创建一个 Response 对象传递给 Servlet 程序去使用。HttpServletRequest 表示请求过来的信息,HttpServletResponse 表示所有响应的信息,我们如果需要设置返回给客户端的信息,都可以通过 HttpServletResponse 对象来进行设置!
简单来说:
2、两个输出流
getOutputStream():字节流,常用于下载(传递二进制数据)getWriter(): 字符流,常用于回传字符串(常用)
注意:二者不可同时使用,否则报错!
3、向客户端回传数据
使用字符流响应请求向浏览器发送数据!浏览器页面会有内容!
1
2
3
4
5
6
7
8
9
public class ResponseIOServlet extends HttpServlet @Override protected void doGet (HttpServletRequest req, HttpServletResponse resp) throws ServletException, IOException "服务器响应的内容..." );
4、响应乱码解决
注意:方案二一定要在获取流对象前调用才会生效!简单来说,设置字符集直接放到方法第一行即可!
1
2
3
4
5
6
7
8
9
10
11
12
13
14
15
16
17
18
19
20
public class ResponseIOServlet extends HttpServlet @Override protected void doGet (HttpServletRequest req, HttpServletResponse resp) throws ServletException, IOException "UTF-8" );"Content-Type" , "text/html; charset=UTF-8" );"text/html; charset=UTF-8" );
5、请求重定向
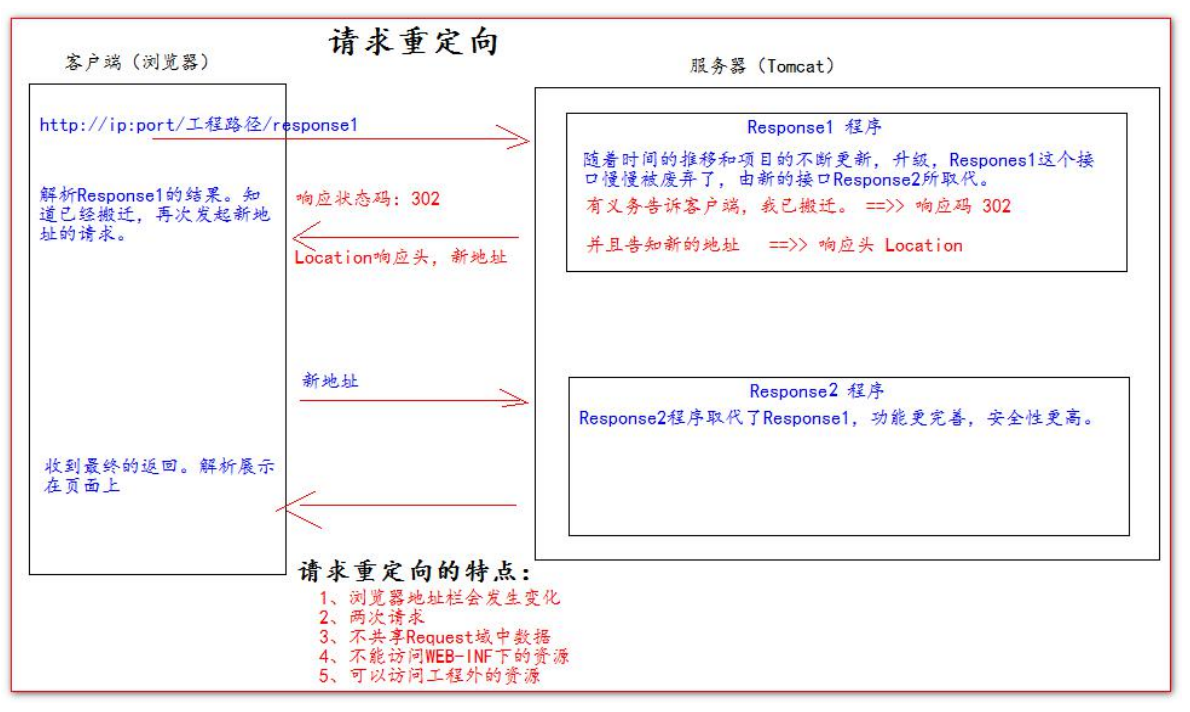
请求重定向:是指客户端给服务器发请求,然后服务器告诉客户端说。我给你一些地址。你去新地址访问。叫请求重定向(因为之前的地址可能已经被废弃)。
5.1、请求重定向图示
5.2、请求重定向特点
浏览器地址栏会发生变化
两次 请求
不共享 Request域中数据(两次请求完全无关)
不能 访问WEB-INF下的资源(只能使用请求转发访问)
可以访问工程外的资源
5.3、重定向方案一(不推荐)
1
2
3
4
5
6
7
8
9
public class Response1 extends HttpServlet @Override protected void doGet (HttpServletRequest req, HttpServletResponse resp) throws ServletException, IOException 302 );"Location" , "http://localhost:8080/08_Servlet/Response2" );
5.4、重定向方案二(推荐)
1
2
3
4
5
6
7
8
9
public class Response1 extends HttpServlet @Override protected void doGet (HttpServletRequest req, HttpServletResponse resp) throws ServletException, IOException "http://localhost:8080/08_Servlet/Response2" );"https://www.baidu.com" );
