一、分布式介绍
1、是什么
《分布式系统原理与范型》定义:
“分布式系统是若干独立计算机的集合,这些计算机对于用户来说就像单个相关系统”
分布式系统(distributed system)是建立在网络之上的软件系统。
随着互联网的发展,网站应用的规模不断扩大,常规的垂直应用架构已无法应对,分布式服务架构以及流动计算架构势在必行,亟需一个治理系统确保架构有条不紊的演进。
2、发展演变
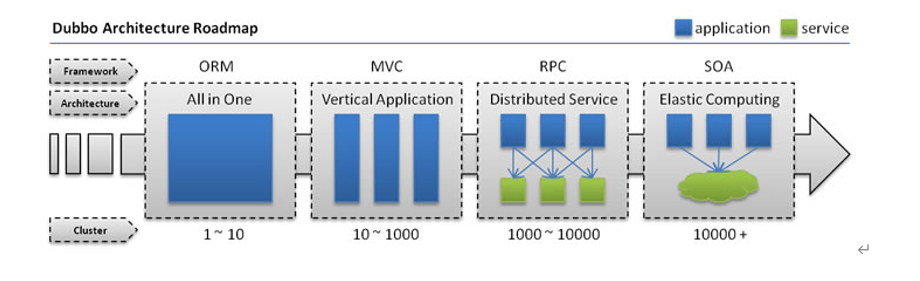
单一应用架构
当网站流量很小时,只需一个应用,将所有功能都部署在一起,以减少部署节点和成本。此时,用于简化增删改查工作量的数据访问框架(ORM)是关键。
适用于小型网站,小型管理系统,将所有功能都部署到一个功能里,简单易用。
缺点:
- 性能扩展比较难
- 协同开发问题
- 不利于升级维护
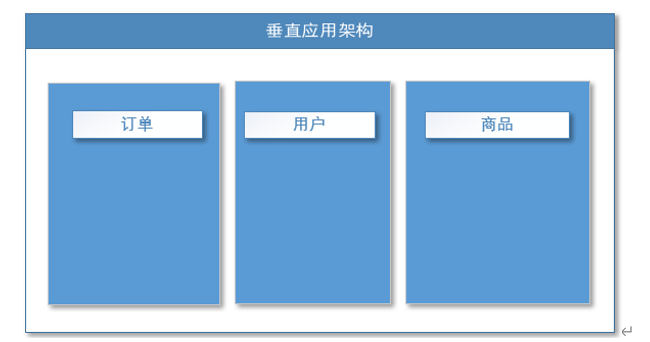
垂直应用架构
当访问量逐渐增大,单一应用增加机器带来的加速度越来越小,将应用拆成互不相干的几个应用,以提升效率。此时,用于加速前端页面开发的Web框架(MVC)是关键。
通过切分业务来实现各个模块独立部署,降低了维护和部署的难度,团队各司其职更易管理,性能扩展也更方便,更有针对性。
缺点:
公用模块无法重复利用,开发性的浪费!
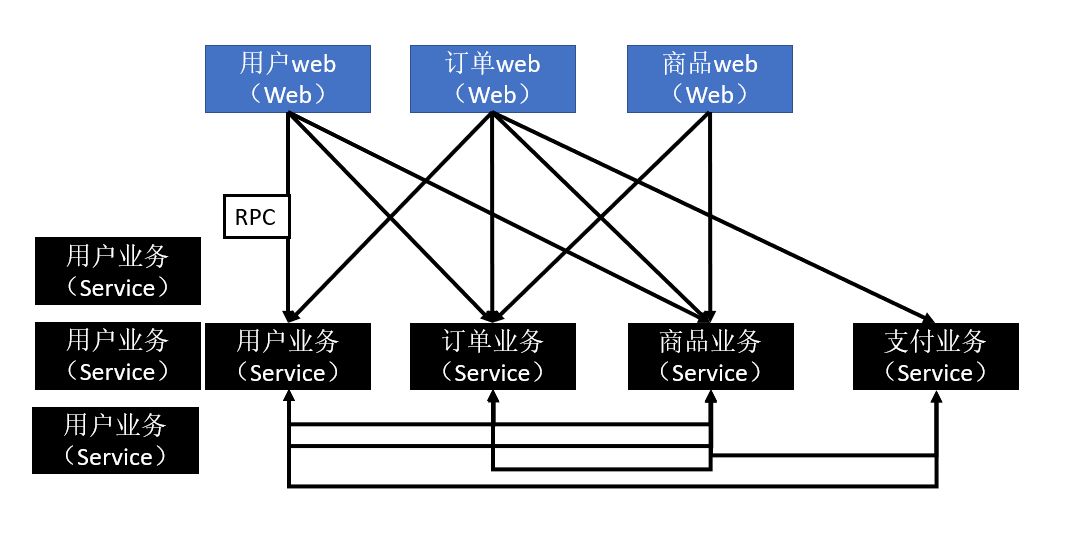
分布式服务架构
当垂直应用越来越多,应用之间交互不可避免,将核心业务抽取出来,作为独立的服务,逐渐形成稳定的服务中心,使前端应用能更快速的响应多变的市场需求。此时,用于提高业务复用及整合的分布式服务框架,**(RPC)**是关键。
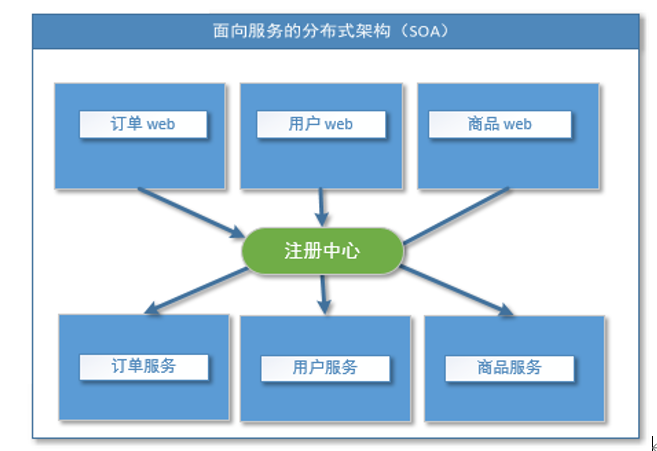
流动计算架构
当服务越来越多,容量的评估,小服务资源的浪费等问题逐渐显现,此时需增加一个调度中心基于访问压力实时管理集群容量,提高集群利用率。此时,用于提高机器利用率的资源调度和治理中心(SOA)[ Service Oriented Architecture]是关键。
可以使用注册中心来完成!
二、Dubbo介绍
1、简介
Apache Dubbo (incubating) 是一款高性能、轻量级的开源Java RPC框架,它提供了三大核心能力:面向接口的远程方法调用,智能容错和负载均衡,以及服务自动注册和发现。
官网:https://dubbo.apache.org/zh/
2、RPC介绍
RPC【Remote Procedure Call】是指远程过程调用,是一种进程间通信方式,他是一种技术的思想,而不是规范。它允许程序调用另一个地址空间(通常是共享网络的另一台机器上)的过程或函数,而不用程序员显式编码这个远程调用的细节。即程序员无论是调用本地的还是远程的函数,本质上编写的调用代码基本相同。
RPC两个核心模块:通讯,序列化。
流程图:
3、Dubbo基本概念
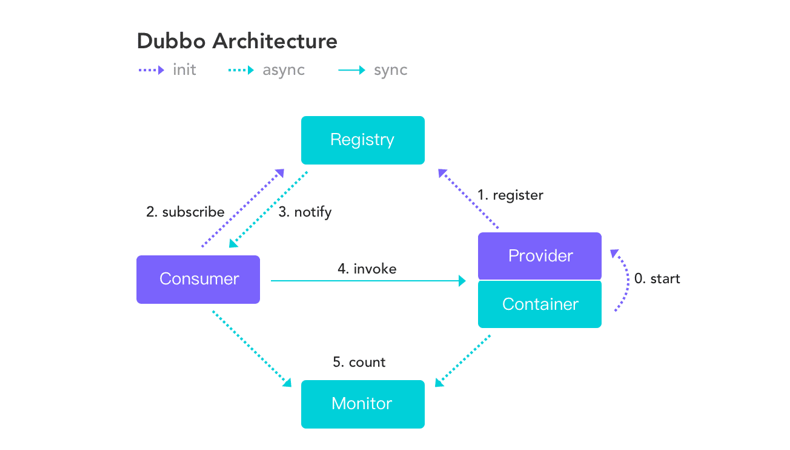
服务提供者(Provider):暴露服务的服务提供方,服务提供者在启动时,向注册中心注册自己提供的服务。
服务消费者(Consumer):调用远程服务的服务消费方,服务消费者在启动时,向注册中心订阅自己所需的服务,服务消费者,从提供者地址列表中,基于软负载均衡算法,选一台提供者进行调用,如果调用失败,再选另一台调用。
注册中心(Registry):注册中心返回服务提供者地址列表给消费者,如果有变更,注册中心将基于长连接推送变更数据给消费者
监控中心(Monitor):服务消费者和提供者,在内存中累计调用次数和调用时间,定时每分钟发送一次统计数据到监控中心
调用关系说明:
- 服务容器负责启动,加载,运行服务提供者。
- 服务提供者在启动时,向注册中心注册自己提供的服务。
- 服务消费者在启动时,向注册中心订阅自己所需的服务。
- 注册中心返回服务提供者地址列表给消费者,如果有变更,注册中心将基于长连接推送变更数据给消费者。
- 服务消费者,从提供者地址列表中,基于软负载均衡算法,选一台提供者进行调用,如果调用失败,再选另一台调用。
- 服务消费者和提供者,在内存中累计调用次数和调用时间,定时每分钟发送一次统计数据到监控中心。
三、Dubbo环境搭建
1、Zookeeper安装
安装详细查看之前ZK教程:https://itnxd.eu.org/posts/34316.html#%E4%BA%8C%E3%80%81%E5%AE%89%E8%A3%85
2、Dubbo-Admin安装
不重要,安不安装都行!
安装参考教程:
命令改一下:
1
2
3
| mvn clean package -Dmaven.test.skip=true
# 改为,原命令报错
mvn clean package '-Dmaven.test.skip=true'
|
注意:
使用Github最新版安装时mvn打包时建议挂全局代理,否则可能会有问题!
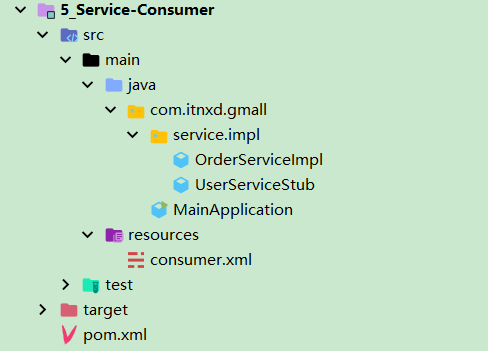
3、Dubbo-HelloWorld
功能需求
某个电商系统,订单服务需要调用用户服务获取某个用户的所有地址:

订单服务web模块在A服务器,用户服务模块在B服务器,A可以远程调用B的功能!
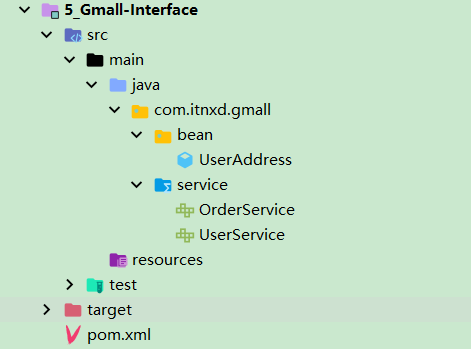
创建模块
公共接口层:
pom.xml:
1
2
3
| <groupId>com.itnxd.gmall</groupId>
<artifactId>gmall-interface</artifactId>
<version>0.0.1-SNAPSHOT</version>
|
服务消费者层:
pom.xml:
1
2
3
4
5
6
7
8
9
10
11
12
13
14
15
16
17
18
19
|
<dependency>
<groupId>com.itnxd.gmall</groupId>
<artifactId>gmall-interface</artifactId>
<version>0.0.1-SNAPSHOT</version>
</dependency>
<dependency>
<groupId>com.alibaba</groupId>
<artifactId>dubbo</artifactId>
<version>2.6.10</version>
</dependency>
<dependency>
<groupId>org.apache.curator</groupId>
<artifactId>curator-framework</artifactId>
<version>4.3.0</version>
</dependency>
|
OrderServiceImpl.java:
1
2
3
4
5
6
7
8
9
10
11
12
13
14
15
16
17
| @Service
public class OrderServiceImpl implements OrderService {
@Autowired
UserService userService;
@Override
public List<UserAddress> initOrder(String userId) {
System.out.println("用户id:"+userId);
List<UserAddress> addressList = userService.getUserAddressList(userId);
for (UserAddress userAddress : addressList) {
System.out.println(userAddress.getUserAddress());
}
return addressList;
}
}
|
问题: UserService的实现在提供者层,我们没有办法直接去调用到!该模块可能在其他服务器!
服务提供者层:
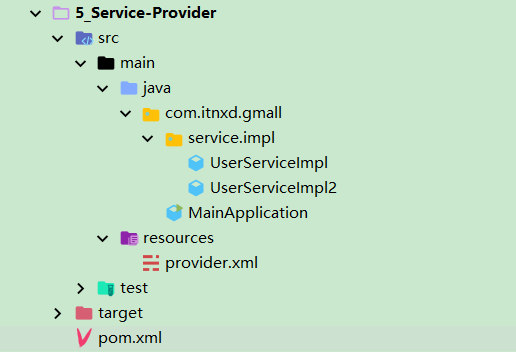
pom.xml:
1
2
3
4
5
6
7
8
9
10
11
12
13
14
15
16
17
18
19
20
|
<dependency>
<groupId>com.itnxd.gmall</groupId>
<artifactId>gmall-interface</artifactId>
<version>0.0.1-SNAPSHOT</version>
</dependency>
<dependency>
<groupId>com.alibaba</groupId>
<artifactId>dubbo</artifactId>
<version>2.6.10</version>
</dependency>
<dependency>
<groupId>org.apache.curator</groupId>
<artifactId>curator-framework</artifactId>
<version>4.3.0</version>
</dependency>
|
创建通道
会发现消费者层UserService的实现在提供者层,我们没有办法直接去调用到!该模块可能在其他服务器!
因此就需要一个服务来大同服务器不同地址之间的链接,也就是远程过程调用RPC,我们可以使用Dubbo这个RPC框架实现!
配置提供者provider.xml:
1
2
3
4
5
6
7
8
9
10
11
12
13
14
15
16
17
18
19
20
21
22
23
24
25
26
27
28
| <?xml version="1.0" encoding="UTF-8"?>
<beans xmlns="http://www.springframework.org/schema/beans"
xmlns:xsi="http://www.w3.org/2001/XMLSchema-instance"
xmlns:dubbo="http://code.alibabatech.com/schema/dubbo"
xsi:schemaLocation="http://www.springframework.org/schema/beans http://www.springframework.org/schema/beans/spring-beans.xsd
http://dubbo.apache.org/schema/dubbo http://dubbo.apache.org/schema/dubbo/dubbo.xsd
http://code.alibabatech.com/schema/dubbo http://code.alibabatech.com/schema/dubbo/dubbo.xsd">
<dubbo:application name="user-service-provider"></dubbo:application>
<dubbo:registry protocol="zookeeper" address="82.156.11.189:2181"></dubbo:registry>
<dubbo:protocol name="dubbo" port="20882"></dubbo:protocol>
<dubbo:service interface="com.itnxd.gmall.service.UserService"
ref="userServiceImpl01">
</dubbo:service>
<bean id="userServiceImpl01" class="com.itnxd.gmall.service.impl.UserServiceImpl"></bean>
</beans>
|
配置消费者consumer.xml:
1
2
3
4
5
6
7
8
9
10
11
12
13
14
15
16
17
18
| <?xml version="1.0" encoding="UTF-8"?>
<beans xmlns="http://www.springframework.org/schema/beans"
xmlns:xsi="http://www.w3.org/2001/XMLSchema-instance"
xmlns:dubbo="http://dubbo.apache.org/schema/dubbo"
xmlns:context="http://www.springframework.org/schema/context"
xsi:schemaLocation="http://www.springframework.org/schema/beans http://www.springframework.org/schema/beans/spring-beans.xsd
http://www.springframework.org/schema/context http://www.springframework.org/schema/context/spring-context-4.3.xsd
http://dubbo.apache.org/schema/dubbo http://dubbo.apache.org/schema/dubbo/dubbo.xsd
http://code.alibabatech.com/schema/dubbo http://code.alibabatech.com/schema/dubbo/dubbo.xsd">
<dubbo:application name="order-service-consumer"></dubbo:application>
<dubbo:registry address="zookeeper://82.156.11.189:2181"></dubbo:registry>
<dubbo:reference interface="com.itnxd.gmall.service.UserService"id="userService"></dubbo:reference>
</beans>
|
启动提供者进程:
1
2
3
4
5
6
7
8
9
10
11
12
13
14
| public class MainApplication {
public static void main(String[] args) throws IOException {
ClassPathXmlApplicationContext ioc = new ClassPathXmlApplicationContext("provider.xml");
ioc.start();
System.out.println("Provider start ...........");
System.in.read();
}
}
|
启动消费者进程:
1
2
3
4
5
6
7
8
9
10
11
12
13
14
15
16
17
18
| public class MainApplication {
@SuppressWarnings("resource")
public static void main(String[] args) throws IOException {
ClassPathXmlApplicationContext applicationContext = new ClassPathXmlApplicationContext("consumer.xml");
OrderService orderService = applicationContext.getBean(OrderService.class);
System.out.println("远程调用开始....");
orderService.initOrder("1");
System.out.println("远程调用完成....");
System.in.read();
}
}
|
**结果:**消费者会获取到提供者暴露到注册中心ZK的服务,获取到订单地址!
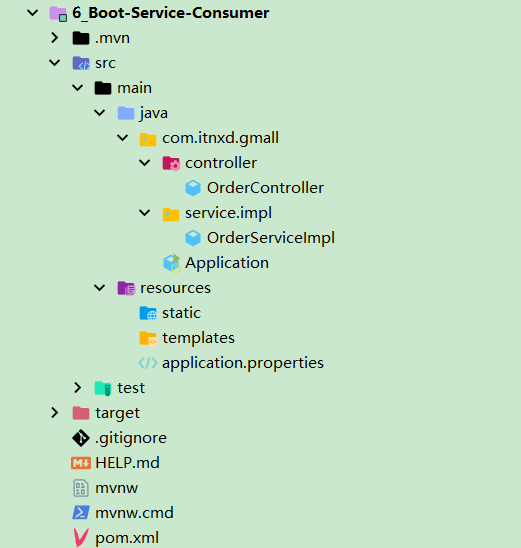
4、整合Spring-Boot
Provider

pom.xml:
1
2
3
4
5
6
7
8
9
10
11
12
13
14
15
16
17
18
19
20
21
22
23
24
25
26
27
28
29
30
31
32
33
34
35
36
37
38
39
40
41
42
43
44
45
46
47
48
49
50
51
52
53
54
55
56
57
58
59
60
61
62
63
64
65
| <groupId>com.itnxd</groupId>
<artifactId>Boot-Service-Provider</artifactId>
<version>0.0.1-SNAPSHOT</version>
<name>6_Boot-Service-Provider</name>
<description>6_Boot-Service-Provider</description>
<properties>
<java.version>1.8</java.version>
</properties>
<dependencies>
<dependency>
<groupId>com.itnxd.gmall</groupId>
<artifactId>gmall-interface</artifactId>
<version>0.0.1-SNAPSHOT</version>
</dependency>
<dependency>
<groupId>org.apache.dubbo</groupId>
<artifactId>dubbo-spring-boot-starter</artifactId>
<version>3.0.0</version>
</dependency>
<dependency>
<groupId>org.apache.curator</groupId>
<artifactId>curator-recipes</artifactId>
<version>4.3.0</version>
</dependency>
<dependency>
<groupId>org.apache.curator</groupId>
<artifactId>curator-x-discovery</artifactId>
<version>4.3.0</version>
</dependency>
<dependency>
<groupId>org.springframework.boot</groupId>
<artifactId>spring-boot-starter</artifactId>
</dependency>
<dependency>
<groupId>org.springframework.boot</groupId>
<artifactId>spring-boot-starter-test</artifactId>
<scope>test</scope>
</dependency>
</dependencies>
|
application.properties:
类似xml配置,一个xml标签对应一串点出来的属性!
注意:建议给ZK地址设置请求参数timeout,且大一点,以防超时无法连接,目前发现连接是很慢的!
参考教程:https://zhuanlan.zhihu.com/p/343204228
1
2
3
4
5
6
7
8
9
|
dubbo.application.name=boot-user-service-provider
dubbo.registry.address=82.156.11.189:2181?timeout=30000
dubbo.registry.protocol=zookeeper
dubbo.protocol.name=dubbo
dubbo.protocol.port=20880
|
使用@DubboService注解在提供方暴露服务:
1
2
3
4
5
6
7
8
9
10
11
12
13
14
15
16
17
18
19
|
@DubboService(timeout = 5000)
@Service
public class UserServiceImpl implements UserService {
@Override
public List<UserAddress> getUserAddressList(String userId) {
System.out.println("UserServiceImpl.....old...");
UserAddress address1 = new UserAddress(1, "北京市昌平区宏福科技园综合楼3层", "1", "李老师", "010-56253825", "Y");
UserAddress address2 = new UserAddress(2, "深圳市宝安区西部硅谷大厦B座3层(深圳分校)", "1", "王老师", "010-56253825", "N");
return Arrays.asList(address1,address2);
}
}
|
使用@EnableDubbo注解开启基于注解的Dubbo功能:
1
2
3
4
5
6
7
8
9
10
11
12
| @EnableDubbo
@SpringBootApplication
public class Application {
public static void main(String[] args) {
SpringApplication.run(Application.class, args);
}
}
|
Consumer
消费者我们使用的是Spring-Boot Web工程!
pom.xml:
1
2
3
4
5
6
7
8
9
10
11
12
13
14
15
16
17
18
19
20
21
22
23
24
25
26
27
28
29
30
31
32
33
34
35
36
37
38
39
40
41
42
43
44
45
46
47
48
49
50
51
52
53
54
55
56
57
58
59
| <groupId>com.itnxd</groupId>
<artifactId>Boot-Service-Consumer</artifactId>
<version>0.0.1-SNAPSHOT</version>
<name>6_Boot-Service-Consumer</name>
<description>6_Boot-Service-Consumer</description>
<properties>
<java.version>1.8</java.version>
</properties>
<dependencies>
<dependency>
<groupId>com.itnxd.gmall</groupId>
<artifactId>gmall-interface</artifactId>
<version>0.0.1-SNAPSHOT</version>
</dependency>
<dependency>
<groupId>org.apache.dubbo</groupId>
<artifactId>dubbo-spring-boot-starter</artifactId>
<version>3.0.0</version>
</dependency>
<dependency>
<groupId>org.apache.curator</groupId>
<artifactId>curator-recipes</artifactId>
<version>4.3.0</version>
</dependency>
<dependency>
<groupId>org.apache.curator</groupId>
<artifactId>curator-x-discovery</artifactId>
<version>4.3.0</version>
</dependency>
<dependency>
<groupId>org.springframework.boot</groupId>
<artifactId>spring-boot-starter-web</artifactId>
</dependency>
<dependency>
<groupId>org.springframework.boot</groupId>
<artifactId>spring-boot-starter-test</artifactId>
<scope>test</scope>
</dependency>
</dependencies>
|
application.properties:
1
2
3
4
5
6
7
8
9
10
|
server.port=8081
dubbo.application.name=boot-order-service-consumer
dubbo.registry.address=zookeeper://82.156.11.189:2181?timeout=30000
dubbo.protocol.name=dubbo
dubbo.protocol.port=20880
|
OrderController:
1
2
3
4
5
6
7
8
9
10
11
12
13
14
15
| @Controller
public class OrderController {
@Autowired
OrderService orderService;
@ResponseBody
@RequestMapping("/initOrder")
public List<UserAddress> init(@RequestParam("uid") String userId){
return orderService.initOrder(userId);
}
}
|
使用@DubboReference注解在消费者方引用服务:
1
2
3
4
5
6
7
8
9
10
11
12
13
14
15
16
17
18
19
20
21
22
23
| @Service
public class OrderServiceImpl implements OrderService {
@DubboReference
UserService userService;
@Override
public List<UserAddress> initOrder(String userId) {
System.out.println("用户id:"+userId);
List<UserAddress> addressList = userService.getUserAddressList(userId);
for (UserAddress userAddress : addressList) {
System.out.println(userAddress.getUserAddress());
}
return addressList;
}
}
|
使用@EnableDubbo注解开启基于注解的Dubbo功能:
1
2
3
4
5
6
7
8
9
| @EnableDubbo
@SpringBootApplication
public class Application {
public static void main(String[] args) {
SpringApplication.run(Application.class, args);
}
}
|
测试
启动提供者和消费者两个主程序,访问 http://localhost:8081/initOrder?uid=1 即可,会将信息以Json字符串形式返回到页面!
四、Dubbo配置
1、配置原则
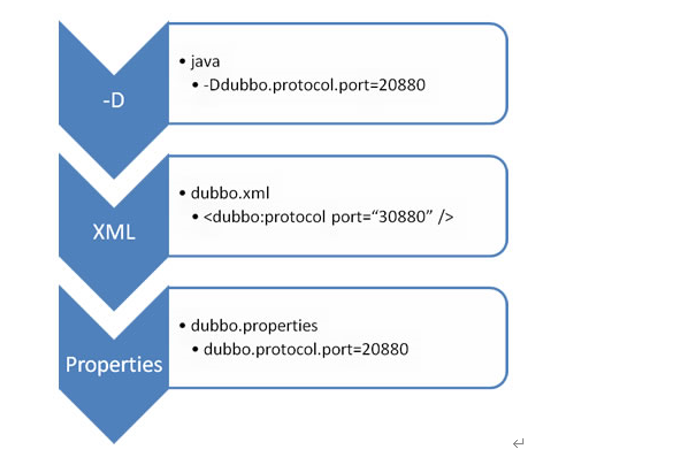
- JVM 启动 -D 参数优先,这样可以使用户在部署和启动时进行参数重写,比如在启动时需改变协议的端口。
- XML 次之,如果在 XML 中有配置,则 dubbo.properties 中的相应配置项无效。
- Properties 最后,相当于缺省值,只有 XML 没有配置时,dubbo.properties 的相应配置项才会生效,通常用于共享公共配置,比如应用名。
生效顺序: JVM -> XML -> application.properties -> dubbo.properties
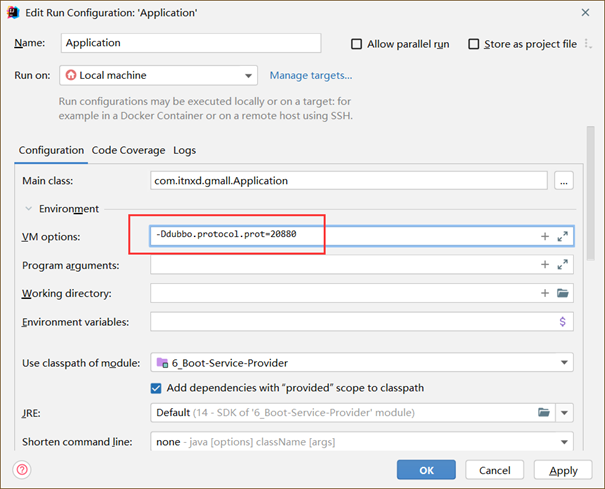
JVM参数设置: 右键More Run中找!
2、启动时检查
官方文档:https://dubbo.apache.org/zh/docs/advanced/preflight-check/
在启动时检查依赖的服务ZK是否可用,可以关闭不进行检查,用到再进行检查!
注意:要想演示效果,记得将ZK先全部清空!
默认Check值为true!
1
2
3
4
5
6
7
|
指定接口不检查:
<dubbo:reference interface="com.itnxd.gmall.service.UserService" id="userService" check="false"/>
全局不检查:
<dubbo:consumer check="false" timeout="5000"></dubbo:consumer>
注册中心
<dubbo:registry check="false" />
|
Spring-Boot配置:
1
2
| dubbo.consumer.check=false(全局)
@DubboReference(check=false)(单个接口)
|
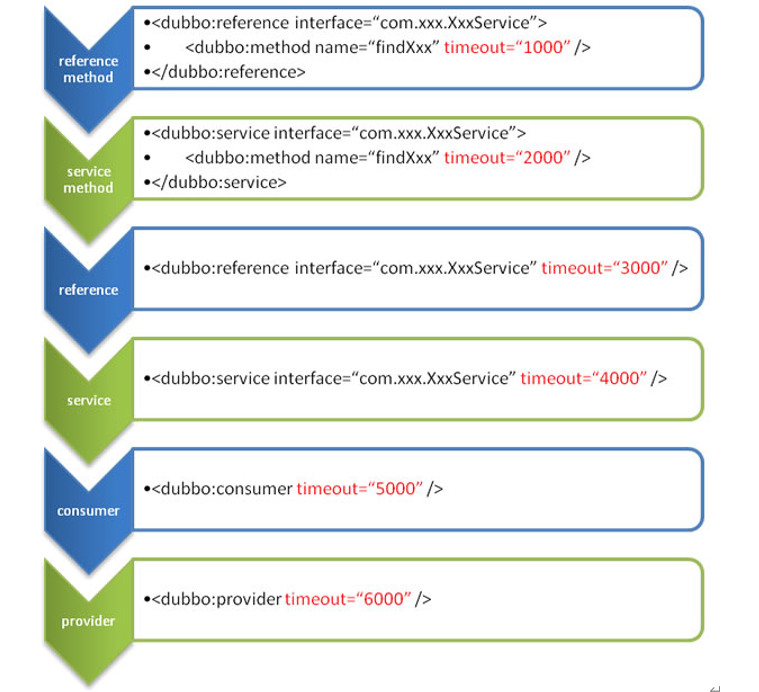
3、超时配置
由于网络或服务端不可靠,会导致调用出现一种不确定的中间状态(超时)。为了避免超时导致客户端资源(线程)挂起耗尽,必须设置超时时间。
默认1000ms!
xml方式:
1
2
3
4
5
6
7
8
9
10
11
12
| <dubbo:reference interface="com.itnxd.gmall.service.UserService" id="userService" timeout="5000">
<dubbo:method name="getUserAddressList" timeout="1000"></dubbo:method>
</dubbo:reference>
<dubbo:service interface="com.itnxd.gmall.service.UserService" id="userService" timeout="5000">
<dubbo:method name="getUserAddressList" timeout="1000"></dubbo:method>
</dubbo:service>
<dubbo:reference interface="com.itnxd.gmall.service.UserService" id="userService" timeout="1000"/>
<dubbo:service interface="com.itnxd.gmall.service.UserService" id="userService" timeout="1000"/>
<dubbo:consumer timeout="5000"></dubbo:consumer>
<dubbo:provider timeout="5000"></dubbo:provider>
|
注解形式:
一般使用在提供方DubboService!
1
2
| @DubboService(timeout = 3000)
@DubboReference(timeout = 3000)
|
4、配置覆盖策略
- 精确优先 (方法级优先,接口级次之,全局配置再次之)
- 消费者设置优先 (如果级别一样,则消费方优先,提供方次之)
配置原则: dubbo推荐在Provider上尽量多配置Consumer端属性:
- 作服务的提供者,比服务使用方更清楚服务性能参数,如调用的超时时间,合理的重试次数,等等
- 在Provider配置后,Consumer不配置则会使用Provider的配置值,即Provider配置可以作为Consumer的缺省值。否则,Consumer会使用Consumer端的全局设置,这对于Provider不可控的,并且往往是不合理的
图示:
5、重试次数
失败自动切换,当出现失败,重试其它服务器,但重试会带来更长延迟。可通过 retries=“x” 来设置重试次数(不含第一次)。
幂等操作可以重试,非幂等操作不可以!
xml方式:
1
2
3
4
5
6
7
| <dubbo:service retries="2" />
或
<dubbo:reference retries="2" />
或
<dubbo:reference>
<dubbo:method name="findFoo" retries="2" />
</dubbo:reference>
|
注解方式:
1
| @DubboService(retries = 3)
|
6、多版本
官方文档:https://dubbo.apache.org/zh/docs/advanced/multi-versions/
当一个接口实现,出现不兼容升级时,可以用版本号过渡,版本号不同的服务相互间不引用。
可以按照以下的步骤进行版本迁移:
- 在低压力时间段,先升级一半提供者为新版本
- 再将所有消费者升级为新版本
- 然后将剩下的一半提供者升级为新版本
xml方式:
1
2
3
4
5
6
7
8
9
10
11
12
13
14
15
| 老版本服务提供者配置:
<dubbo:service interface="com.foo.BarService" version="1.0.0" />
新版本服务提供者配置:
<dubbo:service interface="com.foo.BarService" version="2.0.0" />
老版本服务消费者配置:
<dubbo:reference id="barService" interface="com.foo.BarService" version="1.0.0" />
新版本服务消费者配置:
<dubbo:reference id="barService" interface="com.foo.BarService" version="2.0.0" />
如果不需要区分版本,可以按照以下的方式配置:
version:*代表随机调用,填写provider的版本号实现控制版本!
<dubbo:reference id="barService" interface="com.foo.BarService" version="*" />
|
注解方式:
1
2
3
4
5
| @Service(version = "v1.0")
public class UserServiceImpl1 implements UserService {...}
@Reference(version = "v1.0")
private UserService userService;
|
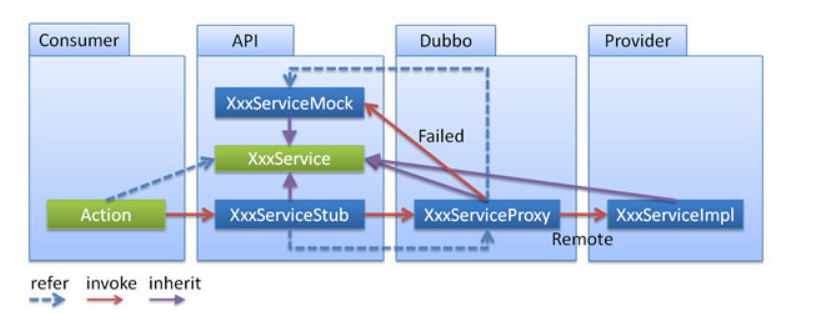
7、本地存根
官方文档:https://dubbo.apache.org/zh/docs/advanced/local-stub/
类似动态代理,在调用提供方的服务之前先做一点判断!
在接口上增加stub配置,指向该本地存根的全类名!
会先进行本地存根的判断,再判断是否远程调用!
consumer.xml配置:
1
2
3
4
| <dubbo:reference interface="com.itnxd.gmall.service.UserService"
id="userService" timeout="5000" retries="3" version="*"
stub="com.itnxd.gmall.service.impl.UserServiceStub">
</dubbo:reference>
|
UserServiceStub.java:
1
2
3
4
5
6
7
8
9
10
11
12
13
14
15
16
17
18
19
20
21
22
23
24
25
26
27
28
29
30
31
32
33
34
35
36
37
38
39
40
41
42
| package com.itnxd.gmall.service.impl;
import java.util.List;
import org.springframework.util.StringUtils;
import com.itnxd.gmall.bean.UserAddress;
import com.itnxd.gmall.service.UserService;
public class UserServiceStub implements UserService {
private final UserService userService;
public UserServiceStub(UserService userService) {
super();
this.userService = userService;
}
@Override
public List<UserAddress> getUserAddressList(String userId) {
System.out.println("UserServiceStub.....");
if(!StringUtils.isEmpty(userId)) {
return userService.getUserAddressList(userId);
}
return null;
}
}
|
五、SpringBoot整合三种方式
1、properties方式
- 导入dubbo-starter
- 在application.properties中配置属性
- 使用@DubboService暴露服务,使用@DubboReference引用服务
- 在Boot启动类上使用@EnableDubbo开启Dubbo注解!
老版本也可使用dubbo.scan.base-packages指定包扫描!就不需要配置@EnableDubbo注解了!
2、xml方式
- 保留 xml 配置文件,导入dubbo-starter
- 使用
@ImportResource(locations = "classpath:provider.xml")指定配置位置
3、配置类方式
- 将每一个组件手动创建到配置类中!
- 使用@DubboComponentScan或者@EnableDubbo注解指定扫描包(EnableDubbo也实现了@DubboComponentScan)
- 使用@DubboReference引用服务,使用@DubboService暴露服务(与配置类暴露方法互不影响)。
配置类:
xml中的每一个表现都对应一个xxxConfig类用于配置!
1
2
3
4
5
6
7
8
9
10
11
12
13
14
15
16
17
18
19
20
21
22
23
24
25
26
27
28
29
30
31
32
33
34
35
36
37
38
39
40
41
42
43
44
45
46
47
48
49
50
51
52
53
54
55
56
57
58
59
60
61
62
63
| package com.itnxd.gmall.config;
import com.itnxd.gmall.service.UserService;
import org.apache.dubbo.config.*;
import org.apache.dubbo.rpc.Protocol;
import org.springframework.boot.autoconfigure.security.SecurityProperties;
import org.springframework.context.annotation.Bean;
import org.springframework.context.annotation.Configuration;
import java.util.Arrays;
@Configuration
public class MyDubboConfig {
@Bean
public ApplicationConfig applicationConfig(){
ApplicationConfig applicationConfig = new ApplicationConfig();
applicationConfig.setName("boot-user-service-provider");
return applicationConfig;
}
@Bean
public RegistryConfig registryConfig(){
RegistryConfig registryConfig = new RegistryConfig();
registryConfig.setProtocol("zookeeper");
registryConfig.setAddress("82.156.11.189:2181?timeout=30000");
return registryConfig;
}
@Bean
public ProtocolConfig protocolConfig(){
ProtocolConfig protocolConfig = new ProtocolConfig();
protocolConfig.setName("dubbo");
protocolConfig.setPort(20880);
return protocolConfig;
}
@Bean
public ServiceConfig<UserService> serviceServiceConfig(UserService userService){
ServiceConfig<UserService> userServiceServiceConfig = new ServiceConfig<>();
userServiceServiceConfig.setInterface(UserService.class);
userServiceServiceConfig.setRef(userService);
userServiceServiceConfig.setVersion("1.0.0");
MethodConfig methodConfig = new MethodConfig();
methodConfig.setName("getUserAddressList");
methodConfig.setTimeout(5000);
userServiceServiceConfig.setMethods(Arrays.asList(methodConfig));
return userServiceServiceConfig;
}
}
|
三种方式:
1
2
3
4
5
6
7
|
@EnableDubbo
@SpringBootApplication
public class Application {
...
}
|
六、高可用
1、Dubbo直连
**现象:**zookeeper注册中心宕机,还可以消费dubbo暴露的服务。
健壮性:
- 监控中心宕掉不影响使用,只是丢失部分采样数据
- 数据库宕掉后,注册中心仍能通过缓存提供服务列表查询,但不能注册新服务
- 注册中心对等集群,任意一台宕掉后,将自动切换到另一台
- 注册中心全部宕掉后,服务提供者和服务消费者仍能通过本地缓存通讯 (ZK挂完了,也有本地缓存)
- 服务提供者无状态,任意一台宕掉后,不影响使用
- 服务提供者全部宕掉后,服务消费者应用将无法使用,并无限次重连等待服务提供者恢复
**高可用:**通过设计,减少系统不能提供服务的时间;
直连设置:
在@DubboReference注解中指定直连地址即可!
dubbo直连,绕过注册中心ZK!
虽然我无法直连…
1
2
| @DubboReference(url = "127.0.0.1:20880")
UserService userService;
|
2、负载均衡
官方文档:https://dubbo.apache.org/zh/docs/advanced/loadbalance/
在集群负载均衡时,Dubbo 提供了多种均衡策略,缺省为 random 随机调用。
Random LoadBalance
随机,按权重设置随机概率。
在一个截面上碰撞的概率高,但调用量越大分布越均匀,而且按概率使用权重后也比较均匀,有利于动态调整提供者权重。
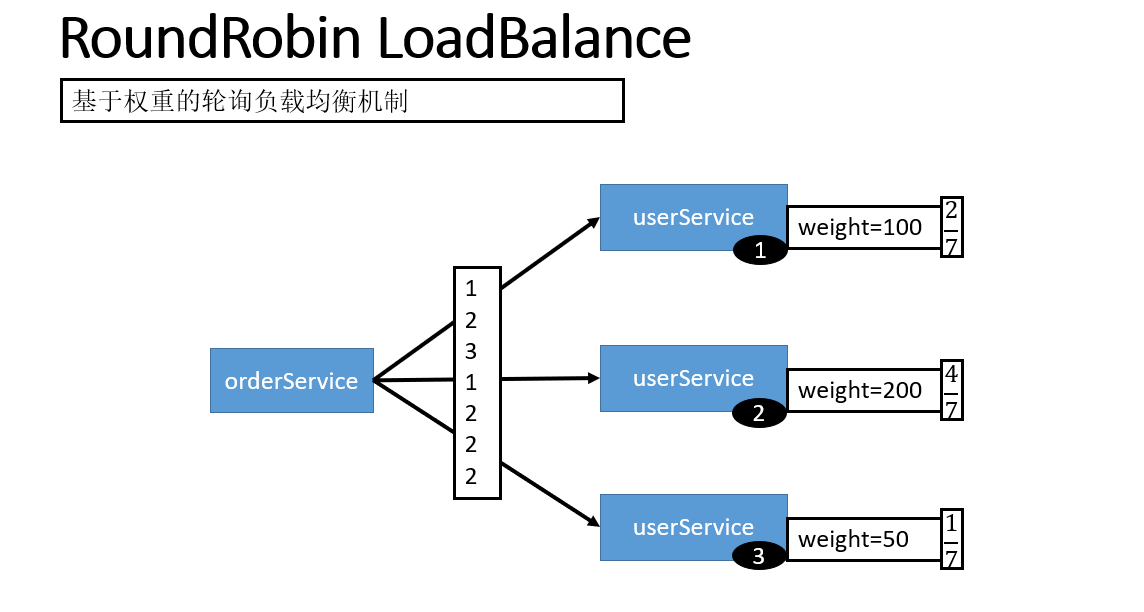
RoundRobin LoadBalance
轮循,按公约后的权重设置轮循比率。
存在慢的提供者累积请求的问题,比如:第二台机器很慢,但没挂,当请求调到第二台时就卡在那,久而久之,所有请求都卡在调到第二台上。
示意图:用完一个比例的,则不会再调用!
LeastActive LoadBalance
最少活跃调用数,相同活跃数的随机,活跃数指调用前后计数差。
使慢的提供者收到更少请求,因为越慢的提供者的调用前后计数差会越大。
ConsistentHash LoadBalance
一致性 Hash,相同参数的请求总是发到同一提供者。
当某一台提供者挂时,原本发往该提供者的请求,基于虚拟节点,平摊到其它提供者,不会引起剧烈变动。
缺省只对第一个参数 Hash,如果要修改,请配置 <dubbo:parameter key="hash.arguments" value="0,1" />
缺省用 160 份虚拟节点,如果要修改,请配置 <dubbo:parameter key="hash.nodes" value="320" />
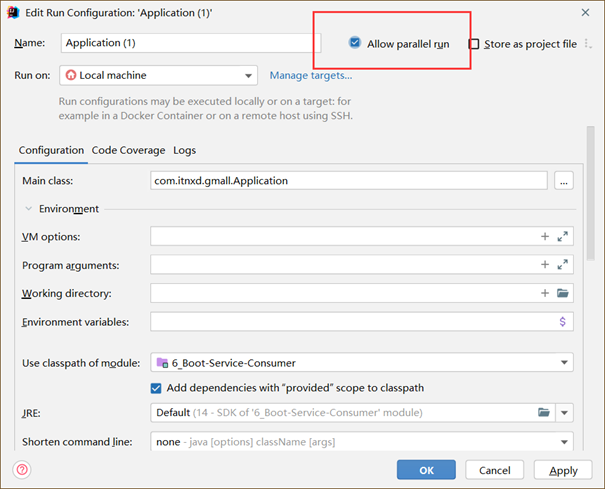
同一个程序多启动配置,将下方勾选即可:
可以用来模拟多个消费者,模拟多种负载均衡策略!
负载均衡策略名查看官网:https://dubbo.apache.org/zh/docs/advanced/loadbalance/
负载均衡配置:
1
2
3
4
5
| @DubboReference(loadbalance = "random")
@DubboReference(loadbalance = "roundrobin")
@DubboReference(loadbalance = "leastactive")
@DubboReference(loadbalance = "consistenthash")
UserService userService;
|
xml中配置:
1
2
3
4
5
6
7
8
9
10
11
12
| 服务端服务级别
<dubbo:service interface="..." loadbalance="roundrobin" />
客户端服务级别
<dubbo:reference interface="..." loadbalance="roundrobin" />
服务端方法级别
<dubbo:service interface="...">
<dubbo:method name="..." loadbalance="roundrobin"/>
</dubbo:service>
客户端方法级别
<dubbo:reference interface="...">
<dubbo:method name="..." loadbalance="roundrobin"/>
</dubbo:reference>
|
注意:
- 可以在dubbo-admin控制台进行快速加权和减权!
- 也可在@DubboService注解暴露服务时进行指定权重weight属性!
3、服务降级
官方文档:https://dubbo.apache.org/zh/docs/advanced/service-downgrade/
当服务器压力剧增的情况下,根据实际业务情况及流量,对一些服务和页面有策略的不处理或换种简单的方式处理,从而释放服务器资源以保证核心交易正常运作或高效运作。
可以通过服务降级功能临时屏蔽某个出错的非关键服务,并定义降级后的返回策略。
mock=force:return+null:表示消费方对该服务的方法调用都直接返回 null 值,不发起远程调用。用来屏蔽不重要服务不可用时对调用方的影响。mock=fail:return+null:表示消费方对该服务的方法调用在失败后,再返回 null 值,不抛异常。用来容忍不重要服务不稳定时对调用方的影响。(例如超时)
xml方式:
1
2
| <dubbo:provider timeout="1000" mock="force : return null"></dubbo:provider>
...
|
注解方式:
1
| @DubboReference(mock = "force : return null")
|
4、集群容错
官方文档:https://dubbo.apache.org/zh/docs/advanced/fault-tolerent-strategy/
在集群调用失败时,Dubbo 提供了多种容错方案,缺省为 failover 重试。
Failover Cluster(默认)
失败自动切换,当出现失败,重试其它服务器。通常用于读操作,但重试会带来更长延迟。可通过 retries="x" 来设置重试次数(不含第一次)。
Failfast Cluster
快速失败,只发起一次调用,失败立即报错。通常用于非幂等性的写操作,比如新增记录。
Failsafe Cluster
失败安全,出现异常时,直接忽略。通常用于写入审计日志等操作。
Failback Cluster
失败自动恢复,后台记录失败请求,定时重发。通常用于消息通知操作。
Forking Cluster
并行调用多个服务器,只要一个成功即返回。通常用于实时性要求较高的读操作,但需要浪费更多服务资源。可通过 forks=“2” 来设置最大并行数。
Broadcast Cluster
广播调用所有提供者,逐个调用,任意一台报错则报错 [2]。通常用于通知所有提供者更新缓存或日志等本地资源信息。
集群模式配置
按照以下示例在服务提供方和消费方配置集群模式!
xml配置:
1
2
3
| <dubbo:service cluster="failsafe" />
或
<dubbo:reference cluster="failsafe" />
|
注解配置:
1
| @Reference(cluster = "failover")
|
5、整合hystrix
Hystrix 旨在通过控制那些访问远程系统、服务和第三方库的节点,从而对延迟和故障提供更强大的容错能力。Hystrix具备拥有回退机制和断路器功能的线程和信号隔离,请求缓存和请求打包,以及监控和配置等功能!
可能是版本问题,换了多个版本都无法运行…
pom.xml:
1
2
3
4
5
6
|
<dependency>
<groupId>org.springframework.cloud</groupId>
<artifactId>spring-cloud-starter-netflix-hystrix</artifactId>
<version>2.2.5.RELEASE</version>
</dependency>
|
然后在Application类上增加@EnableHystrix来启用hystrix starter:
1
2
3
4
5
6
| @EnableHystrix
@EnableDubbo
@SpringBootApplication
public class Application {
..
}
|
配置Provider端:
在Dubbo的Provider上增加@HystrixCommand配置,这样子调用就会经过Hystrix代理。
1
2
3
4
5
6
7
8
9
10
11
12
13
14
| @HystrixCommand
@Override
public List<UserAddress> getUserAddressList(String userId) {
System.out.println("UserServiceImpl.....old...");
UserAddress address1 = new UserAddress(1, "北京市昌平区宏福科技园综合楼3层", "1", "李老师", "010-56253825", "Y");
UserAddress address2 = new UserAddress(2, "深圳市宝安区西部硅谷大厦B座3层(深圳分校)", "1", "王老师", "010-56253825", "N");
if(Math.random() > 0.5){
throw new RuntimeException();
}
return Arrays.asList(address1,address2);
}
|
配置Consumer端:
对于Consumer端,则可以增加一层method调用,并在method上配置@HystrixCommand。当调用出错时,会走到fallbackMethod = "xx"的调用里。
1
2
3
4
5
6
7
8
9
10
11
12
13
14
15
16
17
18
19
20
21
| @DubboReference(loadbalance = "roundrobin")
UserService userService;
@HystrixCommand(fallbackMethod = "hello")
@Override
public List<UserAddress> initOrder(String userId) {
System.out.println("用户id:"+userId);
List<UserAddress> addressList = userService.getUserAddressList(userId);
for (UserAddress userAddress : addressList) {
System.out.println(userAddress.getUserAddress());
}
return addressList;
}
public List<UserAddress> hello (String userId) {
return Arrays.asList(new UserAddress(10,"测试地址","1", "hh", "hh", "hh"));
}
|
七、Dubbo原理
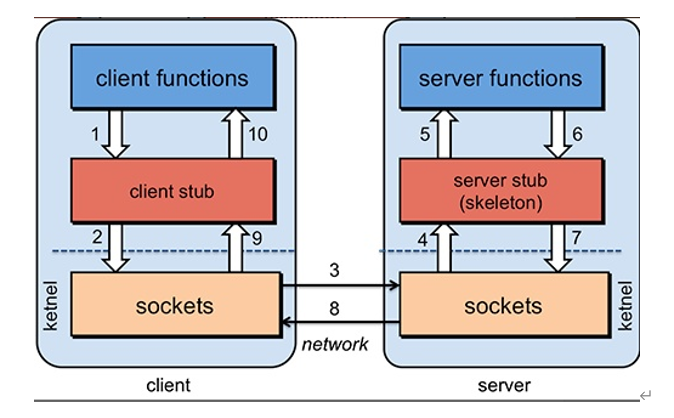
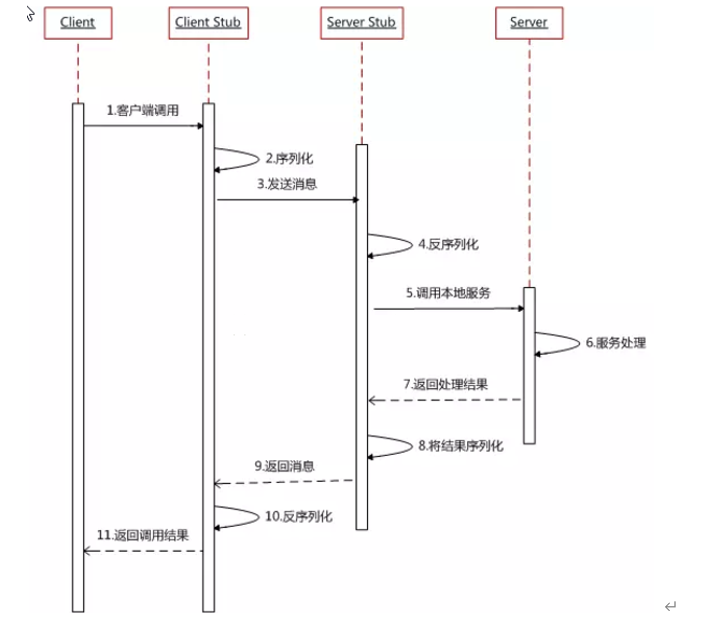
1、RPC原理
原理图示:
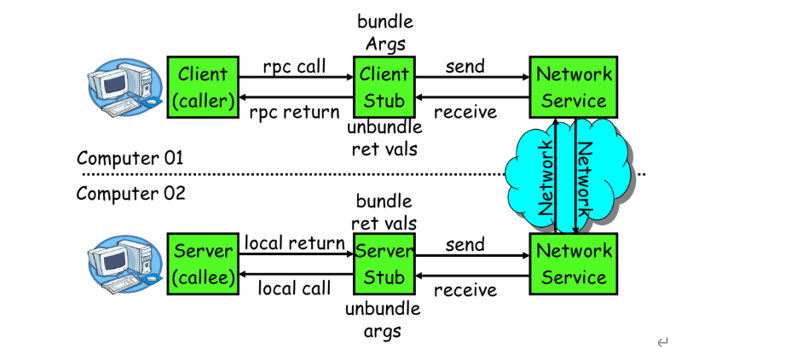
一次完整的RPC调用流程如下:
- 服务消费方(client)调用以本地调用方式调用服务;
- client stub接收到调用后负责将方法、参数等组装成能够进行网络传输的消息体;
- client stub找到服务地址,并将消息发送到服务端;
- server stub收到消息后进行解码;
- server stub根据解码结果调用本地的服务;
- 本地服务执行并将结果返回给server stub;
- server stub将返回结果打包成消息并发送至消费方;
- client stub接收到消息,并进行解码;
- 服务消费方得到最终结果。
RPC框架的目标就是要2~8这些步骤都封装起来,这些细节对用户来说是透明的,不可见的。
2、Netty通信原理
Netty是一个异步事件驱动的网络应用程序框架, 用于快速开发可维护的高性能协议服务器和客户端。它极大地简化并简化了TCP和UDP套接字服务器等网络编程。
BIO:(Blocking IO)
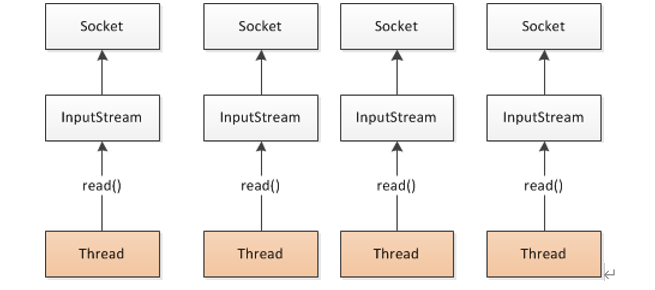
NIO (Non-Blocking IO)
Selector 一般称 为选择器 ,也可以翻译为 多路复用器,
Connect(连接就绪)、Accept(接受就绪)、Read(读就绪)、Write(写就绪)
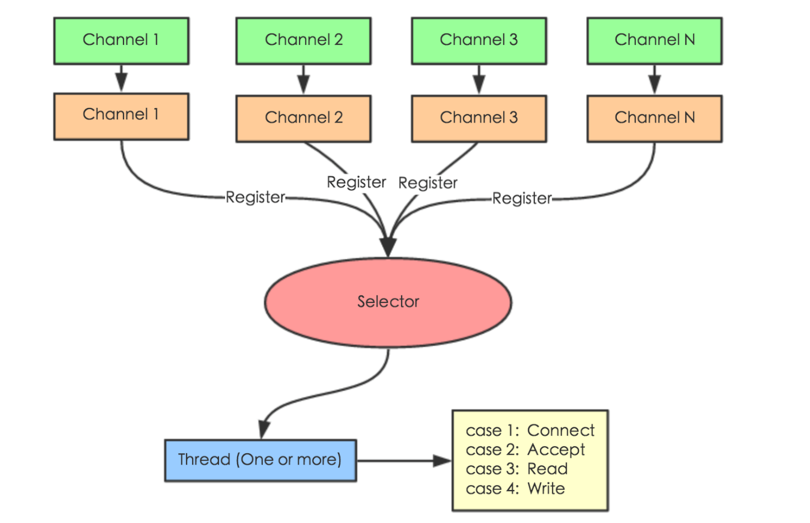
Netty基本原理:

3、Dubbo原理
dubbo原理 - 框架设计

- config 配置层:对外配置接口,以 ServiceConfig, ReferenceConfig 为中心,可以直接初始化配置类,也可以通过 spring 解析配置生成配置类
- proxy 服务代理层:服务接口透明代理,生成服务的客户端 Stub 和服务器端 Skeleton, 以 ServiceProxy 为中心,扩展接口为 ProxyFactory
- registry 注册中心层:封装服务地址的注册与发现,以服务 URL 为中心,扩展接口为 RegistryFactory, Registry, RegistryService
- cluster 路由层:封装多个提供者的路由及负载均衡,并桥接注册中心,以 Invoker 为中心,扩展接口为 Cluster, Directory, Router, LoadBalance
- monitor 监控层:RPC 调用次数和调用时间监控,以 Statistics 为中心,扩展接口为 MonitorFactory, Monitor, MonitorService
- protocol 远程调用层:封装 RPC 调用,以 Invocation, Result 为中心,扩展接口为 Protocol, Invoker, Exporter
- exchange 信息交换层:封装请求响应模式,同步转异步,以 Request, Response 为中心,扩展接口为 Exchanger, ExchangeChannel,ExchangeClient, ExchangeServer
- transport 网络传输层:抽象 mina 和 netty 为统一接口,以 Message 为中心,扩展接口为 Channel, Transporter, Client, Server, Codec
- serialize 数据序列化层:可复用的一些工具,扩展接口为 Serialization, ObjectInput, ObjectOutput, ThreadPool
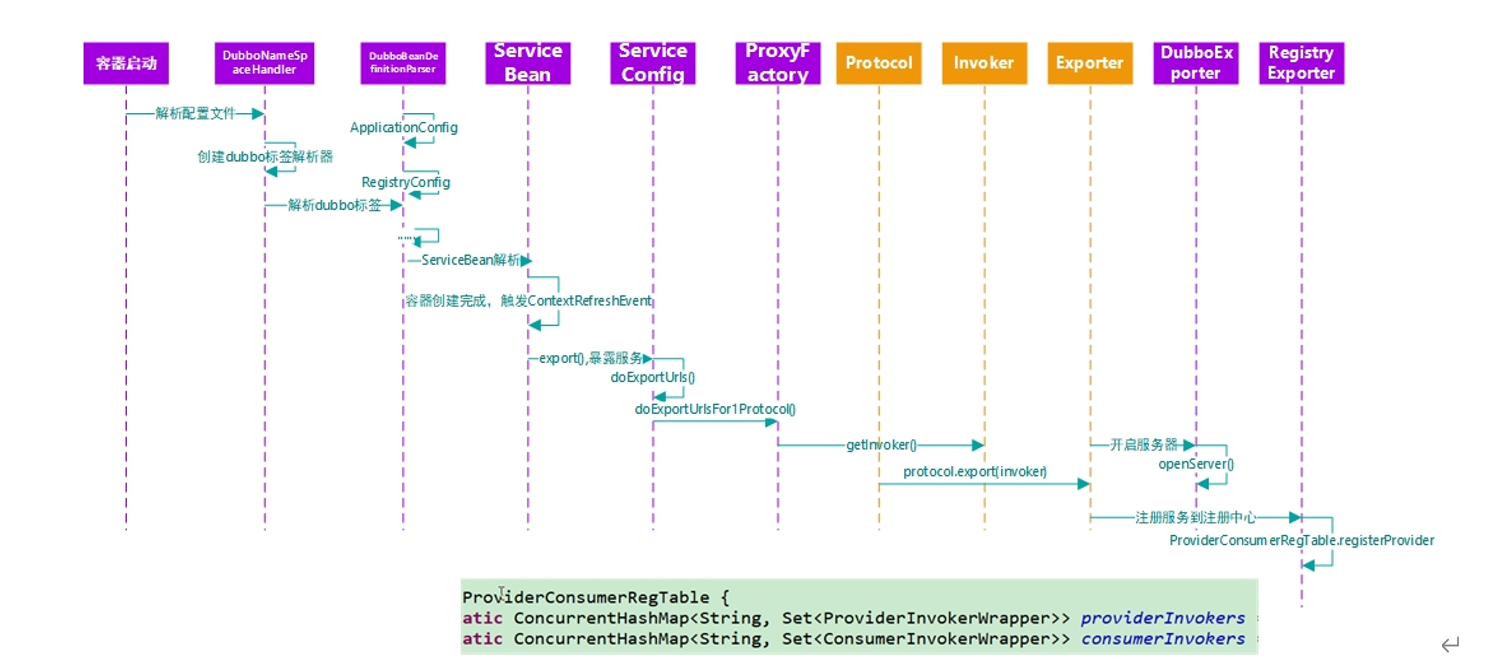
dubbo原理 - 服务暴露
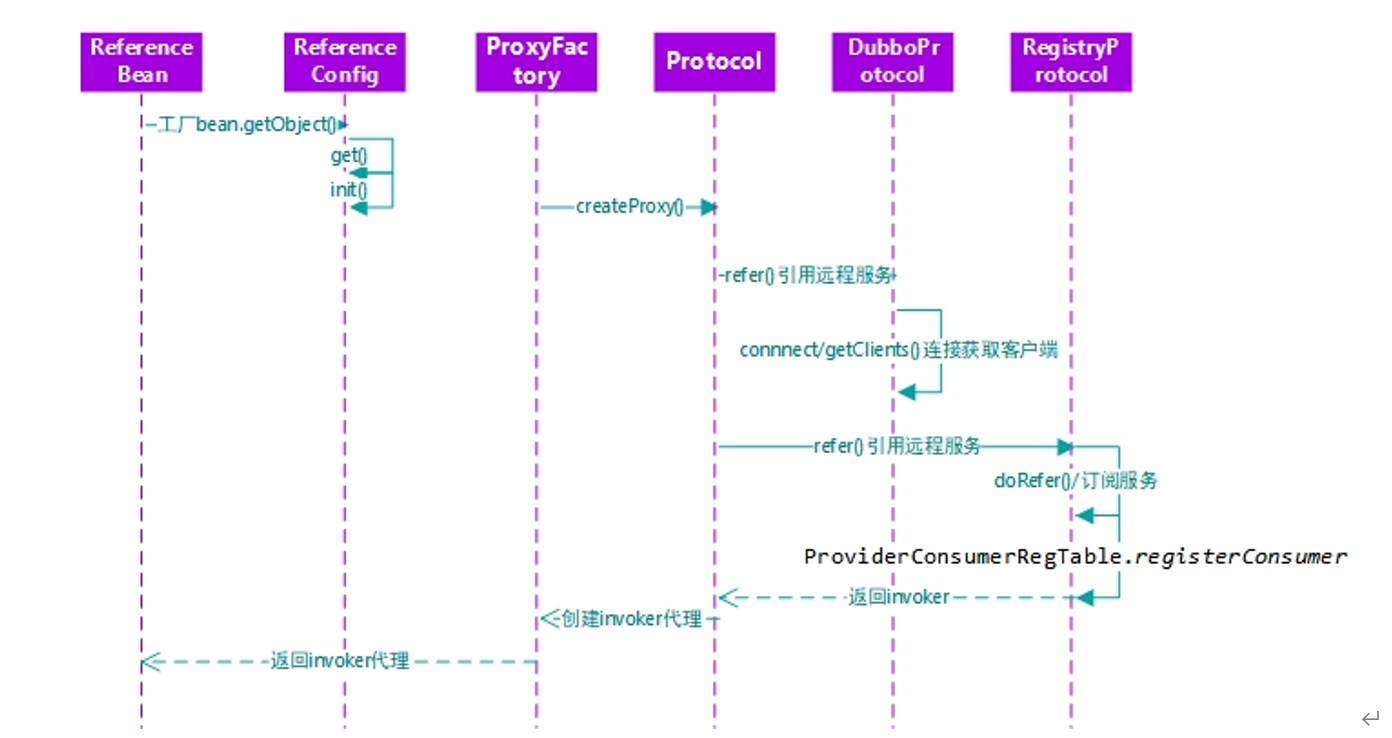
dubbo原理 - 服务引用
dubbo原理 - 服务调用


 微信
微信 支付宝
支付宝