一、SpringMvc概述
1、SpringMvc概述
一种轻量级的、基于 MVC 的 Web 层应用框架。偏前端而不是基于业务逻辑层。Spring框架的一个后续产品!
MVC:新的软件架构模式
M: Model,模型,封装和映射数据(javaBean)
V: View,视图,界面显示工作(.jsp)
C: Controller,控制器,控制整个网站的跳转逻辑(Servlet)
概述:
Spring 为展现层提供的基于 MVC 设计理念的优秀的 Web 框架,是目前最主流的MVC 框架之一
Spring3.0 后全面超越 Struts2,成为最优秀的 MVC 框架。
Spring MVC 通过一套 MVC 注解,让 POJO 成为处理请求的控制器,而无须实现任何接口。
支持 REST 风格的 URL 请求。
采用了松散耦合可插拔组件结构,比其他 MVC 框架更具扩展性和灵活性。
2、SpringMvc实现思想
看下图可知,SpringMvc将所有请求都交由Front Controller来进行控制处理!SpringMvc的核心部分就是前端控制器 !
3、第一个SpringMvc工程
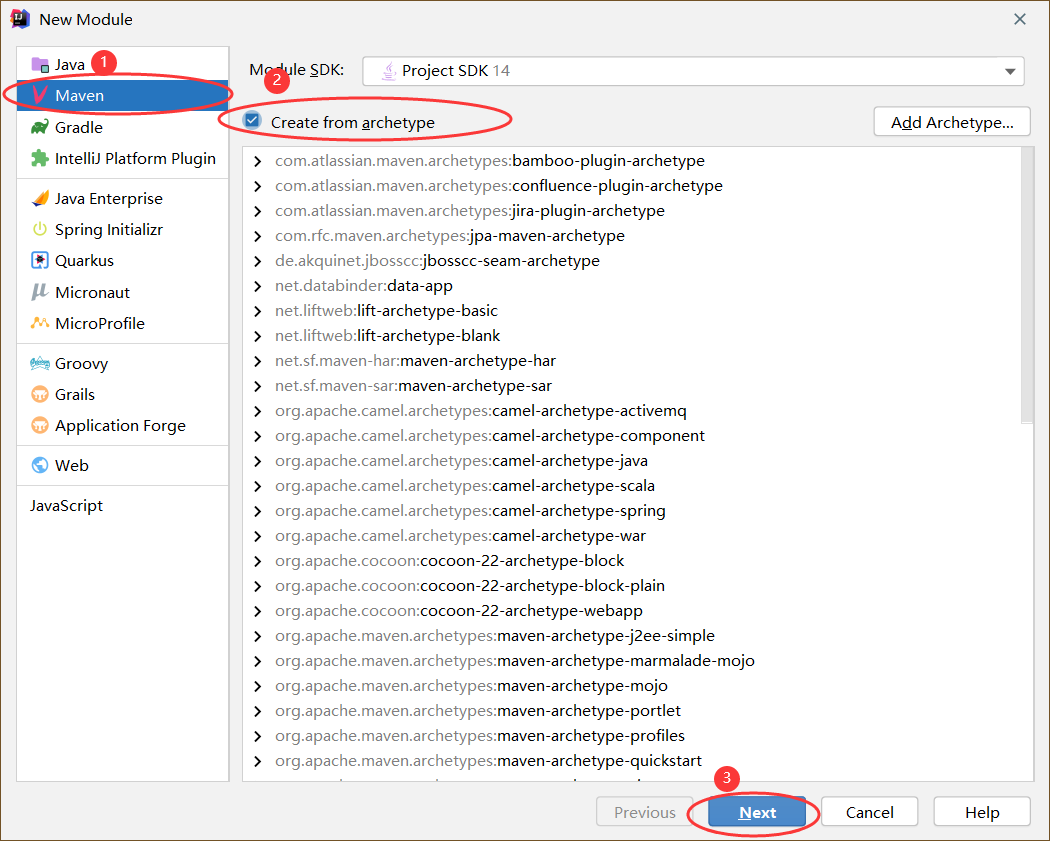
这里我将使用IDEA的Maven项目进行创建!
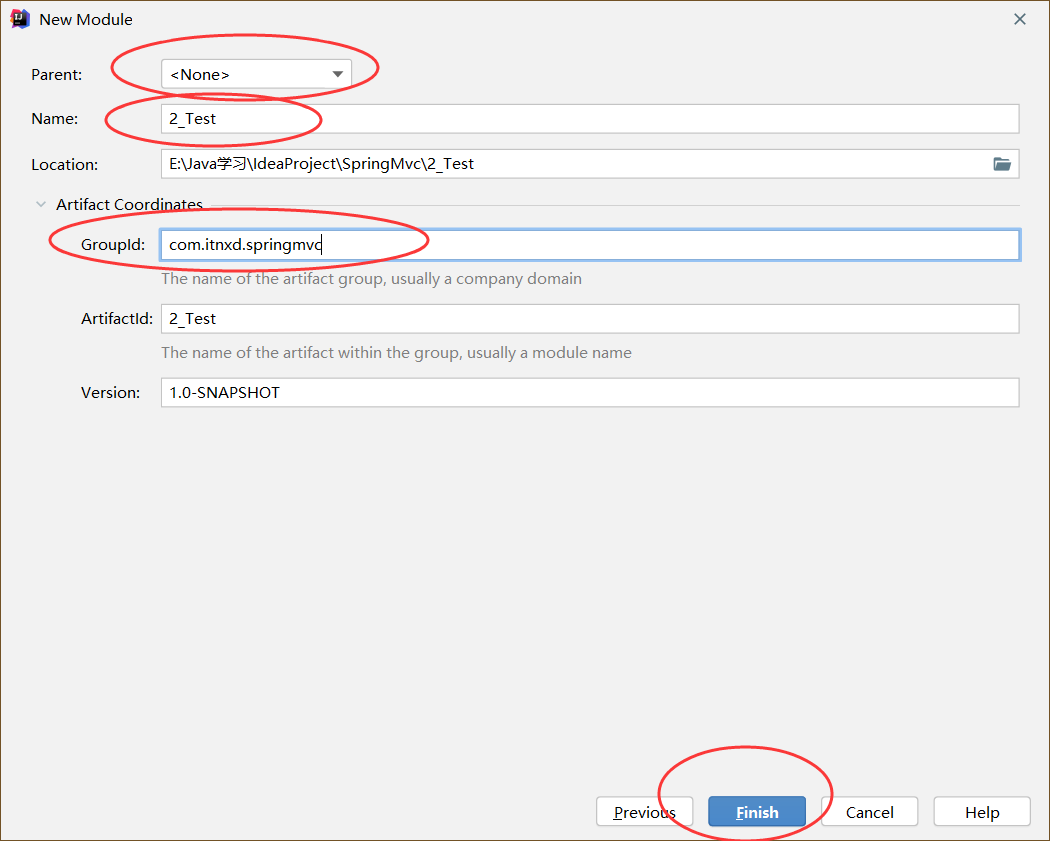
1、新建一个Maven模块
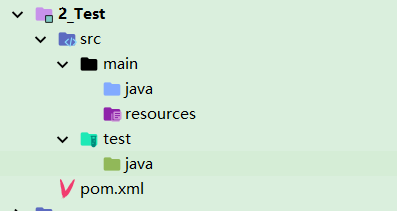
创建好的工程如图所示:
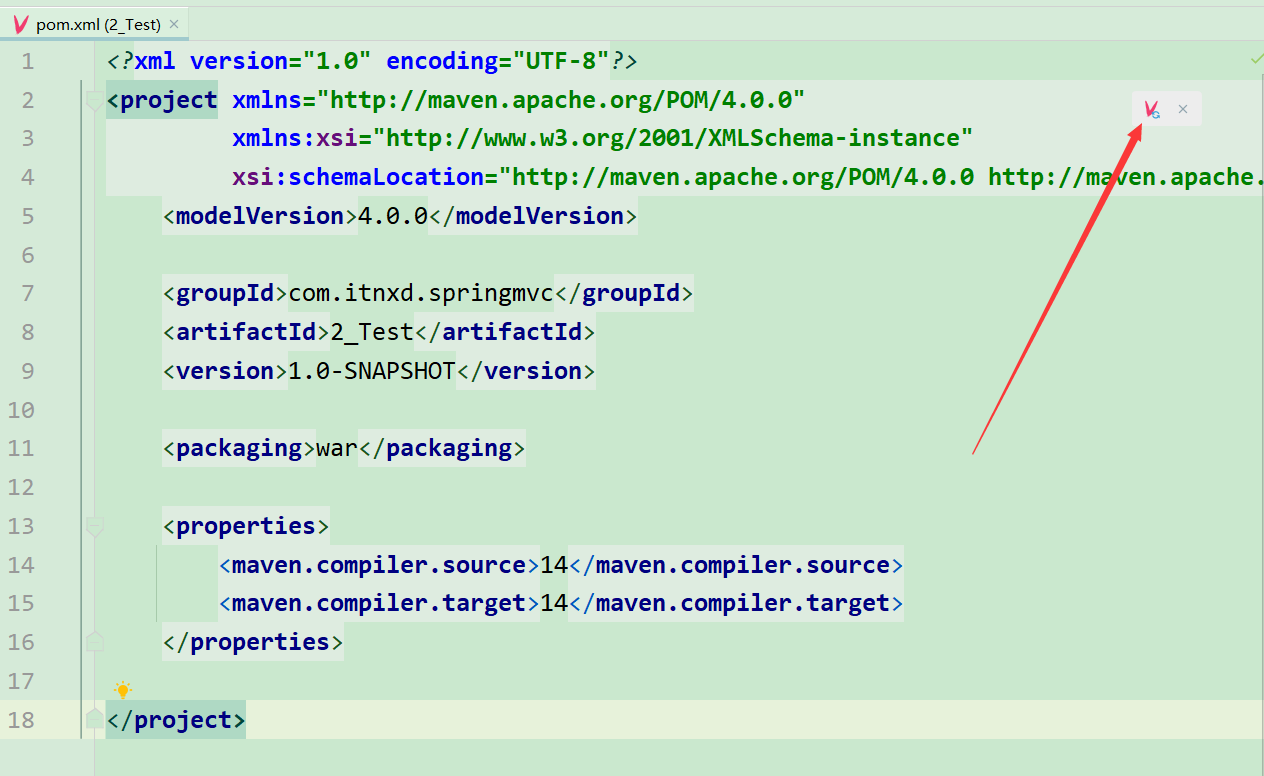
2、修改pom.xml
增加一行packaging标签,值为war,表示是一个web项目!
点击IDEA右上方的标志,更新Maven项目
1 2 3 4 5 6 <groupId > com.itnxd.springmvc</groupId > <artifactId > 2_Test</artifactId > <version > 1.0-SNAPSHOT</version > <packaging > war</packaging >
如下图:
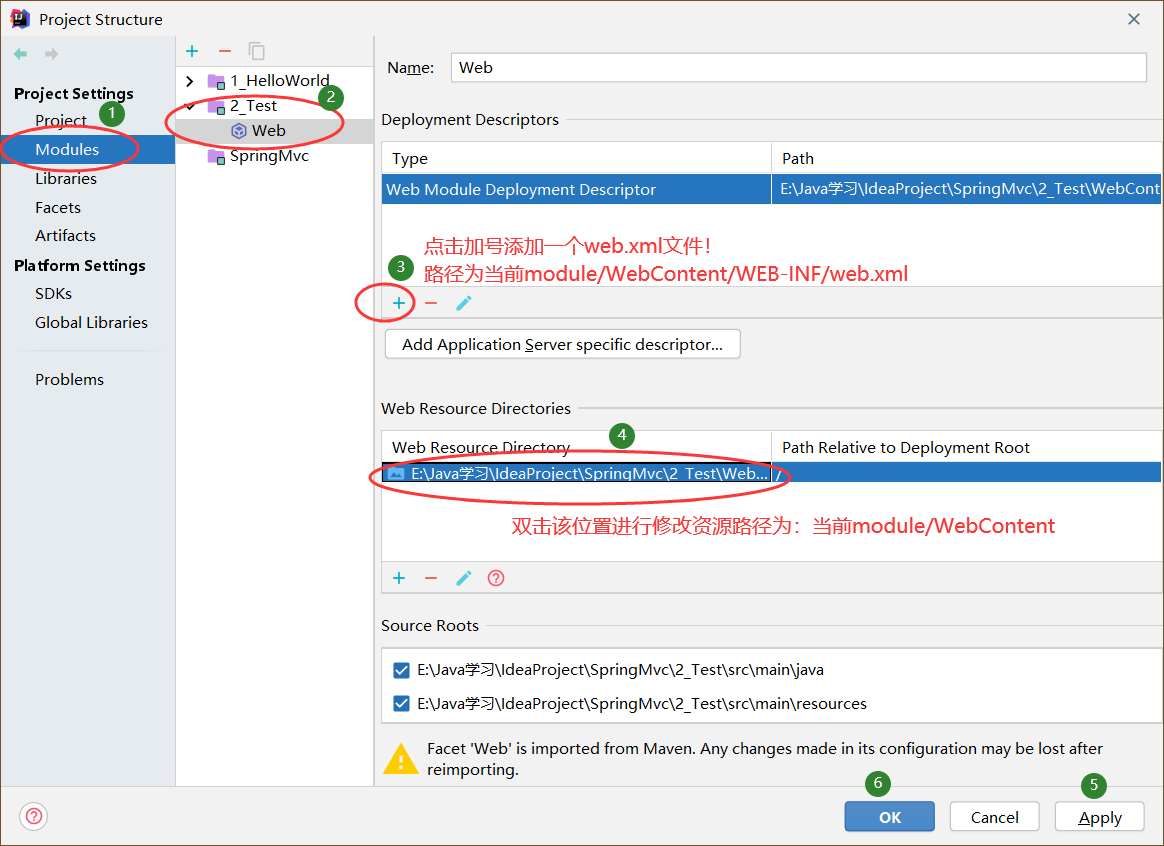
3、配置web.xml和web资源目录
点击Project Structure按钮
配置web.xml的路径并生成
配置web资源目录
我的路径如下:
WebContent目录名可以随意起,但一般都是这个名!放的位置可以随意放,但一般放到工程目录下较为方便!
1
2
3
E:\Java学习\IdeaProject\SpringMvc\2_Test\WebContent\WEB-INF\web.xml
步骤如下图:
建好的目录结构如下:
4、使用Maven导包
需要导入spring基础包和支持web的包!
使用自定义标签统一管理Spring包的版本!
pom.xml中配置如下:
配置完毕后点击右上角的Maven图标进行配置使用!
1
2
3
4
5
6
7
8
9
10
11
12
13
14
15
16
17
18
19
20
21
22
23
24
25
26
27
28
29
30
31
32
33
34
35
36
37
38
39
40
41
42
43
44
45
46
47
48
49
50
51
52
53
54
55
56
57
58
59
60
61
62
63
64
65
66
67
68
69
70
71
<?xml version="1.0" encoding="UTF-8"?> <project xmlns ="http://maven.apache.org/POM/4.0.0" xmlns:xsi ="http://www.w3.org/2001/XMLSchema-instance" xsi:schemaLocation ="http://maven.apache.org/POM/4.0.0 http://maven.apache.org/xsd/maven-4.0.0.xsd" > <modelVersion > 4.0.0</modelVersion > <groupId > com.itnxd.springmvc</groupId > <artifactId > 2_Test</artifactId > <version > 1.0-SNAPSHOT</version > <packaging > war</packaging > <properties > <maven.compiler.source > 14</maven.compiler.source > <maven.compiler.target > 14</maven.compiler.target > <spring.version > 5.3.5</spring.version > </properties > <dependencies > <dependency > <groupId > org.springframework</groupId > <artifactId > spring-core</artifactId > <version > ${spring.version}</version > </dependency > <dependency > <groupId > org.springframework</groupId > <artifactId > spring-context</artifactId > <version > ${spring.version}</version > </dependency > <dependency > <groupId > org.springframework</groupId > <artifactId > spring-aop</artifactId > <version > ${spring.version}</version > </dependency > <dependency > <groupId > org.springframework</groupId > <artifactId > spring-beans</artifactId > <version > ${spring.version}</version > </dependency > <dependency > <groupId > org.springframework</groupId > <artifactId > spring-expression</artifactId > <version > ${spring.version}</version > </dependency > <dependency > <groupId > org.springframework</groupId > <artifactId > spring-web</artifactId > <version > ${spring.version}</version > </dependency > <dependency > <groupId > org.springframework</groupId > <artifactId > spring-webmvc</artifactId > <version > ${spring.version}</version > </dependency > </dependencies > </project >
5、web.xml配置
在这里需要配置前端控制器DispatcherServlet,SpringMvc最核心的部分!能拦截所有请求,并智能派发!
关于前端控制器的拦截问题:
Tomcat也有一个web.xml文件,处理*.jsp是Tomcat做的事,所有项目的web.xml都是继承于Tomcat服务器的web.xml!
服务器的web.xml中有一个DefaultServlet是url-pattern=/,该配置服务于静态资源(除jsp和servlet外都是静态资源),静态资源在Tomcat中不会被拦截而是会去服务器去找该资源文件进行返回!
为何不可以访问静态资源 :我们的配置中前端控制器url-pattern=/,相当于项目的配置覆盖了服务器DefaultServlet的配置,静态资源会通过前端控制器去RequestMapping去找对应的资源名,若没有相应的请求映射,则直接会返回错误为何可以访问jsp :服务器的web.xml中有一个JspServlet,服务于jsp,不会进行拦截,而是去服务器去找到资源进行返回!我们并没有进行覆盖重写该配置,所以不会拦截jsp页面!
1
2
3
4
5
6
7
8
9
10
DefaultServlet是Tomcat中处理静态资源的?
SpringMvc配置文件问题:
在DispatcherServlet中需要告知前端控制器SpringMvc的配置文件地址!可以使用init-param标签进行指定,param-value值中的/代表的地址是web资源根目录即WebContent/。
SpringMvc配置文件若不进行配置,则默认去web资源根目录/WEB-INF/xxx-servlet.xml去找!其中xxx代表servlet-name表现的值!
一般,我们都将该配置文件放到WEB-INF下,并规范命名如上,即可省去该配置的书写!即如下部分可以省略!
1 2 3 4 5 6 7 <init-param > <param-name > contextConfigLocation</param-name > <param-value > /WEB-INF/springmvc-servlet.xml</param-value > </init-param >
完整配置:
1
2
3
4
5
6
7
8
9
10
11
12
13
14
15
16
17
18
19
20
21
22
23
24
25
26
27
28
29
30
31
32
33
34
35
36
37
38
<?xml version="1.0" encoding="UTF-8"?> <web-app xmlns ="http://xmlns.jcp.org/xml/ns/javaee" xmlns:xsi ="http://www.w3.org/2001/XMLSchema-instance" xsi:schemaLocation ="http://xmlns.jcp.org/xml/ns/javaee http://xmlns.jcp.org/xml/ns/javaee/web-app_4_0.xsd" version ="4.0" > <servlet > <servlet-name > springmvc</servlet-name > <servlet-class > org.springframework.web.servlet.DispatcherServlet</servlet-class > <load-on-startup > 1</load-on-startup > </servlet > <servlet-mapping > <servlet-name > springmvc</servlet-name > <url-pattern > /</url-pattern > </servlet-mapping > </web-app >
6、spingmvc-servlet.xml配置
开启组件扫描
可选:配置视图解析器来简化页面地址!
1
2
3
4
5
6
7
8
9
10
11
12
13
14
15
16
17
18
19
20
21
22
<?xml version="1.0" encoding="UTF-8"?> <beans xmlns ="http://www.springframework.org/schema/beans" xmlns:xsi ="http://www.w3.org/2001/XMLSchema-instance" xmlns:context ="http://www.springframework.org/schema/context" xsi:schemaLocation ="http://www.springframework.org/schema/beans http://www.springframework.org/schema/beans/spring-beans.xsd http://www.springframework.org/schema/context https://www.springframework.org/schema/context/spring-context.xsd" ><context:component-scan base-package ="com.itnxd" > </context:component-scan > <bean class ="org.springframework.web.servlet.view.InternalResourceViewResolver" > <property name ="prefix" value ="/WEB-INF/pages/" > </property > <property name ="suffix" value =".jsp" > </property > </bean > </beans >
7、第一个Controller程序
使用Controller注解表示创建对象,四个注解都可以,但Controller一般用于web层的servlet中!
使用RequestMapping注解表示处理请求hello,返回值就是请求转发的地址!
这里的地址可以由前面配置的视图解析器来简化,只需要简单的返回jsp文件名即可!
1
2
3
4
5
6
7
8
9
10
11
12
13
14
15
16
@Controller public class MyController @RequestMapping("/hello") public String myRequest () "请求已收到!" );return "success" ;
8、运行结果
访问工程名/hello即可拦截并处理请求,转发到WEB-INF下的success.jsp页面!
二、RequestMapping注解
指定可以处理那些请求!
DispatcherServlet 截获请求后,就通过控制器上 @RequestMapping 提供的映射信息确定请求所对应的处理方法。
1、使用位置
方法上:则请求地址为/handle01
类上:则请求地址为/hello/handle01,即多了一层
注意: RequestMapping的value值可以省略/,但不建议省略!
1
2
3
4
5
6
7
8
9
10
@RequestMapping("/hello") @Controller public class RequestMappingController @RequestMapping("/handle01") public String handle01 () "RequestMappingController.handle01()...." );return "success" ;
2、RequestMapping属性
value:默认属性,指定请求
method:限定请求方式,默认全接收,只支持POST,GET(表单只能发出这两种请求)
HTTP请求类型:GET, HEAD, POST, PUT, PATCH, DELETE, OPTIONS, TRACE
请求方式不匹配,会报错: HTTP状态 405 - 方法不允许
params:规定请求参数
params = {"param1"}:表示请求地址必须包含该参数,否则404params = {"!param1"}:表示请求地址必须不包含该参数,否则404params = {"param1 != value1"}:表示请求地址不带有该参数或者参数值不为value1,否则404params = {“param1=value1”, “param2” ...}:表示同时满足多个要求
headers:规定请求头,和params一样可写简单的表达式!(同上)
consumes:只接受内容类型为指定类型的请求,规定请求头中的Context-Type
produces:告诉浏览器返回的内容类型是什么,给响应头添加Context-Type
1 2 3 4 5 6 7 8 9 10 @RequestMapping(value = "/handle02", method = RequestMethod.POST) @RequestMapping(value = "/handle02", params = {"username"}) @RequestMapping(value = "/handle02", params = {"!username"}) @RequestMapping(value = "/handle02", params = {"username=aa"}) @RequestMapping(value = "/handle02", params = {"username!=aa"}) @RequestMapping(value = "/handle02", params = {"username=aa", "pwd", "!age"}) @RequestMapping(value = "/handle03", headers = {"User-Agent=Mozilla/5.0 (Windows NT 10.0; Win64; x64) AppleWebKit/537.36 (KHTML, like Gecko) Chrome/89.0.4389.90 Safari/537.36 Edg/89.0.774.57"})
3、RequestMapping模糊匹配
类似于正则表达式!
Ant 风格资源地址支持 3 种匹配符:
?:匹配任意一个字符*:匹配任意多个字符和一层路径**:匹配多层路径
注意 :多个匹配,精确匹配优先!*和**,*优先!
1 2 3 4 5 6 7 @RequestMapping("/ant01") @RequestMapping("/ant0?") @RequestMapping("/ant*") @RequestMapping("/a*/ant") @RequestMapping("/a/*/ant") @RequestMapping("/a/**/ant")
4、PathVariable注解
用来处理RequestMapping映射地址中的占位符!
通过 @PathVariable 可以将 URL 中占位符参数绑定到控制器处理方法的入参中!
URL 中的 {xxx} 占位符可以通过 @PathVariable(“xxx”) 绑定到操作方法的入参中!
占位符格式:{xx}
1
2
3
4
5
@RequestMapping("/user/{id}") public String PathVariableTest (@PathVariable("id") String id) return "success" ;
三、REST
1、概述
REST:即 Representational State Transfer。(资源)表现层状态转化。是目前最流行的一种互联网软件架构。
系统希望以非常简洁的URL地址来发请求,可以使用请求方式来区分:
GET查询
PUT更新
DELETE删除
POST添加
REST风格:/资源名/资源标识符
2、使用
由于表单只能发送GET和POST请求,所以需要有一定的方法让程序可以识别到我们发的不同请求!
Spring提供了对Rest风格的支持!
SpringMVC中有一个Filter,他可以把普通的请求转化为规定形式的请求,配置这个HiddenHttpMethodFilter
建一个post类型的表单,携带一个 _method参数,参数值写 DELETE,PUT
注意:
8.x版本的Tomcat无法使用这两个请求,9和10正常!
在jsp页面的上方添加isErrorPage="true",九大内置对象才会有exception对象!
表示jsp页面若有错则封装到异常内,不要直接不执行!转发的jsp页面也要添加!
在web.xml中配置:
1 2 3 4 5 6 7 8 9 10 <filter > <filter-name > HiddenHttpMethodFilter</filter-name > <filter-class > org.springframework.web.filter.HiddenHttpMethodFilter</filter-class > </filter > <filter-mapping > <filter-name > HiddenHttpMethodFilter</filter-name > <url-pattern > /*</url-pattern > </filter-mapping >
jsp页面:
1
2
3
4
5
6
7
8
9
10
11
12
13
14
15
<a href="book/1">查询图书</a><br>"book" method="post" >"submit" value="添加图书" >"book/1" method="post" >"hidden" name="_method" value="put" >"submit" value="修改图书" >"book/1" method="post" >"hidden" name="_method" value="delete" >"submit" value="删除图书" >
Controller程序:
1
2
3
4
5
6
7
8
9
10
11
12
13
14
15
16
17
18
19
20
21
22
23
24
@Controller public class BookController @RequestMapping(value = "/book/{id}", method = RequestMethod.GET) public String getBook (@PathVariable("id") Integer id) "查询到了" + id + "号图书!" );return "success" ;@RequestMapping(value = "/book", method = RequestMethod.POST) public String addBook () "添加了图书!" );return "success" ;@RequestMapping(value = "/book/{id}", method = RequestMethod.DELETE) public String deleteBook (@PathVariable("id") Integer id) "删除了" + id + "号图书!" );return "success" ;@RequestMapping(value = "/book/{id}", method = RequestMethod.PUT) public String updateBook (@PathVariable("id") Integer id) "修改了" + id + "号图书!" );return "success" ;
外部新增一个表单
通过JS更改该表单的action的值,并进行提交即可!
1 2 3 4 5 6 7 8 9 10 11 12 13 14 15 16 17 18 19 20 21 22 23 24 25 26 27 <td>"${ctp}/emp/${emp.id}" method="post" >"hidden" name="_method" value="delete" >"submit" value="Delete" >"deleteForm" action="" method="post" >"hidden" name="_method" value="DELETE" />".deleteBtn" ).click(function (){"#deleteForm" ).attr("action" , this .href);"#deleteForm" ).submit();return false ;
四、处理请求数据
1、RequestParam 注解
用来获取请求参数!
入参和请求参数名一样可以自动获取(请求地址没有该参数则为null,该参数=后不写则为空串)
可以使用@RequsetParam注解来获取请求参数,使用该注解则请求地址必须携带该参数,否则400
属性:
value:指定获取参数的key
default:设置默认value值
required:是否必须带该参数(默认为true)
@PathVariable 和 @RequestParam 区分:
@PathVariable:获取路径占位符(?号前的占位符)
@RequestParam:获取请求参数(?后后的参数)
1
2
3
4
5
6
@RequestMapping("/nxd") public String handle01 (@RequestParam("user") String user) return "success" ;
获取请求头重某个参数的值!
注意 :若没有该参数则报错500
属性:
1
2
3
4
5
@RequestMapping("/nxd") public String handle01 (@RequestHeader("User-Agent") String userAgent) return "success" ;
3、CookieValue 注解
获取某个cookie值!
属性:
1
2
3
4
5
@RequestMapping("/nxd") public String handle01 (@CookieValue("JSESSIONID") String cookie) return "success" ;
4、使用 JavaBean作为参数
如果我们的请求参数是一个JavaBean,SpringMVC会自动的为这个JavaBean进行赋值!
从request参数中尝试获取出来,并封装为JavaBean对象
还可以级联赋值(套娃操作,JavaBean中有JavaBean)
自然:想要成功赋值,最好保证属性名一致!
Controller:
1
2
3
4
5
@RequestMapping("/addBook") public String addBook (Book book) return "success" ;
jsp页面:
注意:级联嵌套操作,嵌套的类需要使用类名首字母小写.属性作为name属性!
1
2
3
4
5
6
7
8
9
10
11
12
<form action="addBook" method="post" >"text" name="bookName" ><br>"text" name="author" ><br>"text" name="price" ><br>"text" name="stock" ><br>"text" name="sales" ><br>"text" name="address.province" ><br>"text" name="address.city" ><br>"submit" >
Book类: Book中有Address!
1
2
3
4
5
6
7
8
9
10
11
public class Book private String bookName;private String author;private Double price;private Integer stock;private Integer sales;private Address address;
Address类:
1
2
3
4
5
6
public class Address private String province;private String city;
解决中文乱码 :上面的测试在有中文情况下会发生乱乱,无法正确封装为JavaBean对象!
解决方案:请查看下一小节!
5、SpringMvc解决请求响应乱码
请求乱码:
响应乱码:
注意 :该处理编码的filter一定要配置在其他filter的最前面,否则请求将会被前面的filter拦截!导致无法生效!
建议:
使用SpringMVC前端控制器写完就直接写字符编码过滤器
Tomcat一装上,上手就是server.xml的8080处添加URIEncoding="UTF-8"(实测这个GET请求乱码无需处理)
web.xml:
SpringMvc的处理编码的Filter:CharacterEncodingFilter,可以点进去看这个类的属性,有三个属性:
encoding:编码格式
forceRequestEncoding:强制设置请求编码为encoding的值
forceResponseEncoding:强制设置响应编码为encoding的值,但这里并没有设置文件类型,可以在使用的地方进行设置
1 2 3 4 5 6 7 8 9 10 11 12 13 14 15 16 17 18 19 20 21 22 23 24 25 26 27 <filter > <filter-name > CharacterEncodingFilter</filter-name > <filter-class > org.springframework.web.filter.CharacterEncodingFilter</filter-class > <init-param > <param-name > encoding</param-name > <param-value > UTF-8</param-value > </init-param > <init-param > <param-name > forceRequestEncoding</param-name > <param-value > true</param-value > </init-param > <init-param > <param-name > forceResponseEncoding</param-name > <param-value > true</param-value > </init-param > </filter > <filter-mapping > <filter-name > CharacterEncodingFilter</filter-name > <url-pattern > /*</url-pattern > </filter-mapping >
5、使用 Servlet 原生 API 作为参数
SpringMVC可以直接在参数上写原生API
pom.xml中添加servlet-api:
1 2 3 4 5 <dependency > <groupId > javax.servlet</groupId > <artifactId > javax.servlet-api</artifactId > <version > 4.0.1</version > </dependency >
这些类使用需要导入Servlet-api
九大原生API:
HttpServletRequest
HttpServletResponse
HttpSession
java.security.Principal:https安全协议相关
Locale:国际化相关
InputStream:字节流
OutputStream:字节流
Reader:字符流
Writer:字符流
1
2
3
4
5
6
7
8
9
10
11
12
13
@RequestMapping("/handle02") public String handle02 (HttpSession session, HttpServletRequest request, HttpServletResponse response) "requestParam" , "reqScope" );"sessionParam" , "SessScope" );return "success" ;
五、处理响应数据
SpringMvc提供了几种途径输出模型数据!
1、ModelAndView
处理方法返回值类型为 ModelAndView 时, 方法体可通过该对象添加模型数据!
(返回值)ModelAndView:既可传递数据又可去到相应页面!用在返回值类型!
数据放在是request域中!
1
2
3
4
5
6
7
8
9
10
@RequestMapping("/hh04") public ModelAndView handle04 () new ModelAndView();"success" );"msg" , "你好!" );return mav;
2、Map和Model
入参为 org.springframework.ui.Model、org.springframework.ui.ModelMap 或 java.uti.Map 时,处理方法返回时,Map 中的数据会自动添加到模型中。
(传参)可以在方法处传入Map、或者Model或者ModelMap。给这些参数里面保存的所有数据都会放在域中。
Map、Model、ModelMap:
三者都是request域!
三者具体类都是:BindingAwareModelMap
只要是BindingAwareModelMap,就会保存到request域中!
关系:
1
2
3
4
5
6
7
8
9
10
11
12
13
14
15
16
17
18
@RequestMapping("/hh02") public String handle02 (Model model) "msg" , "你好" );return "success" ;@RequestMapping("/hh03") public String handle03 (ModelMap modelMap) "msg" , "你好" );return "success" ;@RequestMapping("/hh04") public String handle04 (Map<String, Object> map) "msg" , "你好" );return "success" ;
3、ModelAttribute 注解
方法入参标注该注解后, 入参的对象就会放到数据模型中!
以前用于和hibernate结合使用,现在都是mybatis,几乎不用了!
使用该注解的方法会提前于处理请求程序之前运行!
实际场景应用场景:
并不是全字段修改,只会修改部分字段!
不修改的字段可以在页面进行展示但是不要提供修改输入框,为了简单,Controller直接在参数位置来写Book对象,SpringMVC为我们自动封装book,(没有带的值是nul1),如果接下来调用了一个全字段更新的dao操作,会将其他的字段可能变为null。
解决方法:
通过判断是否为空进行sql拼串来实现动态sql!太麻烦
另一个方法:(依赖于@ModelAttribute注解)
让SpringMVC别创建book对象,直接从数据库中取出对应id的数据
使用刚才从数据库取出的book对象,给它的里面设置值,(非null的进行设置,否则不进行设置)
将之前从数据库查到的对象,并且封装了请求参数的对象进行保存即可!
@ModelAttribute:
参数位置:目标方法入参前添加该注解获取提前方法的保存的对象
方法位置:这个方法就会提前于目标方法先运行(即标了该注解的方法会先执行),并把方法的运行结果放在隐含模型 中!
该方法提前运行,则我们可以提前从数据库中查询出该对象!
将该对象保存起来
告诉SpringMvc不要new了,使用这里从数据库查询到的book
使用注解@ModelAttribute,在入参前添加即可!
存入隐含模型会使用一个key值:
如果@ModelAttribute注解指定value值,则该value值作为key
否则返回值类型首字母小写作为key值(Book类型,则key值为book)
注意:
两个方法中的map和model是同一个对象!
两个方法中的book也是同一个对象!
jsp页面:
1
2
3
4
5
6
7
8
9
<form action="hhh01" method="post" >"text" name="author" ><br>"text" name="price" ><br>"text" name="stock" ><br>"text" name="sales" ><br>"submit" >
Controller:
提前执行:
1
2
3
4
5
6
7
8
9
10
@ModelAttribute public Book ModelAttributeTest (Map<String, Object> map) new Book(1 , "dd" , "dd" , 33.22 , 33 , 33 );"hh" , book);"book" , book);"数据库中的book:" + book);"ModelAttribute...数据库查完并进行了保存!" );return book;
目标方法:
1
2
3
4
5
@RequestMapping("/hhh01") public String updateBook (@ModelAttribute("book") Book book, Model model) return "success" ;
总结 :实际操作中,一般不使用ModelAttribute注解传key或返回值传key,大多都是使用Map进行put操作,更加方便,可以处理多个数据!
4、SessionAttributes 注解(了解)
将模型中的某个属性暂存到 HttpSession 中,以便多个请求之间可以共享这个属性!
SpringMVC提供了一种可以临时给Session域中保存数据的方式,使用一个注解@SessionAttributes,该注解只能标在类上
属性:
建议:
后来推荐@SessionAttributes就别用了,可能会引发异常
给session中放数据请使用原生API
该注解最好不要使用:
为了避免可能引发的异常,若要使用,需要保证两点
要么隐含模型中有@sessionAttributes标注的属性
如果隐含模型中有,session还说有就一定要有。否则抛异常!
1
2
3
4
5
@SessionAttributes(value = {"msg", "hh"}, types = {String.class}) @Controller public class OutputController
5、通过分析源码得到几种情况
验证自定义类型参数book的赋值情况!
ModelAttribute注解有value,则隐含模型通过该value值获取隐含模型中的key获取,标注ModelAttribute注解的提前执行方法中的map.put操作就是放到隐含模型的操作!
1
2
3
4
5
6
7
8
9
10
11
12
13
14
@RequestMapping("/hhh01") public String updateBook (@ModelAttribute("hh") Book book) return "success" ;@ModelAttribute public void ModelAttributeTest (Map<String, Object> map) new Book(1 , "dd" , "dd" , 33.22 , 33 , 33 );"hh" , book);"数据库中的book:" + book);"ModelAttribute...数据库查完并进行了保存!" );
没有ModelAttribute注解,则隐含模型使用参数类型Book首字母小写作为key获取,本情况:不写注解,可以让map.put("book", book);即默认使用参数类名首字母小写去隐含模型中去找!
1
2
3
4
5
6
7
8
9
10
11
12
13
14
@RequestMapping("/hhh01") public String updateBook (Book book) return "success" ;@ModelAttribute public void ModelAttributeTest (Map<String, Object> map) new Book(1 , "dd" , "dd" , 33.22 , 33 , 33 );"book" , book);"数据库中的book:" + book);"ModelAttribute...数据库查完并进行了保存!" );
隐含模型找不到,则去SessionAttributes注解中获取value值作为key,从session中获取,本情况:保证ModelAttribute注解中不与隐含模型对应即可
类上不添加SessionAttributes注解,由于找不到,会利用反射进行创建一个空对象
很明显,隐含模型中找不到,Session中找不到,则报错500!直接无法访问!(我们并没有在Session中添加该对象)
类似承诺session中有,结果没有,报错500,所以该SessionAttributes注解一般不要使用!
1
2
3
4
5
6
7
8
9
10
11
12
13
14
15
16
17
18
@SessionAttributes(value = "hh") @Controller public class ModelAttributeController @RequestMapping("/hhh01") public String updateBook ((@ModelAttribute("hh") Book book) return "success" ;@ModelAttribute public void ModelAttributeTest (Map<String, Object> map) new Book(1 , "dd" , "dd" , 33.22 , 33 , 33 );"book" , book);"数据库中的book:" + book);"ModelAttribute...数据库查完并进行了保存!" );
ModelAttribute注解的方法一个特性,方法返回值也会放入隐含模型
因此可以修改该提前方法返回值为Book,并返回该对象即可,无需map.put,默认key值为返回值类型小写即为book
我们可以使用@ModelAttribute("返回类型小写book")来接收
我们想自定义接收@ModelAttribute("自定义key, hh"),则只需要在ModelAttribute注解方法的注解@ModelAttribute添加value属性值为自定义key即可
1
2
3
4
5
6
7
8
9
10
11
12
13
14
15
16
17
18
19
20
21
22
23
24
25
26
27
28
@RequestMapping("/hhh01") public String updateBook ((@ModelAttribute("book") Book book) return "success" ;@ModelAttribute public Book ModelAttributeTest (Map<String, Object> map) new Book(1 , "dd" , "dd" , 33.22 , 33 , 33 );"数据库中的book:" + book);"ModelAttribute...数据库查完并进行了保存!" );return book;@RequestMapping("/hhh01") public String updateBook ((@ModelAttribute("hh") Book book) return "success" ;@ModelAttribute(value = "hh") public Book ModelAttributeTest (Map<String, Object> map) new Book(1 , "dd" , "dd" , 33.22 , 33 , 33 );"数据库中的book:" + book);"ModelAttribute...数据库查完并进行了保存!" );return book;
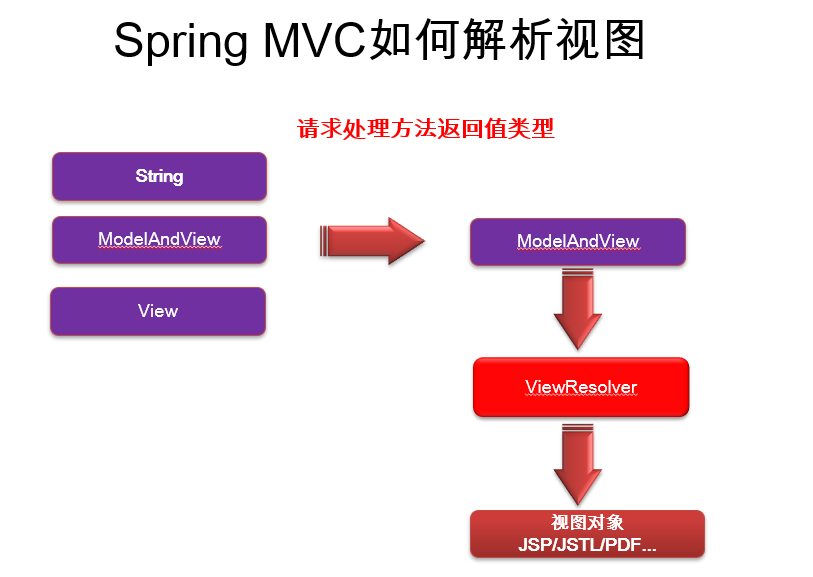
六、视图解析
请求处理方法执行完成后,最终返回一个 ModelAndView 对象。对于那些返回 String,View 或 ModeMap 等类型的处理方法,Spring MVC 也会在内部将它们装配成一个ModelAndView 对象,它包含了逻辑名和模型对象的视图
Spring MVC 借助视图解析器(ViewResolver)得到最终的视图对象(View),最终的视图可以是 JSP ,也可能是 Excel、JFreeChart 等各种表现形式的视图
对于最终究竟采取何种视图对象对模型数据进行渲染,处理器并不关心,处理器工作重点聚焦在生产模型数据的工作上,从而实现 MVC 的充分解耦
视图解析器ViewResolver只是为了得到视图对象,视图对象View才能真正的转发(将模型数据全部放在请求域中)或者重定向到页面视图对象才能真正的渲染视图。
1、视图
1.1、常用的视图实现类
视图的作用是渲染模型数据,将模型里的数据以某种形式呈现给客户。
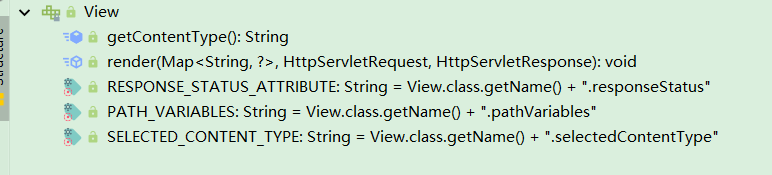
为了实现视图模型和具体实现技术的解耦,Spring 在 org.springframework.web.servlet包中定义了一个高度抽象的 View 接口:
视图对象由视图解析器负责实例化 。由于视图是无状态 的,所以他们不会有线程安全 的问题
无状态 :上一次和下一次没有关系,下一次不会是哟红上一次的东西!
View接口:
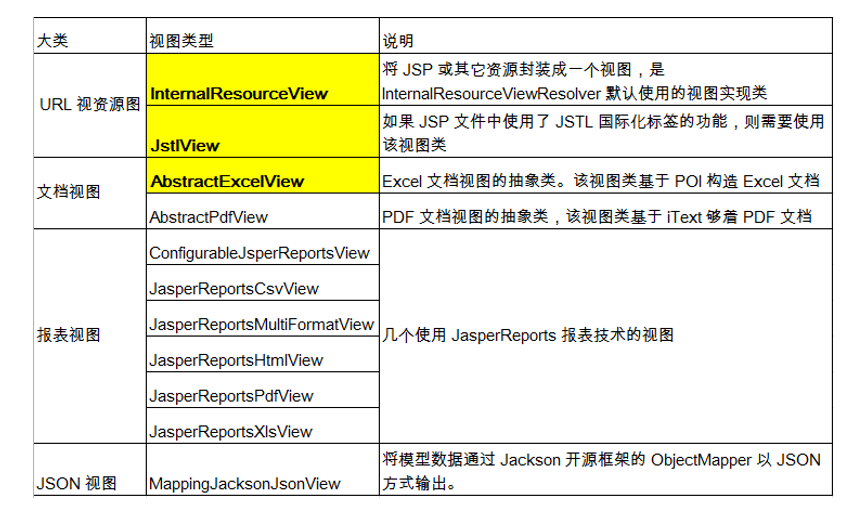
常用视图实现类:
1.2、JstlView
可以快速方便的实现国际化功能!
不使用SpringMvc的步骤略有复杂:纯i18n国际化配置步骤,学习JavaWeb写的记录!点击这里!
导包导入jstl的依赖包
配置JstlView视图类型
创建资源文件并让SpringMvc管理国际化资源文件
使用<fmt:message key="关键词"></fmt:message>即可
注意:
一定要过SpringMvc的视图解析流程,人家会创建一个JstlView帮你快速国际化
需要经过Controller的处理才可!直接访问无效
从源码分析createView方法可以知道,带上前缀redirect和forward之后就走对应的方法不会带有区域信息locale,但不带使用默认的就会携带该locale信息!也不能使用前缀!
直接访问的效果:???welcome???您的光临!
pom.xml导包:
1 2 3 4 5 6 7 8 9 10 11 12 13 14 15 16 17 18 <dependency > <groupId > javax.servlet.jsp.jstl</groupId > <artifactId > jstl</artifactId > <version > 1.2</version > </dependency > <dependency > <groupId > javax.servlet.jsp.jstl</groupId > <artifactId > jstl-api</artifactId > <version > 1.2</version > </dependency > <dependency > <groupId > org.glassfish.web</groupId > <artifactId > jstl-impl</artifactId > <version > 1.2</version > </dependency >
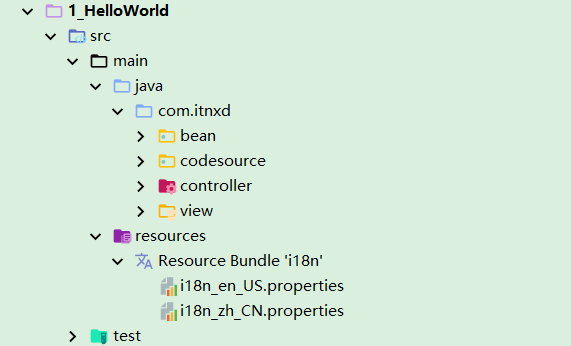
创建国际化资源文件:
对于Maven项目来说,直接放到resource目录下即可!
springmvc-servlet.xml配置:
1 2 3 4 5 6 7 8 9 10 11 12 13 14 15 16 17 18 19 20 <bean class ="org.springframework.web.servlet.view.InternalResourceViewResolver" > <property name ="prefix" value ="/WEB-INF/pages/" > </property > <property name ="suffix" value =".jsp" > </property > <property name ="viewClass" value ="org.springframework.web.servlet.view.JstlView" > </property > </bean > <bean id ="messageSource" class ="org.springframework.context.support.ResourceBundleMessageSource" > <property name ="basename" value ="i18n" > </property > </bean >
jsp页面使用:
IDE会自动导入fmt标签的!
1
2
3
4
5
6
7
8
9
10
11
12
<%@ taglib prefix="fmt" uri="http://java.sun.com/jsp/jstl/fmt" %>"text/html;charset=UTF-8" language="java" %>"welcome" />您的光临!
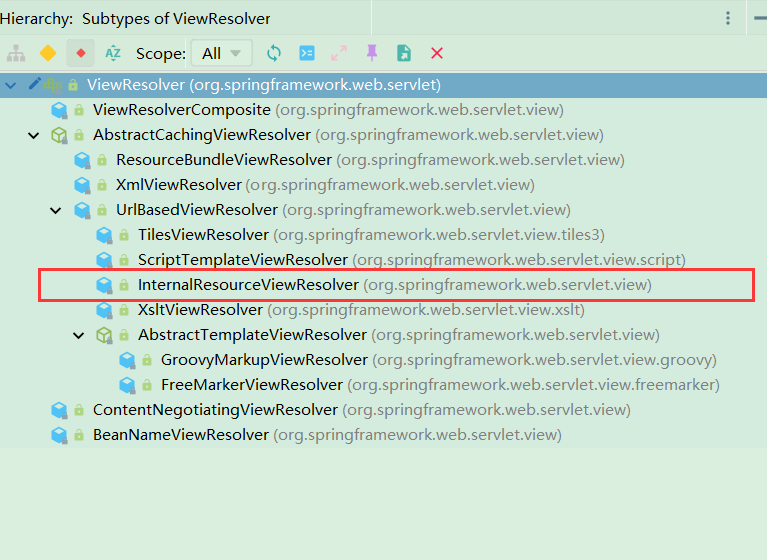
2、视图解析器
SpringMVC 为逻辑视图名的解析提供了不同的策略,可以在 Spring WEB 上下文中配置一种或多种解析策略,并指定他们之间的先后顺序。每一种映射策略对应一个具体的视图解析器实现类。
视图解析器的作用比较单一:将逻辑视图解析为一个具体的视图对象。
所有的视图解析器都必须实现 ViewResolver 接口
ViewResolver 接口:
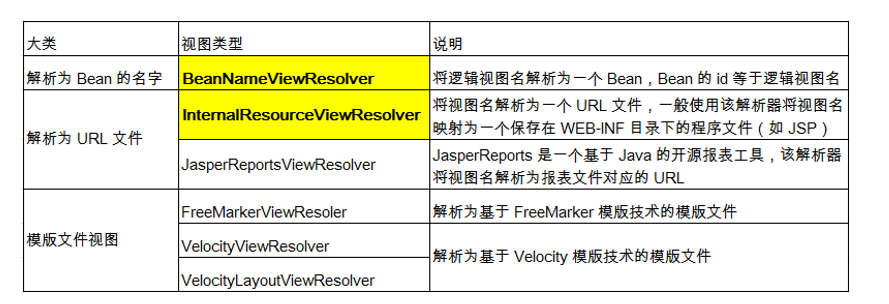
常用的视图解析器实现类:
程序员可以选择一种视图解析器或混用多种视图解析器
每个视图解析器都实现了Ordered接口并开放出一个order属性,可以通过 order 属性指定解析器的优先顺序,order 越小优先级越高 。
SpringMVC会按视图解析器顺序的优先顺序对逻辑视图名进行解析,直到解析成功并返回视图对象,否则将抛出ServletException异常
3、请求转发和重定向
有前缀的转发和重定向操作,视图解析器不生效!
3.1、forward
需求 :转发到WebContent目录下的redirect.jsp页面
使用两层../让浏览器根据地址回退到工程根目录去找对应文件
使用SpringMvc的forward前缀
forward:
转发到目标页面,不参与拼串,独立解析
注意 :一定要加 /,表示WebContent路径,即工程根路径,不加/则是相对路径,易出问题支持套娃操作,如下方第三个方法
1
2
3
4
5
6
7
8
9
10
11
12
13
14
15
16
17
18
19
@RequestMapping(value = "/nb01") public String handler01 () return "../../redirect" ;@RequestMapping(value = "/nb02") public String handler02 () return "forward:/redirect.jsp" ;@RequestMapping(value = "/nb03") public String handler03 () return "forward:/nb02" ;
3.2、redirect
redirect:
/表示WebContent资源根目录与原生Servlet重定向不同,SpringMvc会自动进行拼串,无需写项目路径
同样支持套娃操作
1
2
3
4
5
6
7
8
9
10
@RequestMapping(value = "/nb04") public String handler04 () return "redirect:/redirect.jsp" ;@RequestMapping(value = "/nb05") public String handler05 () return "redirect:/nb04" ;
3.3、mvc标签
对于前两个小结方法内只有一个作用,请求转发或重定向,则我们可以更简洁的使用配置文件mvc标签实现!
springmvc-servlet.xml文件:
<mvc:view-controller path="/xxx" view-name="xxx"/>
path:指定哪个请求
view-name:指定映射给哪个视图,即转发地址
/开头的,同样经过上面视图解析器的拼串forward或redirect开头的,同样不会经过上面视图解析器拼串
这样写同样保证可以走SpringMvc的整个流程,经过了Controller控制器处理,可以使用国际化,同样forward或redirect开头的无法使用国际化!
副作用 :其他请求将全部失效,无法访问!解决 :开启mvc注解驱动模式(之后的内容同样会用到该模式,是mvc的开挂模式,高配运行)
1 2 3 4 5 <mvc:view-controller path ="/welcome01" view-name ="welcome" /> <mvc:view-controller path ="/welcome02" view-name ="forward:/WEB-INF/pages/welcome.jsp" /> <mvc:annotation-driven > </mvc:annotation-driven >
4、自定义视图和视图解析器
4.1、自定义前缀
1
2
3
4
5
6
7
8
9
10
11
12
13
@RequestMapping("/download") public String download (Model model) new ArrayList<>();"一些内容" );"一些内容" );"vname" , vname);return "itnxd:/success" ;
4.1、自定义视图
实现View接口和重写渲染render方法!
视图用于渲染页面!处理逻辑都在render方法内!
渲染的页面无法正确显示中文:
由于我们在前方使用SpringMvc配置乱码的编码问题时候,只是设置了响应的编码格式,并没有设置文件类型!因此在实现逻辑之前先response.setContentType("text/html");
1
2
3
4
5
6
7
8
9
10
11
12
13
14
15
16
17
18
19
20
21
22
23
24
25
26
27
28
29
30
31
32
33
34
35
36
37
public class MyItnxdView implements View @Override public void render (Map<String, ?> model, HttpServletRequest request, HttpServletResponse response) throws Exception "model信息:" + model);"text/html" );"vname" );"即将展现精彩内容!<br>" );for (String s : vname) {"<a href='#'>下载" + s + ".avi</a><br>" );@Override public String getContentType () return "text/html; charset=utf-8" ;
4.2、自定义视图解析器
实现ViewResolver接口重写resolveViewName方法!
实现Ordered重写getOrder方法,使得SpringMvc可以获取到多个视图解析器的优先级顺序!
增加setOrder方法,使得可以在配置文件中进行设置优先级!
1
2
3
4
5
6
7
8
9
10
11
12
13
14
15
16
17
18
19
20
21
22
23
24
25
26
27
public class MyItnxdViewResolver implements ViewResolver , Ordered private Integer order;@Override public View resolveViewName (String viewName, Locale locale) throws Exception if (viewName.startsWith("itnxd:" )){return new MyItnxdView();return null ;@Override public int getOrder () return order;public void setOrder (Integer order) this .order = order;
springmvc-servlet.xml文件配置自定义视图解析器和优先级:
并进行设置Order参数!
InternalResourceViewResolver优先级默认值为Integer.MAX_VALUE,即优先级最低!
不设置优先级会导致被InternalResourceViewResolver进行拼串导致页面地址错误!
1 2 3 4 5 6 7 8 9 10 11 12 <bean class ="com.itnxd.view.MyItnxdViewResolver" > <property name ="order" value ="1" > </property > </bean >
七、SpringMvc表单标签
通过 SpringMVC 的表单标签可以实现将模型数据中的属性和 HTML 表单元素相绑定,以实现表单数据更便捷编辑和表单值的回显 ,SpringMVC认为,表单数据中的每一项最终都是要回显的!
path属性:
path指定的是一个属性,这个属性是从隐含模型(请求域中取出的某个对象中的属性)﹔
path指定的每一个属性,请求域中必须有一个对象,拥有这个属性
这个对象就是请求域中的command 表单字段,对应 html 元素的 name 属性,支持级联属性,自动回显隐含模型中的某个对象与之对应的属性值
modelAttribute属性:
以前我们表单标签会从请求域中获取一个command 对象,把这个对象中的每一个属性对应的显示出来
可以告诉SpringMVC不要去取command的值了,放了一个modelAttribute指定的值
取对象用的key就用我modelAttribute指定的
form标签:
一般情况下,通过 GET 请求获取表单页面,而通过 POST 请求提交表单页面,因此获取表单页面和提交表单页面的 URL 是相同的。
只要满足该最佳条件的契约,<form:form> 标签就无需通过 action 属性指定表单提交的 URL
可以通过 modelAttribute 属性指定绑定的模型属性,若没有指定该属性,则默认从 request 域对象中读取 command 的表单 bean,如果该属性值也不存在,则会发生错误。
form:errors: 显示表单组件或数据校验所对应的错误
<form:errors path="*"/>:显示表单所有的错误**<form:errors path="user*"/>:显示所有以 user 为前缀的属性对应的错误
<form:errors path="username"/>:显示特定表单对象属性的错误
form:select: 用于构造下拉框组件
items:指定要遍历的集合,自动遍历,可以是一个 List、String[] 或 Map
itemValue:指定刚才遍历出来的这个对象的哪个属性是作为要提交的value值,可以是集合中 bean 的一个属性值
itemLabel:指定遍历出的这个对象的哪个属性是作为option标签体的值
需要添加form标签库:IDE自动添加
1 <%@ taglib prefix="form" uri="http://www.springframework.org/tags/form" %>
1 2 3 4 5 6 7 8 9 10 11 12 13 14 15 16 17 18 19 <%--指定绝对路径--%>"ctp" , request.getContextPath());"${ctp}/emp" modelAttribute="employee" method="post" >"lastName" /><form:errors path="lastName" /><br>"email" /><form:errors path="email" /><br>"gender" value="1" /><br>"gender" value="2" /><br>"birth" />"department.id" items="${depts}" itemLabel="departmentName" itemValue="id" />"submit" >
八、数据转换&数据格式化&数据校验
1、数据类型转换
SpringMVC封装自定义类型对象的时候:javaBean要和页面提交的数据进行一一绑定,页面提交的所有数据都是字符串!
这就牵扯到了数据绑定期间的类型转换问题!
分析底层得到:
WebDataBinder:数据绑定器负责数据绑定工作
ConversionService组件:负责数据类型的转换以及格式化功能,内部已有一些类型转换器实现,自定义类型自然需要我们自己实现!
自定义类型转换
步骤:
实现Converter接口,写一个自定义的类型转换器
Converter是ConversionService中的组件
你的Converter得放进ConversionService中
将WebDataBinder中的ConversionService设置成我们这个加了自定义类型转换器的ConversionService
实现Converter接口﹐写一个自定义的类型转换器
配置出ConversionService
1 2 3 4 5 6 7 8 9 10 11 12 13 14 15 16 17 18 19 20 21 22 23 24 25 26 27 28 public class MyStringToEmployeeConverter implements Converter <String , Employee > @Autowired @Override public Employee convert (String source) "页面提交的将要转换的字符串!" );new Employee();if (source.contains("-" )){"-" );0 ]);1 ]);2 ]));3 ]));return employee;
springmvc-servlet.xml配置:
1 2 3 4 5 6 7 8 9 10 11 12 13 <bean id ="conversionService" class ="org.springframework.format.support.ConversionServiceFactoryBean" > <property name ="converters" > <set > <bean class ="com.itnxd.restcrud.Converter.MyStringToEmployeeConverter" /> </set > </property > </bean > <mvc:annotation-driven conversion-service ="conversionService" />
测试:
1 2 3 4 5 6 7 8 9 10 11 @RequestMapping("/quickAdd") public String quickAdd (@RequestParam("empInfo") Employee employee) return "redirect:/toList" ;
2、数据格式化
数据绑定期间的日期格式化问题:比如提交的日期进行转换
eg:birth=2017-12-15----->Date 2017/12/15 2017.12.15 2017-12-15
两大注解:
@NumberFormat:可对类似数字类型的属性进行标注,它拥有两个互斥的属性:
style : 类 型 为 NumberFormat.Style 。 用 于 指 定 样 式 类 型 , 包 括 三 种 :Style.NUMBER(正常数字类型)、 Style.CURRENCY(货币类型)、 Style.PERCENT(百分数类型)
pattern:类型为 String,自定义样式,如 pattern="#,###"
@DateTimeFormat:可对 java.util.Date、java.util.Calendar、java.long.Long 时间类型进行标注:
pattern 属性:类型为字符串。指定解析/格式化字段数据的模式,如:”yyyy-MM-dd hh:mm:ss”
iso 属性:类型为 DateTimeFormat.ISO。指定解析/格式化字段数据的 ISO 模式,包 括 四 种 : ISO.NONE ( 不 使 用 ) – 默 认 、 ISO.DATE(yyyy-MM-dd) 、ISO.TIME(hh:mm:ss.SSSZ)、 ISO.DATE_TIME(yyyy-MM-dd hh:mm:ss.SSSZ)
style 属性:字符串类型。通过样式指定日期时间的格式,由两位字符组成,第一位表示日期的格式,第二位表示时间的格式:S:短日期/时间格式、M:中日期/时间格式、L:长日期/时间格式、F:完整日期/时间格式、-:忽略日期或时间格式
两大转换器:
ConversionServiceFactoryBean不支持格式化功能
FormattingConversionServiceFactoryBean,支持格式化功能,皆具类型转换和格式化!(默认支持的格式是/方式的日期)
1 2 3 @DateTimeFormat(pattern = "yyyy-MM-dd") private Date birth;
springmvc.xml配置:
1 2 3 4 5 6 7 8 9 10 11 12 13 14 <bean id ="conversionService" class ="org.springframework.format.support.FormattingConversionServiceFactoryBean" > <property name ="converters" > <set > <bean class ="com.itnxd.restcrud.Converter.MyStringToEmployeeConverter" /> </set > </property > </bean > <mvc:annotation-driven conversion-service ="conversionService" />
3、数据校验
只做前端校验是不安全的,(浏览器可以禁用js)
在重要数据一定要加上后端验证;
可以写程序将我们每一个数据取出进行校验,如果失败直接来到添加页面,提示其重新填写
SpringMvc可以用JSR303来做数据校验了
JSR303规范:Hibernate validator(第三方校验框架,实现了该规范)
3.1、导包
最好最好不要使用最新版,6.0即可,7.0无法使用,还不知道原因!
pom.xml配置:
1 2 3 4 5 6 7 8 9 10 11 12 13 14 15 <dependency > <groupId > org.hibernate.validator</groupId > <artifactId > hibernate-validator</artifactId > <version > 6.0.0.Final</version > </dependency > <dependency > <groupId > org.hibernate.validator</groupId > <artifactId > hibernate-validator-annotation-processor</artifactId > <version > 6.0.0.Final</version > </dependency >
3.2、在JavaBean属性上添加校验注解
1
2
3
4
5
6
7
8
9
10
11
12
13
14
15
16
@NotEmpty(message = "lastName不能为空!") @Length(min = 6, max = 18) private String lastName;@Email private String email;private Integer gender;private Department department;@Past @DateTimeFormat(pattern = "yyyy-MM-dd") private Date birth;
3.3、Controller处理器添加@Valid注解
1
2
3
4
5
6
@RequestMapping(value = "/emp", method = RequestMethod.POST) public String addEmp (@Valid Employee employee) return "redirect:/toList" ;
3.4、查看校验结果
给需要校验的JavaBean后面**紧跟(中间不能有任何东西间隔)**一个BindingResult。这个BindingResult就是封装前一个bean的校验结果
表单显示错误信息:
普通表单,使用Model保存错误信息,使用EL表达式取出错误信息即可
SpringMvc的表单,直接可以使用<form:errors path="lastName"/>获取错误信息
1
2
3
4
5
6
7
8
9
10
11
12
13
14
15
16
17
18
19
20
21
22
23
24
25
26
27
28
29
30
@RequestMapping(value = "/emp", method = RequestMethod.POST) public String addEmp (@Valid Employee employee, BindingResult bindingResult, Model model) if (bindingResult.hasErrors()){"有校验错误!" );new HashMap<>();for (FieldError error : fieldErrors) {"错误提示信息:" + error.getDefaultMessage());"错误的字段是:" + error.getField());"errorsInfo" , errorsMap);return "addEmp" ;else {return "redirect:/toList" ;
3.5、国际化定制错误消息
编写国际化文件:
errors_zh_CN. properties
errors_en_Us.properties
国际化文件的key有规定:
每一个字段发生错误以后,都会有自己的错误代码,国际化文件中错误消息的key必须对应一个错误代码:
Email.emplbyee.email:校验规则.隐含模型中这个对象的key.对象的属性
Email.email:校验规则.属性名
Email.java.lang.String:校验规则.属性类型
Email:
举例:
高级国际化:动态传入消息参数
1
2
3
4
5
6
7
Email.email =email incorrect! NotEmpty =must not empty! Length.java.lang.String =length incorrect! {0} {1} {2} Past =must past time! typeMismatch.birth =geshi incorrect!
让SpringMvc管理国际化资源:
1 2 3 4 5 6 7 8 9 10 11 12 13 14 <bean id ="messageSource" class ="org.springframework.context.support.ResourceBundleMessageSource" > <property name ="basenames" > <list > <value > i18n</value > <value > errors</value > <value > login</value > </list > </property > </bean >
3.6、使用message属性定制错误信息
使用message指定错误消息(不能实现国际化)
国际化优先级高于message
1
2
3
@NotEmpty(message = "lastName不能为空!") @Length(min = 6, max = 18) private String lastName;
九、mvc:annotation-driven
<mvc:default-servlet-handler/><mvc:annotation-driven/>
接下来分析一下这两大mvc标签的几种情况!
为了方便,下面以一和二来称呼两大标签!
mvc:annotation-driven会自动注册:
RequestMappingHandlerMapping 、
RequestMappingHandlerAdapter 与
ExceptionHandlerExceptionResolver 三个 bean。
还将提供以下支持:
支持使用 ConversionService 实例对表单参数进行类型转换
支持使用 @NumberFormat、@DateTimeFormat 注解完成数据类型的格式化
支持使用 @Valid 注解对 JavaBean 实例进行 JSR 303 验证
支持使用 @RequestBody 和 @ResponseBody 注解
1、一和二都没有
动态资源(@RequestMapping映射的资源)能访问,静态资源(html, js)不能访问!
HandlerMapping:
动态能访问:DefaultAnnotationHandlerMapping中的handlerMap中保存了每一个资源的映射信息;
静态不能访问:handlerMap中没有保存静态资源映射的请求,
HandlerAdapter: 方法执行的适配器(过时的)
AnnotationMethodHandlerAdapter:帮我们执行目标方法
2、一有二没有
静态资源ok,动态资源完蛋!
HandlerMapping变化:
动态不能访问:DefaultAnnotationHandlerMapping没有了,用SimpleUrlHandlerwapping替换了,他的作就用是将所有请求直接交给tomcat
静态能访问的原因:simpleUrlHandlerMapping 把所有请求都映射给tomcat
HandlerAdapter变化:
AnnotationMethodHandlerAdapter都没有了:帮我们执行目标方法的适配器没有了
3、一二都有
静态动态都可访问!
HandlerMapping变化:
RequestMappingHandlerMapping:动态资源可以访问
handleMethods属性保存了每一个请求用哪个方法来处理
SimpleUrlHandlerMapping:将请求直接交给tomcat,有他,静态资源就没问题
HandlerAdapter变化:
原来的AnnotationMethodHandlerAdapter,被换成RequestMappingHandlerAdapter,确定参数都用成解析器了
十、处理JSON
1、JackSon使用
SpringMvc可以利用Jackson来方便 的处理Json数据!
原生JavaWeb需要使用Gson来转换为Json数据!
导包:
pom.xml:
1 2 3 4 5 6 7 8 9 10 11 12 13 14 15 16 17 18 19 20 <dependency > <groupId > com.fasterxml.jackson.core</groupId > <artifactId > jackson-databind</artifactId > <version > 2.12.2</version > </dependency > <dependency > <groupId > com.fasterxml.jackson.core</groupId > <artifactId > jackson-core</artifactId > <version > 2.12.2</version > </dependency > <dependency > <groupId > com.fasterxml.jackson.core</groupId > <artifactId > jackson-annotations</artifactId > <version > 2.12.2</version > </dependency >
jsp页面:
1
2
3
4
5
6
7
8
9
10
11
12
13
14
15
16
17
18
19
20
21
22
23
24
25
26
27
28
29
30
31
32
33
34
35
36
37
38
39
40
41
42
43
44
45
46
<%@ page contentType="text/html;charset=UTF-8" language="java" %>"ctp" , request.getContextPath());"text/javascript" >"a" ).click(function (){"${ctp}/sendAjax" ,"GET" ,var empInfo = this .lastName + "--" + this .email + " --" this .gender + "--" + this .birth;"div" ).append(empInfo + "<br>" );return false ;new Date()%><br>
Controller:
添加@ResponseBody注解:返回数据会放到响应体中,jsp页面可以通过ajax请求获取到数据并展示到页面上!
1 2 3 4 5 6 7 8 9 10 11 12 @ResponseBody @RequestMapping("/sendAjax") public Collection<Employee> ajaxGetAll () return all;
2、@ResponseBody
将返回的数据放在响应体中!返回json数据,将对象转换为json数据,返回给浏览器!
如果是对象,jackson包自动将对象转为json格式!
我们可以用它替代response.getWriter().write()方法,将数据写到页面!
1
2
3
4
5
6
7
8
9
10
11
12
13
@ResponseBody @RequestMapping("/sendAjax") public Collection<Employee> ajaxGetAll () return all;@ResponseBody @RequestMapping("/responseBody") public String responseBodyTest () return "<h1>success</h1>" ;
3、@RequestBody
获取一个请求的请求体!
@RequestBody:获取一个请求的请求体!接受json数据,封装为JavaBean
@RequestParam:获取一个请求体参数
1 2 3 4 5 6 7 8 9 10 11 12 13 14 15 16 17 18 @RequestMapping("/requestBody") public String requestBodyTest (@RequestBody String body) return "success" ;@RequestMapping("/requestBody01") public String requestBodyTest1 (@RequestBody Employee employee) return "success" ;
jsp页面:
1
2
3
4
5
6
7
8
9
10
11
12
13
14
15
16
17
18
19
20
21
22
23
24
25
<form action="${ctp}/requestBody" method="post" enctype="multipart/form-data" >"text" name="username" value="tom" /><br>"password" name="password" value="123453345" /><br>"file" name="file" /><br>"submit" value="提交" />"a" ).click(function (){var emp = {lastName:"张三" , email:"nb@mail.com" , gender:"0" };var empJson = JSON.stringify(emp);"${ctp}/requestBody01" ,"post" ,"application/json" ,return false ;
4、ResponseEntity
可以自定义响应!作为返回值!
1 2 3 4 5 6 7 8 9 10 11 12 13 14 15 @RequestMapping("/responseBody01") public ResponseEntity<String> responseBodyTest01 () "<h1>success</h1>" ;new HttpHeaders();"Set-Cookie" , "username=itnxd" );new ResponseEntity<>(body,return responseEntity;
5、HttpEntity
可以获取请求体和请求头!作为入参!
1 2 3 4 5 6 7 8 9 10 @RequestMapping("/httpEntity") public String httpEntityTest (HttpEntity<String> str) return "success" ;
6、文件下载
使用ResponseEntity实现文件下载!
1 2 3 4 5 6 7 8 9 10 11 12 13 14 15 16 17 18 19 20 21 22 23 24 25 26 27 28 29 30 31 32 33 @RequestMapping("/download01") public ResponseEntity<byte []> download01(HttpServletRequest request) throws IOException {"/index.jsp" );new FileInputStream(realPath);byte [] buffer = new byte [fis.available()];new HttpHeaders();"Content-Disposition" , "attachment;filename=" + "index.jsp" );byte []> responseEntity = new ResponseEntity<>(buffer, headers, HttpStatus.OK);return responseEntity;
7、文件上传
@RequestParam("header") MultipartFile file: 自动将文件流封装到MultipartFile对象!
JavaWeb文件上传方法,点击这里查看!
步骤 :
文件上传表单准备enctype="multipant/form-data"
导入fileupload;
SpringMVC配置文件中,配置文件上传解析器。(SpringMvc九大组件之一MultipartResolver) 配置其实现类CommonsMultipartResolver
文件上传请求处理,在处理器方法上写一个@RequestParam( "header " ) MultipartFile file ,封装当前文件的信息,进行保存
导包pom.xml:
1 2 3 4 5 6 7 <dependency > <groupId > commons-fileupload</groupId > <artifactId > commons-fileupload</artifactId > <version > 1.4</version > </dependency >
springmvc-servlet.xml:
1 2 3 4 5 6 7 8 9 10 11 12 13 <bean id ="multipartResolver" class ="org.springframework.web.multipart.commons.CommonsMultipartResolver" > <property name ="maxUploadSize" value ="#{1024*1024*20}" /> <property name ="defaultEncoding" value ="utf-8" /> </bean >
单文件上传:
1
2
3
4
5
6
7
8
9
10
11
12
13
14
15
16
17
18
@RequestMapping("/upload") public String upload (@RequestParam(value = "username", required = false) String username, @RequestParam("header") MultipartFile file, Model model) "username = " + username);"文件file input 的name值:" + file.getName());"文件名:" + file.getOriginalFilename());try {new File("C:\\Users\\15890\\Desktop\\" + file.getOriginalFilename()));"msg" , "文件上传成功!" );catch (IOException e) {"msg" , "文件上传失败!" + e.getMessage());
多文件上传:
1
2
3
4
5
6
7
8
9
10
11
12
13
14
15
16
17
18
19
20
21
22
@RequestMapping("/upload") public String upload (@RequestParam(value = "username", required = false) String username, @RequestParam("header") MultipartFile[] files, Model model) for (MultipartFile file : files) {if (!file.isEmpty()){try {new File("C:\\Users\\15890\\Desktop\\" + file.getOriginalFilename()));"msg" , "文件上传成功!" );catch (IOException e) {"msg" , "文件上传失败!" + e.getMessage());return "success" ;
十一、拦截器
SpringMVC提供了拦截器机制,允许运行目标方法之前进行一些拦截工作,或者目标方法运行之后进行一些其他处理!
Filter:javaWeb
Handlerlnterceptor:SpringMVC,更加强大!
1、概述
preHandle:在目标方法运行之前调用,返回boolean, return true ; (chain.doFilter())放行;return false,不放行
postHandle:在目标方法运行之后调用,目标方法调用后
afterCompletion:在请求整个完成之后,来到目标页面之后,chain.doFilter()放行,资源响应之后
什么时候用Filter什么时候用拦截器?
如果某些功能,需要其他组件配合完成,我们就使用拦截器
其他情况可以写filter
2、拦截器使用
实现Handlerlntercept接口
在SpringMVC配置文件中注册这个拦截器的工作,配置这个拦截器来拦截哪些请求的目标方法
拦截器实现:
1
2
3
4
5
6
7
8
9
10
11
12
13
14
15
16
17
18
19
20
21
22
23
24
25
26
27
28
29
30
31
32
33
public class MyInterceptor implements HandlerInterceptor @Override public boolean preHandle (HttpServletRequest request, HttpServletResponse response, Object handler) throws Exception ".................MyInterceptor.preHandle().........." );return true ;@Override public void postHandle (HttpServletRequest request, HttpServletResponse response, Object handler, ModelAndView modelAndView) throws Exception "....................MyInterceptor.postHandle().........." );@Override public void afterCompletion (HttpServletRequest request, HttpServletResponse response, Object handler, Exception ex) throws Exception "................MyInterceptor.afterCompletion().........." );
springmvc-servlet.xml配置:
1 2 3 4 5 6 7 8 9 10 11 12 13 14 15 16 17 18 <mvc:interceptors > <mvc:interceptor > <mvc:mapping path ="/test" /> <bean class ="com.itnxd.interceptor.MyInterceptor" /> </mvc:interceptor > <mvc:interceptor > <mvc:mapping path ="/interceptor" /> <bean class ="com.itnxd.interceptor.MyInterceptor2" /> </mvc:interceptor > </mvc:interceptors >
Controller:
1
2
3
4
5
6
@RequestMapping("/interceptor") public String interceptor () "Controller下的interceptor()........" );return "success" ;
3、拦截器运行流程
3.1、单个拦截器
正常流程:
拦截器的preHandle------>目标方法----->拦截器postHandle----->页面------->拦截器的afterCompletion
运行流程:
1
2
3
4
5
................MyInterceptor.preHandle()..........
其他流程:
只要preHandle不放行就没有以后的流程;
只要放行了,afterCompletion一定会执行;(即使目标方法处理器炸了)
3.2、多个拦截器
正常流程:
类似Filter,一个来回,先顺序后逆序
1
2
3
4
5
6
7
8
................MyInterceptor.preHandle()..........
异常流程︰
不放行:
哪一块不放行从此以后都没有
放行的afterCompletion仍然执行:
eg:MySecondInterceptor不放行,但是他前面已经放行了的拦截器的afterCompletion会执行
1
2
3
.................MyInterceptor.preHandle()..........
3.3、流程总结
拦截器的preHandle:是按照顺序执行拦截器的
拦截器的postHandle:是按照逆序执行
拦截器的afterCompletion:是按照逆序执行
已经放行了的拦截器的afterCompletion总会执行
十二、国际化
区域信息获取,为SpringMvc的九大组件之一的AcceptHeaderLocaleResolver!
1、概述
写好国际化资源文件
让Spring的ResourceBundleMessageSource管理国际化资源文件
直接去页面取值
springmvc配置文件:
1 2 3 4 5 6 7 8 9 10 11 12 <bean id ="messageSource" class ="org.springframework.context.support.ResourceBundleMessageSource" > <property name ="basenames" > <list > <value > i18n</value > </list > </property > </bean >
jsp页面:
1 <fmt:message key="welcome" />您的光临!
2、区域化信息locale
国际化区域信息时决定国际化显示的因素!还是SpringMvc的九大组件之一!
private LocaleResolver localeResolver;
区域信息是由区域信息解析器解析得到的!默认会用一个 AcceptHeaderLocaleResolver!
1
2
3
4
5
6
7
8
9
10
11
12
13
14
15
16
17
@Autowired private MessageSource messageSource;@RequestMapping("/locale") public String LocalTest2 (Locale locale, Model model) "username" , null , locale); "msg" , message);return "success" ;
3、自定义区域信息解析器
实现LocaleResolver接口并重写方法即可!
可以从来实现点击链接切换国际化信息!
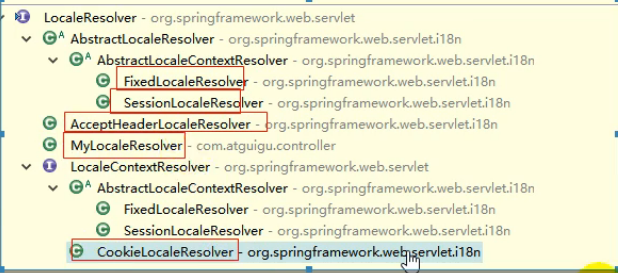
LocaleResolver接口实现类:
AcceptHeaderLocaleResolver:使用请求头的区域信息
FixedLocaleResolver:使用系统默认的区域信息
sessionLocaleResolver:区域信息是从session中获取。可以根据请求参数创建一个locale对象,把他放在session中
CookieLocaleResolver:从Session中获取
springmvc.xml:
1 <bean id ="localeResolver" class ="com.itnxd.i18n.MyLocaleResolver" />
自定义区域信息解析器:
1
2
3
4
5
6
7
8
9
10
11
12
13
14
15
16
17
18
19
20
21
22
23
24
25
26
public class MyLocaleResolver implements LocaleResolver @Override public Locale resolveLocale (HttpServletRequest request) "locale" );null ;if (localeStr != null && !"" .equals(localeStr)){new Locale(localeStr.split("_" )[0 ], localeStr.split("_" )[1 ]);else {return l;@Override public void setLocale (HttpServletRequest request, HttpServletResponse response, Locale locale) throw new UnsupportedOperationException("Cannot change HTTP accept header - use a different locale resolution strategy" );
jsp页面:
1
2
3
4
5
6
7
8
<form action="" >"username" />:<input type="text" name="username" /><br>"password" /> :<input type="password" name="password" />"submit" value="<fmt:message key=" login"/>" >
4、使用SessionLocaleResolver
区域信息是从session中获取。可以根据请求参数创建一个locale对象,把他放在session中!
1 2 <bean id ="localeResolver" class ="org.springframework.web.servlet.i18n.SessionLocaleResolver" />
1
2
3
4
5
6
7
8
9
10
11
12
13
14
15
@RequestMapping("/login") public String LocalTest1 (@RequestParam(value = "locale", defaultValue = "zh_CN") String localeStr, Locale locale, Model model, HttpSession session) null ;if (localeStr != null && !"" .equals(localeStr)){new Locale(localeStr.split("_" )[0 ], localeStr.split("_" )[1 ]);else {".LOCALE" , l);return "login" ;
5、更简便方式
结合LocaleChangeInterceptor实现自动获取请求参数的locale值,自动设置local解析器!
拦截器和SessionLocaleResolver结合实现自动获取!
自动获取请求参数的locale值,会在preHandle方法中进行设置!
会使用 SessionLocaleResolver解析器进行设置,因此这两个都要设置!
注意:请求参数key必须为locale
1 2 3 4 5 6 <mvc:interceptor > <mvc:mapping path ="/login" /> <bean class ="org.springframework.web.servlet.i18n.LocaleChangeInterceptor" /> </mvc:interceptor > <bean id ="localeResolver" class ="org.springframework.web.servlet.i18n.SessionLocaleResolver" />
十三、异常处理
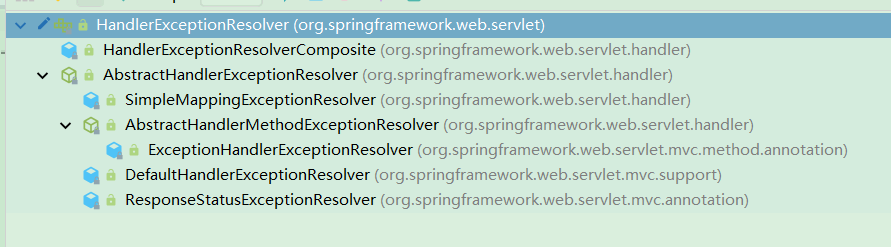
Spring MVC 通过 HandlerExceptionResolver 处理程序的异常,包括 Handler 映射、数据绑定以及目标方法执行时发生的异常。
1、概述
如果异常解析器都不能处理就直接抛出去!
HandlerExceptionResolver异常解析器实现类
SimpleMappingExceptionResolver:通过配置的方式进行异常处理
DispatcherServlet.properties文件内的默认值:
HandlerExceptionResolver(默认值)
ExceptionHandlerExceptionResolver:@ExceptionHandler
ResponseStatusExceptionResolver:@ResponseStatus 给自定义异常标注
DefaultHandlerExceptionResolver:判断是否SpringMVC自带的异常(没人处理则会有一个默认错误页面)
2、@ExceptionHandler
处理本类异常!
给方法上随便写一个Exception,用来接收发生的异常
要携带异常信息不能给参数位置写Model
返回ModelAndView就行了
如果有多个@ExceptionHandler都能处理这个异常,精确优先
全局异常处理与本类同时存在,本类优先
1
2
3
4
5
6
7
8
9
10
11
@ExceptionHandler(ArithmeticException.class) public ModelAndView handlerException01 (Exception exception) "handlerException01.........." );new ModelAndView("myerror" );"errorInfo" , exception);return mv;
3、处理全局异常
一个专门用来处理全局异常的类,使用@ControllerAdvice标注即可!
1
2
3
4
5
6
7
8
9
10
11
12
13
14
@ControllerAdvice public class MyWholeException @ExceptionHandler(ArithmeticException.class) public ModelAndView handlerException01 (Exception exception) "全局的 handlerException01.........." );new ModelAndView("myerror" );"errorInfo" , exception);return mv;
4、@ResponseStatus
可以自定义错误页面的提示信息,以及状态码!
自定义异常:
1
2
3
4
5
@ResponseStatus(reason = "用户被拒绝登录!", value = HttpStatus.NOT_ACCEPTABLE) public class UsernameNotFoundException extends RuntimeException static final long serialVersionUID = 1L ;
5、通过配置文件处理异常
SimpleMappingExceptionResolver:通过配置的方式进行异常处理!
配置异常解析器,优先级最低 ,优先前三个处理,处理不了再交给配置文件的解析器!
springmvc-servlet.xml:
1 2 3 4 5 6 7 8 9 10 11 12 13 14 15 16 17 18 19 20 21 22 <bean class ="org.springframework.web.servlet.handler.SimpleMappingExceptionResolver" > <property name ="exceptionMappings" > <props > <prop key ="java.lang.NullPointerException" > myerror</prop > </props > </property > <property name ="exceptionAttribute" value ="ex" /> </bean >
十四、SpringMvc运行流程
所有请求,前端控制器(DispatcherServlet )收到请求,调用doDispatch进行处理 根据HandlerMapping中保存的请求映射信息找到,处理当前请求的,处理器执行链(包含拦截器) 根据当前处理器找到他的HandlerAdapter (适配器) 拦截器的preHandle先执行 适配器执行目标方法,并返回ModelAndView
ModelAttribute注解标注的方法提前运行
执行目标方法的时候(确定目标方法用的参数)
有注解:保存注解信息,最终得到这个注解应该对应解析的值
没注解:
看是否只原生API
看是否Model、Map以及其他的
都不是,看是否是简单类型:paramName
给atttName赋值,attrName(参数标了@ModelAttribute就是指定的value值,没标就是"")
如果是自定义类型
attrName使用参数类型首字母小写;或者使用入参@ModelAttribute的值
先看隐含模型中有没有这个attrName作为key对应的值;如果有就从隐含模型中获取并赋值
看是否是@SessionAttributes标注的属性,如果是,就从session中拿,如果拿不到就会抛异常(因此不建议使用)
都不是,就利用反射创建对象
拦截器的postHandle执行 处理结果(页面渲染流程)
如果有异常使用异常解析器处理异常,处理完后还会返回ModelAndView 调用render进行页面渲染
视图解析器根据视图名得到视图对象
视图对象调用render方法
执行拦截器的afterCompletion
十五、SpringMvc与Spring整合
1、整合的目的
分工明确:
SpringMVC的配置文件就来配置和网站转发逻辑以及网站功能有关的(视图解析器,文件上传解析器,支持ajax , xxx ) ;
Spring的配置文件来配置和业务有关的(事务控制,数据源,xxx ) ;
2、单文件配置
都放在 SpringMVC 的配置文件中,也可以分多个 Spring 的配置文件, 然后使用 import 节点导入其他的配置文件!
主要用于单文件内容太多,分文件之后的整合,本质还是一个IOC容器!
两个配置文件:
可以使用import标签实现分文件的合并!
1 <import resource ="spring.xml" />
3、分文件配置
主要是为了让配置文件各司其职,分工明确!
Spring管理业务逻辑组件,SpringMVC管理控制器组件!
注意: 若 Spring 的 IOC 容器和 SpringMVC 的 IOC 容器扫描的包有重合的部分, 就会导致有的 bean 会被创建 2 次!
在web.xml中指定两个配置文件路径!
配置启动 Spring IOC 容器的 Listener!
1
2
3
4
5
6
7
8
9
10
11
12
13
14
15
16
17
18
19
20
21
22
23
24
25
26
27
28
29
<?xml version="1.0" encoding="UTF-8"?> <web-app xmlns ="http://xmlns.jcp.org/xml/ns/javaee" xmlns:xsi ="http://www.w3.org/2001/XMLSchema-instance" xsi:schemaLocation ="http://xmlns.jcp.org/xml/ns/javaee http://xmlns.jcp.org/xml/ns/javaee/web-app_4_0.xsd" version ="4.0" > <context-param > <param-name > contextConfigLocation</param-name > <param-value > /WEB-INF/spring.xml</param-value > </context-param > <listener > <listener-class > org.springframework.web.context.ContextLoaderListener</listener-class > </listener > <servlet > <servlet-name > springmvc</servlet-name > <servlet-class > org.springframework.web.servlet.DispatcherServlet</servlet-class > <load-on-startup > 1</load-on-startup > </servlet > <servlet-mapping > <servlet-name > springmvc</servlet-name > <url-pattern > /</url-pattern > </servlet-mapping > </web-app >
springmvc配置文件只处理Controller和ControllerAdvice!
1
2
3
4
5
6
7
8
9
10
11
12
13
14
15
16
17
18
19
20
21
22
23
24
25
26
27
28
29
30
<?xml version="1.0" encoding="UTF-8"?> <beans xmlns ="http://www.springframework.org/schema/beans" xmlns:xsi ="http://www.w3.org/2001/XMLSchema-instance" xmlns:context ="http://www.springframework.org/schema/context" xsi:schemaLocation ="http://www.springframework.org/schema/beans http://www.springframework.org/schema/beans/spring-beans.xsd http://www.springframework.org/schema/context http://www.springframework.org/schema/context/spring-context.xsd" ><context:component-scan base-package ="com.itnxd" use-default-filters ="false" > <context:include-filter type ="annotation" expression ="org.springframework.stereotype.Controller" /> <context:include-filter type ="annotation" expression ="org.springframework.web.bind.annotation.ControllerAdvice" /> </context:component-scan > <bean class ="org.springframework.web.servlet.view.InternalResourceViewResolver" > <property name ="prefix" value ="/WEB-INF/pages/" /> <property name ="suffix" value =".jsp" /> </bean > </beans >
spring配置文件只处理其他注解
1
2
3
4
5
6
7
8
9
10
11
12
13
14
<?xml version="1.0" encoding="UTF-8"?> <beans xmlns ="http://www.springframework.org/schema/beans" xmlns:xsi ="http://www.w3.org/2001/XMLSchema-instance" xmlns:context ="http://www.springframework.org/schema/context" xsi:schemaLocation ="http://www.springframework.org/schema/beans http://www.springframework.org/schema/beans/spring-beans.xsd http://www.springframework.org/schema/context http://www.springframework.org/schema/context/spring-context.xsd" ><context:component-scan base-package ="com.itnxd" > <context:exclude-filter type ="annotation" expression ="org.springframework.stereotype.Controller" /> <context:exclude-filter type ="annotation" expression ="org.springframework.web.bind.annotation.ControllerAdvice" /> </context:component-scan > </beans >
4、两大IOC容器关系
即父子容器!
Spring为父容器,SpringMvc为子容器,子可以访问父,父不可以访问子!
Spring MVC WEB 层容器可作为 “业务层”, Spring 容器的子容器!
即 WEB 层容器可以引用业务层容器的 Bean,而业务层容器却访问不到 WEB 层容器的 Bean!
因此Controller中可以装配service,反过来则不行!


 微信
微信 支付宝
支付宝