一、MyBatis简介
MyBatis,和数据库进行交互的持久化层框架(SQL映射框架)
官方文档也很详细:点击这里!
MyBatis特点:
MyBatis将重要的步骤抽取出来可以人工定制,其他步骤自动化
重要步骤都是写在配置文件中(好维护)
完全解决数据库的优化问题
MyBatis底层就是对原生JDBC的一个简单封装
既将java编码与sq|抽取了出来,还不会失去自动化功能;半自动的持久化层框架
实现原理图示: 复杂场景可以实现手动!半自动
二、MyBatis搭建
1、数据库建表和对应JavaBean(略)
2、pom.xml导包
导入MyBatis、数据库驱动、以及log4j依赖!
1
2
3
4
5
6
7
8
9
10
11
12
13
14
15
16
17
18
19
20
21
22
23
24
25
26
27
28
29
30
31
32
33
34
35
36
37
38
39
40
41
42
43
44
45
46
47
48
49
50
51
<?xml version="1.0" encoding="UTF-8"?> <project xmlns ="http://maven.apache.org/POM/4.0.0" xmlns:xsi ="http://www.w3.org/2001/XMLSchema-instance" xsi:schemaLocation ="http://maven.apache.org/POM/4.0.0 http://maven.apache.org/xsd/maven-4.0.0.xsd" > <modelVersion > 4.0.0</modelVersion > <groupId > com.itnxd.mybatis</groupId > <artifactId > 3_MyBatis</artifactId > <version > 1.0-SNAPSHOT</version > <properties > <maven.compiler.source > 14</maven.compiler.source > <maven.compiler.target > 14</maven.compiler.target > </properties > <dependencies > <dependency > <groupId > org.mybatis</groupId > <artifactId > mybatis</artifactId > <version > 3.5.6</version > </dependency > <dependency > <groupId > mysql</groupId > <artifactId > mysql-connector-java</artifactId > <version > 8.0.23</version > </dependency > <dependency > <groupId > log4j</groupId > <artifactId > log4j</artifactId > <version > 1.2.17</version > </dependency > <dependency > <groupId > org.junit.jupiter</groupId > <artifactId > junit-jupiter-api</artifactId > <version > 5.8.0-M1</version > <scope > test</scope > </dependency > </dependencies > </project >
3、创建log4j配置文件
在maven工程的resources目录下新建log4j.xml文件(名字固定),这样可以在运行程序时显示更详细的信息,会有发送的sql语句提示信息!
在mybatis配置文件中加入<setting name="logImpl" value="LOG4J"/>即可!
1
2
3
4
5
6
7
8
9
10
11
12
13
14
15
16
17
18
19
20
21
22
<?xml version="1.0" encoding="UTF-8" ?> <!DOCTYPE log4j :configuration SYSTEM "log4j.dtd" > <log4j:configuration xmlns:log4j ="http://jakarta.apache.org/log4j/" > <appender name ="STDOUT" class ="org.apache.log4j.ConsoleAppender" > <param name ="Encoding" value ="UTF-8" /> <layout class ="org.apache.log4j.PatternLayout" > <param name ="ConversionPattern" value ="%-5p %d{MM-dd HH:mm:ss,SSS} %m (%F:%L) \n" /> </layout > </appender > <logger name ="java.sql" > <level value ="debug" /> </logger > <logger name ="org.apache.ibatis" > <level value ="info" /> </logger > <root > <level value ="debug" /> <appender-ref ref ="STDOUT" /> </root > </log4j:configuration >
4、创建mybatis配置文件
在maven工程的resources目录下新建mybatis-config.xml配置文件(名字任意)!
注意 :
1 properties?,settings?,typeAliases?,typeHandlers?,objectFactory?,objectWrapperFactory?,reflectorFactory?,plugins?,environments?,databaseIdProvider?,mappers?
1
2
3
4
5
6
7
8
9
10
11
12
13
14
15
16
17
18
19
20
21
22
23
24
25
26
27
28
29
30
31
32
<?xml version="1.0" encoding="UTF-8" ?> <!DOCTYPE configuration PUBLIC "-//mybatis.org//DTD Config 3.0//EN" "http://mybatis.org/dtd/mybatis-3-config.dtd" > <configuration > <settings > <setting name ="logImpl" value ="LOG4J" /> </settings > <environments default ="development" > <environment id ="development" > <transactionManager type ="JDBC" /> <dataSource type ="POOLED" > <property name ="driver" value ="com.mysql.cj.jdbc.Driver" /> <property name ="url" value ="jdbc:mysql:///mybatis" /> <property name ="username" value ="root" /> <property name ="password" value ="xxx" /> </dataSource > </environment > </environments > </configuration >
5、创建sql映射文件
在maven工程的resources目录下新建EmployeeDao.xml(名称与Dao接口名称一致)!
该文件作为Dao的实现,类似之前的EmployeeDaoImpl实现类!
1
2
3
4
5
6
7
8
9
10
11
12
13
14
15
16
17
18
19
20
21
22
23
24
25
26
27
28
29
30
31
32
33
34
35
36
37
38
39
40
41
42
43
44
<?xml version="1.0" encoding="UTF-8" ?> <!DOCTYPE mapper PUBLIC "-//mybatis.org//DTD Mapper 3.0//EN" "http://mybatis.org/dtd/mybatis-3-mapper.dtd" > <mapper namespace ="com.itnxd.dao.EmployeeDao" > <select id ="getEmpById" resultType ="com.itnxd.bean.Employee" > </select > <delete id ="deleteEmployee" > </delete > <update id ="updateEmployee" > </update > <insert id ="insertEmployee" > </insert > </mapper >
6、将sql映射文件注册到mybatis中
在mybatis-config.xml中注册sql映射文件位置!
1 2 3 4 5 6 7 8 <mappers > <mapper resource ="EmployeeDao.xml" /> </mappers >
7、测试
1 2 3 4 5 6 7 8 9 10 11 12 13 14 15 16 17 18 19 20 21 22 23 24 25 26 27 28 29 30 31 32 33 34 35 36 37 38 39 40 41 42 43 44 45 46 47 48 49 50 51 52 53 54 55 56 @Test public void test1 () throws IOException "mybatis-config.xml" ;new SqlSessionFactoryBuilder().build(inputStream);try (SqlSession session = sqlSessionFactory.openSession()) {3 );catch (Exception e) {@Test public void test2 () throws IOException "mybatis-config.xml" ;new SqlSessionFactoryBuilder().build(inputStream);try (SqlSession session = sqlSessionFactory.openSession()) {1 );int i = employeeDao.updateEmployee(new Employee(1 , "itnxd" , 1 , "itnxd@gmail.com" ));int i1 = employeeDao.insertEmployee(new Employee(null , "admin" , 1 , "admin@gmail.com" ));int i2 = employeeDao.deleteEmployee(1 );catch (Exception e) {
三、MyBatis全局配置文件
官方全局配置文件详解,点击这里!
1、properties
引入外部配置文件!
如下方为引入数据库配置信息文件,可以在environment中使用${}获取值!
1 2 3 4 5 6 7 8 <properties resource ="dbconfig.properties" />
2、settings
settings属性的各类设置,可以设置许多东西,官方地址,点击这里!
settings这是MyBatis中极为重要的调整设置,它们会改变MyBatis的运行时行为。
1 2 3 4 5 6 7 8 9 10 11 12 13 14 15 16 17 18 19 20 21 22 23 <settings > <setting name ="logImpl" value ="LOG4J" /> <setting name ="mapUnderscoreToCamelCase" value ="true" /> <setting name ="lazyLoadingEnabled" value ="true" /> <setting name ="aggressiveLazyLoading" value ="false" /> <setting name ="cacheEnabled" value ="true" /> </settings >
3、typeAliases(了解)
类型别名,可以为常用的类型(JavaBean)起别名!
一些官方别名:查看这里,防止被你占用!
推荐:使用全类名,而不是别名!
1 2 3 4 5 6 7 8 9 10 11 12 13 14 15 16 <typeAliases > <package name ="com.itnxd.bean" /> </typeAliases >
4、typeHandlers(了解)
MyBatis 在设置预处理语句(PreparedStatement)中的参数或从结果集中取出一个值时, 都会用类型处理器将获取到的值以合适的方式转换成 Java 类型!
1 2 3 4 5 6 7 8 <typeHandlers > <typeHandler handler ="" /> </typeHandlers >
5、plugins(了解)
插件,动态代理的使用,可以提供强大功能!
6、environments(了解)
配置一个具体环境,需要事务管理器 transactionManager 和数据源 dataSource(连接池)
做事务管理:mybatis不如spring,因此一般transactionManager标签不用配置。
数据库连接池:第三方连接池比默认的更强,因此这个一般也不用配置。
可以配置多个环境,使用 default 指定默认使用环境!
后来的数据源和事务管理都是spring来做!
1 2 3 4 5 6 7 8 9 10 11 12 13 14 15 16 17 18 19 20 21 22 23 24 25 26 27 28 29 30 31 32 33 34 35 36 37 38 39 40 41 42 <environments default ="development" > <environment id ="testEnv" > <transactionManager type ="JDBC" /> <dataSource type ="POOLED" > <property name ="driver" value ="${driverClass}" /> <property name ="url" value ="jdbc:mysql://192.168.1.1/test" /> <property name ="username" value ="${username}" /> <property name ="password" value ="${password}" /> </dataSource > </environment > <environment id ="development" > <transactionManager type ="JDBC" /> <dataSource type ="POOLED" > <property name ="driver" value ="${driverClass}" /> <property name ="url" value ="${jdbcUrl}" /> <property name ="username" value ="${username}" /> <property name ="password" value ="${password}" /> </dataSource > </environment > </environments >
7、databaseIdProvider
数据库厂商标识,mybatis用来处理数据库移植性的!
type固定值:从官方文档扣过来即可!
去Dao.xml中增加各类数据库实现即可!
默认通过databaseId值区分数据库,若都不匹配执行没有添加databaseId属性的默认语句!
可以精确匹配就精确匹配,否则使用默认的模糊匹配!
1 2 3 4 5 6 7 8 9 10 11 12 13 14 15 16 17 18 19 20 21 22 23 <databaseIdProvider type = "DB_VENDOR" > <property name = "MySQL" value ="mysql" /> <property name = "SQL Server" value ="sqlserver" /> <property name = "Oracle" value ="oracle" /> </databaseIdProvider >
1 2 3 4 5 6 7 8 9 10 11 12 13 14 <select id ="getEmpById" resultType ="com.itnxd.bean.Employee" > </select > <select id ="getEmpById" resultType ="com.itnxd.bean.Employee" databaseId ="mysql" > </select > <select id ="getEmpById" resultType ="com.itnxd.bean.Employee" databaseId ="oracle" > </select >
8、mappers
写好的Dao.xml sql映射文件注册进来!
普通注册
resource:类路径下找映射文件
class:直接写Dao接口的全类名
可以将xml放在和dao接口同目录下,而且文件名和接口名一致
还可以用来配置注解版本的Dao接口,不使用配置文件!
url:从磁盘或者网络路径
批量注册:
映射文件和dao必须同路径才可以
解决方法:
在maven工程下的resources文件夹下新建一个和dao包名同路径的文件夹,映射文件放到这里
同时配置pom.xml文件,让其将配置文件一同打包到与源文件同路径!
pom.xml文件:
src/main/java:若映射文件和类文件同在该目录下,则指定maven打包将该目录一起打包
src/main/resources:若映射文件在工程下的resources目录下同报名路径,则指定maven打包将该目录一起打包
1 2 3 4 5 6 7 8 9 10 11 12 13 14 15 16 17 18 19 20 21 <build > <resources > <resource > <directory > src/main/java</directory > <includes > <include > **/*.properties</include > <include > **/*.xml</include > </includes > <filtering > false</filtering > </resource > <resource > <directory > src/main/resources</directory > <includes > <include > **/*.properties</include > <include > **/*.xml</include > </includes > <filtering > true</filtering > </resource > </resources > </build >
mybatis-config.xml文件:
1 2 3 4 5 6 7 8 9 10 11 12 13 14 15 16 17 18 19 20 21 22 23 24 25 26 27 28 29 30 31 <mappers > <package name ="com.itnxd.dao" /> </mappers >
9、注解映射文件
重要的复杂的dao可以写配置
简单的dao就直接标注解
1
2
3
4
5
6
7
8
9
10
11
12
13
14
15
16
17
18
19
20
21
22
23
24
25
26
27
28
package com.itnxd.dao;import com.itnxd.bean.Employee;import org.apache.ibatis.annotations.Delete;import org.apache.ibatis.annotations.Insert;import org.apache.ibatis.annotations.Select;import org.apache.ibatis.annotations.Update;public interface EmployeeAnnoDao @Select(" select * from t_employee where id = #{id}") Employee getEmpById (Integer id) ;@Insert("insert into t_employee(empname, gender, email) " + "values(#{empname}, #{gender}, #{email})") int insertEmployee (Employee employee) @Update(" update t_employee set empname = #{empname} " + "gender = #{gender},email = #{email} where id = #{id}") int updateEmployee (Employee employee) @Delete("delete from t_employee where id = #{id}") int deleteEmployee (Integer id)
四、Sql映射配置文件
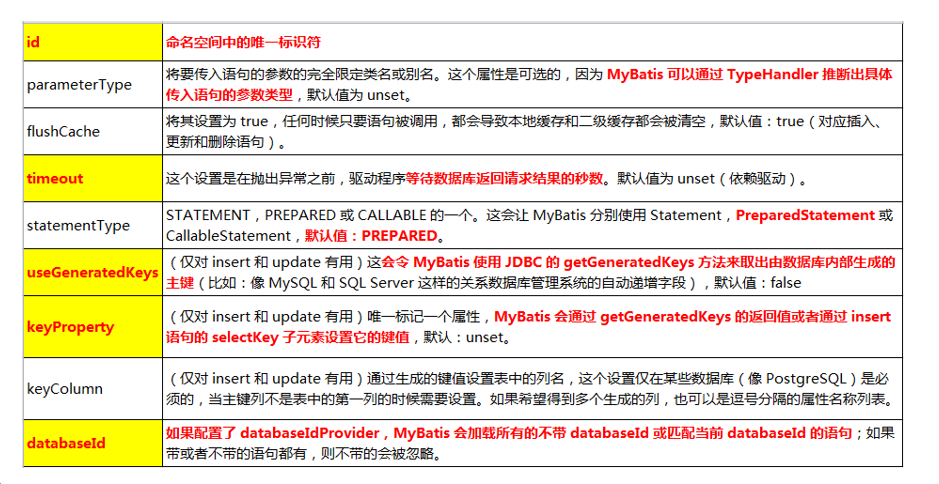
0、可以写的标签
1
2
3
4
5
6
7
8
9
10
11
cache – 该命名空间的缓存配置。
增删改标签属性:
id:对应的方法名
parameterType:默认可以自动推断,不写
flusthCache:后续介绍
timeout:一般使用spring管理!
statementType:默认为preparedStatement(一般不改),callable:调用存储过程使用
1、获取参数值
1.1、各种参数取值
单个参数:基本类型:#{随便写}
多个参数:内部使用Map存储,通过key取值,默认key为#{arg0, arg1 或 param1, param2}
使用@param注解为参数指定key,称之为命名参数(推荐):#{指定的key}
JavaBean:#{JavaBean的属性值},无需.
Map:#{key}
混合型:
使用注解:可以使用 #{JavaBean.属性} 获取
不使用注解:使用{paramN.属性} 获取
几个例子:
例子一:不使用@Param注解
默认有一个对应关系,(参数1,参数2 .. ) 对应 arg0, arg1或param1, param2!
单个参数:随便写即可
多个参数:按照默认情况写(内部为使用Map保存)
1 2 3 4 5 6 7 8 9 10 11 12 <select id ="getEmpByIdAndEmpName" resultType ="com.itnxd.bean.Employee" > </select > <select id ="getEmpByIdAndEmail3" resultType ="com.itnxd.bean.Employee" > </select >
例子二:使用@Param注解(推荐)
使用注解起别名可以更方便获取值!
使用@param注解为参数指定key,称之为命名参数 !
1 Employee getEmpByIdAndEmail3 (@Param("id") Integer id, @Param("employee") Employee employee) ;
1 2 3 <select id ="getEmpByIdAndEmail3" resultType ="com.itnxd.bean.Employee" > </select >
1.2、取值时可设置规则
javaType、jdbcType、mode、numericScale、resultMap、typeHandler、jdbcTypeName、expression等!
实际上通常被设置的是:可能为空的列名指定 jdbcType
eg:id=#{id,jdbcType=INT};
只有jdbcType才可能是需要被指定的:
正常情况,默认不指定jdbcType,mysql没问题,oracle没问题;
万一传入的数据是null,mysql插入null没问题,oracle不知道null到底是什么类型
1.3、#{key}和${key}区别
#{key}:获取参数的值,预编译到SQL中。安全。(无法使用在非参数位置进行预编译)
${key}:获取参数的值,拼接到SQL中。有SQL注入问题。ORDER BY ${name}
在不支持参数预编译的情况下,使用${},例如表名位置。。
2、获取自增主键的值
1 2 3 4 5 6 7 8 9 10 11 12 <insert id ="insertEmployee" useGeneratedKeys ="true" keyProperty ="id" > </insert >
对于不支持自增数据库的处理: 例如Oracle!
使用selectKey标签和order属性指定提前运行的sql语句,便于主sql语句可以取到该值!
同样查询到的最大id赋值给了JavaBean对应的属性!
1 2 3 4 5 6 7 8 9 10 11 12 13 14 15 16 17 18 19 <insert id ="insertEmployee2" > <selectKey order ="BEFORE" resultType ="Integer" keyProperty ="id" > </selectKey > </insert >
3、resultType
指定返回值类型!
2.1、集合
如果返回的是集合,写的是集合里面元素的类型!
1 List<Employee> getAllEmps () ;
1 2 3 4 5 6 <select id ="getAllEmps" resultType ="com.itnxd.bean.Employee" > </select >
2.2、单条记录返回Map
查询返回一个Map,则写map,mybatis指定的别名,Map->map
1 2 3 4 Map<String, Object> getEmpByIdReturnMap (Integer id) ;
1 2 3 4 5 6 7 <select id ="getEmpByIdReturnMap" resultType ="map" > </select >
2.3、多条记录返回Map
使用@MapKey注解指定那个属性作为主键!
resultType写JavaBean类型!
1 2 3 4 5 6 7 @MapKey("id") Map<Integer, Employee> getAllEmpsReturnMap () ;
1 2 3 4 5 6 7 <select id ="getAllEmpsReturnMap" resultType ="com.itnxd.bean.Employee" > </select >
2.4、普通类型
直接写JavaBean类型!
4、resultMap
自定义返回类型!自己定义每一列数据和JavaBean的映射规则!
1 2 3 4 5 6 7 8 9 10 11 12 13 14 15 16 17 18 19 20 21 22 23 24 25 26 27 28 29 30 <resultMap id ="myCat" type ="com.itnxd.bean.Cat" > <id property ="id" column ="id" /> <result property ="name" column ="cname" /> <result property ="gender" column ="cgender" /> <result property ="age" column ="cage" /> </resultMap > <select id ="getCatById" resultMap ="myCat" > </select >
5、联合查询
Key类和Lock类:
1
2
3
4
5
6
7
8
9
10
11
12
13
14
15
16
17
18
19
20
public class Key private Integer id;private String keyName;private Lock lock; public class Lock private Integer id;private String lockName;private List<Key> keys;
5.1、级联属性
1 2 3 4 5 6 7 8 9 10 11 12 13 14 15 16 <select id ="getKeyById" resultMap ="myKey" > </select > <resultMap id ="myKey" type ="com.itnxd.bean.Key" > <id property ="id" column ="id" /> <result property ="keyName" column ="keyName" /> <result property ="lock.id" column ="lid" /> <result property ="lock.lockName" column ="lockName" /> </resultMap >
5.2、association(推荐)
比直接自定义更方便!处理JavaBean内的JavaBean!
1 2 3 4 5 6 7 8 9 10 11 12 13 14 15 16 17 18 19 20 21 <select id ="getKeyById" resultMap ="myKey" > </select > <resultMap id ="myKey" type ="com.itnxd.bean.Key" > <id property ="id" column ="id" /> <result property ="keyName" column ="keyName" /> <association property ="lock" javaType ="com.itnxd.bean.Lock" > <id property ="id" column ="lid" /> <result property ="lockName" column ="lockName" /> </association > </resultMap >
5.3、collection
处理JavaBean内的集合!
1 2 3 4 5 6 7 8 9 10 11 12 13 14 15 16 17 18 19 20 21 22 23 24 25 26 27 28 29 <select id ="getLockById" resultMap ="myLock" > </select > <resultMap id ="myLock" type ="com.itnxd.bean.Lock" > <id property ="id" column ="id" /> <result property ="lockName" column ="lockName" /> <collection property ="keys" ofType ="com.itnxd.bean.Key" > <id property ="id" column ="kid" /> <result property ="keyName" column ="keyName" /> </collection > </resultMap >
6、分步查询
也就是一步步查,下一步根据上一步结果继续查询,直到查到最终结果!
对于分步查询,我们可以开启延迟加载 :即对于分的步,用到的时候再去发送sql语句!
全局开启延迟加载
可使用fetch设置进行局部配置开或关(当然是在全局已经开启的情况下)默认为 fetchType="lazy" ,如果本次的查询不想使用延迟加载,则可设置为fetchType="eager"
mybatis-config.xml:
1 2 3 4 5 6 7 8 9 10 11 <settings > <setting name ="lazyLoadingEnabled" value ="true" /> <setting name ="aggressiveLazyLoading" value ="false" /> </settings >
KeyDao.xml文件:
1 2 3 4 5 6 7 8 9 10 11 <resultMap id ="myKeySimple" type ="com.itnxd.bean.Key" > <id property ="id" column ="id" /> <result property ="keyName" column ="keyName" /> <association property ="lock" select ="com.itnxd.dao.LockDao.getLockByIdSimple" column ="lockId" fetchType ="lazy" /> </resultMap >
例子一:先根据获取lockId获取锁子信息,再将信息封装到key对象内!
KeyDao.xml文件:
1 2 3 4 5 6 7 8 9 10 11 12 13 14 15 16 17 18 19 20 21 22 23 24 25 26 27 <select id ="getKeyByIdSimple" resultMap ="myKeySimple" > </select > <resultMap id ="myKeySimple" type ="com.itnxd.bean.Key" > <id property ="id" column ="id" /> <result property ="keyName" column ="keyName" /> <association property ="lock" select ="com.itnxd.dao.LockDao.getLockByIdSimple" column ="lockId" fetchType ="lazy" /> </resultMap >
LockDao.xml文件:
1 2 3 <select id ="getLockByIdSimple" resultType ="com.itnxd.bean.Lock" > </select >
例子二:先根据锁子id获取获取对应的所有钥匙,再将得到结果封装到keys属性!
LockDao.xml文件:
1 2 3 4 5 6 7 8 9 10 11 12 13 14 <select id ="getLockByIdByStep" resultMap ="myLockStep" > </select > <resultMap id ="myLockStep" type ="com.itnxd.bean.Lock" > <id property ="id" column ="id" /> <result property ="lockName" column ="lockName" /> <collection property ="keys" select ="com.itnxd.dao.KeyDao.getKeysByLockId" column ="id" /> </resultMap >
KeyDao.xml文件:
1 2 3 4 5 <select id ="getKeysByLockId" resultType ="com.itnxd.bean.Key" > </select >
7、关联关系中外键的选择
一对一关联:随便
一对多关联:多的一端
多对多关联:中间表存储对应关系
五、动态Sql
0、EGNL表达式
用于下面test属性的条件书写!
OGNL( Object Graph Navigation Language )对象图导航语言,这是一种强大的表达式语言,通过它可以非常方便的来操作对象属性。 类似于我们的 EL。
访问对象属性: person.name
调用方法: person.getName()
调用静态属性/方法: @java.lang.Math@PI,@java.util.UUID@randomUUID()
调用构造方法: new com.atguigu.bean.Person(“admin”).name
运算符: +,-*,/,%
逻辑运算符: in,not in,>,>=,<,<=,==,!=
注意:xml 中特殊符号如”,>,<等这些都需要使用转义字符
1、if标签
后面添加and用于连接!
1 2 3 4 5 6 <if test ="id != null" > </if > <if test ="name != null & & !name.equals(" " ) " > </if >
2、where标签
where可以不用手写,使用标签where,还可以过滤多余的and,or!
注意:只能过滤条件前面的!不能过滤后面的!
1 2 3 4 5 6 7 8 9 10 11 <where > <if test ="id != null" > </if > <if test ="name != null & & !name.equals(" " ) " > </if > <if test ="birth != null" > < #{birth}</if > </where >
3、trim标签
可以用于过滤前后多余字符!
1 2 3 4 5 6 7 8 9 10 11 12 13 14 15 16 17 18 19 20 21 22 <trim prefix ="where" prefixOverrides ="and" suffixOverrides ="and" > <if test ="id != null" > </if > <if test ="name != null & & !name.equals(" " ) " > </if > <if test ="birth != null" > < #{birth}</if > </trim >
4、foreach标签
遍历集合!
collection:指定要便利集合的key,List只能填list
解决:使用@Param注解指明key
1 2 3 4 5 6 7 8 9 10 11 12 13 14 15 16 17 18 19 20 21 22 23 24 25 26 27 28 29 30 <select id ="getTeacherByIdIn" resultMap ="myTeacher" > <if test ="ids.isEmpty" > </if > <foreach collection ="ids" open ="(" close =")" item ="id_item" separator ="," > </foreach > </select >
5、choose标签
类似switch case!
1 2 3 4 5 6 7 8 9 10 11 12 13 14 15 16 17 18 19 20 21 22 23 24 <select id ="getTeacherByConditionChose" resultMap ="myTeacher" > <where > <choose > <when test ="id != null" > </when > <when test ="name != null and !name.equals(" " )" > </when > <when test ="birth != null" > </when > <otherwise > </otherwise > </choose > </where > </select >
6、set标签
set 替换原生的update(可以解决逗号多余问题)
1 2 3 4 5 6 7 8 9 10 11 12 13 14 15 16 17 18 19 20 21 22 <update id ="updateTeacher" > <set > <if test ="name != null and !name.equals(" " )" > </if > <if test ="course != null and !course.equals(" " )" > </if > <if test ="address != null" > </if > <if test ="birth != null" > </if > </set > <where > id = #{id} </where > </update >
7、bind标签(了解)
对于传递进来的属性绑定一些内容,例如模糊匹配等等!
1 2 3 4 5 6 7 8 9 10 11 12 13 14 15 16 17 18 19 20 21 22 <select id ="" > <where > <if test ="id != null" > </if > <bind name ="_name" value ="'%' + name + '%'" /> <if test ="name != null & & !name.equals(" " ) " > </if > <if test ="birth != null" > < #{birth}</if > </where > </select >
8、sql标签
抽取可重用sql!
1 2 3 4 5 6 7 8 9 10 11 12 <sql id ="selectSql" > </sql > <select id ="" > <include refid ="selectSql" /> </select >
六、缓存机制
自然是将查过的数据保存下来,方便下一次使用,而无需再次查询!
1、一级缓存
Sqlsession级别缓存 ,也就是说每次会话关闭会自动清空缓存!
每次查询,先看一级缓存中有没有,如果没有就去发送新的sql,每个sqlSession拥有自己的一级缓存!
一级缓存失效的几种情况:
不同的SqlSession对应不同的一级缓存
同一个SqlSession但是查询条件不同,由于可能之前没查询过,所有还会发新的sql
同一个SqlSession两次查询期间执行了任何一次增删改操作,增删改操作会把缓存清空
同一个SqlSession两次查询期间手动清空了缓存(调用session.clearCache())
一级缓存的工作机制:
同一次会话期间只要查询过的数据都会保存在当前 SqlSession 的一个 Map 中!
key: hashCode+查询的 Sqlid+编写的 sql 查询语句+参数
2、二级缓存
namespace级别缓存 ,全局作用域缓存!
一级缓存 SqlSession关闭或者提交以后, 一级缓存的数据会放在二级缓存中!
二级缓存默认不开启,需要手动配置!
全局配置mybatis-config.xml开启二级缓存:
1 2 3 4 <setting name = "cacheEnabled" value ="true" />
配置某个dao.xml文件,让其使用二级缓存:
每个实体类JavaBean都要加上implements Serializable
1 2 3 public class Teacher implements Serializable
测试:
1 2 3 4 5 6 7 8 9 10 11 12 13 14 15 16 17 18 19 20 21 22 @Test public void test7 () throws IOException, InterruptedException "mybatis-config.xml" ;new SqlSessionFactoryBuilder().build(inputStream);try (SqlSession session = sqlSessionFactory.openSession(true )) {1 );try (SqlSession session = sqlSessionFactory.openSession(true )) {1 );
3、二级缓存相关属性
eviction=“FIFO”:缓存回收策略:
LRU – 最近最少使用的:移除最长时间不被使用的对象。
FIFO – 先进先出:按对象进入缓存的顺序来移除它们。
SOFT – 软引用:移除基于垃圾回收器状态和软引用规则的对象。
WEAK – 弱引用:更积极地移除基于垃圾收集器状态和弱引用规则的对象。
默认的是 LRU。
flushInterval:刷新间隔,单位毫秒,默认情况是不设置,也就是没有刷新间隔,缓存仅仅调用语句时刷新
size:引用数目,正整数,代表缓存最多可以存储多少个对象,太大容易导致内存溢出
readOnly:只读,true/false
true:只读缓存;会给所有调用者返回缓存对象的相同实例。因此这些对象不能被修改。这提供了很重要的性能优势。
false:读写缓存;会返回缓存对象的拷贝(通过序列化)。这会慢一些,但是安全,
因此默认是 false。
4、缓存相关属性设置
全局 setting 的 cacheEnable:配置二级缓存的开关,一级缓存一直是打开的。
select 标签的 useCache 属性:配置这个 select 是否使用二级缓存。一级缓存一直是使用的
sql 标签的 flushCache 属性:增删改默认 flushCache=true。sql 执行以后,会同时清空一级和二级缓存。查询默认 flushCache=false。
sqlSession.clearCache():只是用来清除一级缓存。
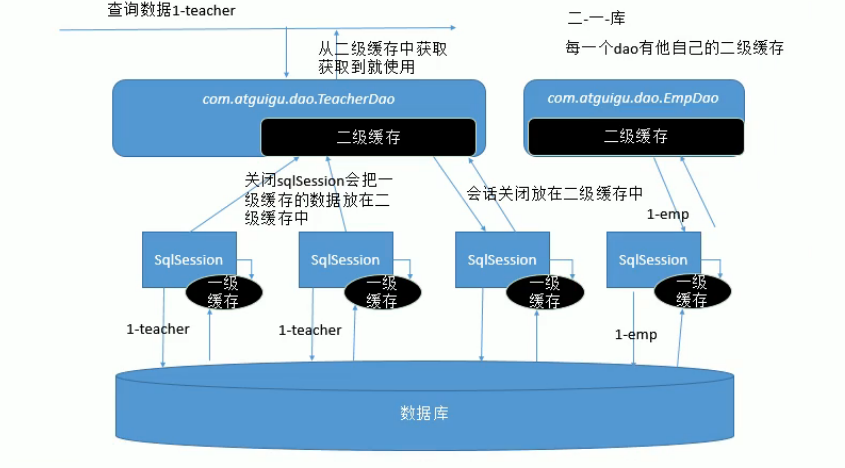
5、缓存原理
不会出现一级缓存和二级缓存中有同一个数据
二级缓存中:一级缓存关闭了就有了
一级缓存中:二级缓存中没有此数据,就会看一级缓存,一级缓存没有去查数据库
数据库的查询后的结果放在一级缓存中了
任何时候都是先看二级缓存、再看一级缓存,如果大家都没有就去查询数据库
缓存原理图示:
6、整合第三方缓存EhCache
原因:自带缓存太菜!
MyBatis留了一个Cache接口,可以让第三方进行实现!
EhCache非常专业的Java进程内的缓存框架!
6.1、pom.xml导包
核心包和整合包,整合包(可选,不导包则需要自己继承Cache接口进行实现)
1 2 3 4 5 6 7 8 9 10 11 12 13 14 15 16 17 18 19 20 21 22 23 24 25 26 <dependency > <groupId > org.ehcache</groupId > <artifactId > ehcache</artifactId > <version > 3.9.2</version > </dependency > <dependency > <groupId > org.mybatis.caches</groupId > <artifactId > mybatis-ehcache</artifactId > <version > 1.2.1</version > </dependency > <dependency > <groupId > org.slf4j</groupId > <artifactId > slf4j-log4j12</artifactId > <version > 2.0.0-alpha1</version > </dependency > <dependency > <groupId > org.slf4j</groupId > <artifactId > slf4j-api</artifactId > <version > 2.0.0-alpha1</version > </dependency >
6.2、配置ehcache.xml
各个属性配置见下方注释!
1 2 3 4 5 6 7 8 9 10 11 12 13 14 15 16 17 18 19 20 21 22 23 24 25 26 27 28 29 30 31 32 33 34 35 36 37 <?xml version="1.0" encoding="UTF-8"?> <ehcache xmlns:xsi ="http://www.w3.org/2001/XMLSchema-instance" xsi:noNamespaceSchemaLocation ="../config/ehcache.xsd" > <diskStore path ="D:\ehcache" /> <defaultCache maxElementsInMemory ="100000" maxElementsOnDisk ="10000000" eternal ="false" overflowToDisk ="true" timeToIdleSeconds ="120" timeToLiveSeconds ="120" diskExpiryThreadIntervalSeconds ="120" memoryStoreEvictionPolicy ="LRU" > </defaultCache > </ehcache >
6.3、在mapper.xmI中配置使用自定义的缓存
还可以使用cache-ref指定和其他dao.xml使用同一块缓存!
1 2 3 4 5 <cache type ="org.mybatis.caches.ehcache.EhcacheCache" />
七、MyBatis逆向工程
MyBatis Generator: 简称 MBG,是一个专门为 MyBatis 框架使用者定制的代码生成器,可以快速的根据表生成对应的映射文件,接口,以及 bean 类。
可以通过数据库表生成对应的文件!
官方地址:所有的配置都可以在这里找到详细答案,点击这里!
1、pom.xml添加插件
该插件执行依赖于mybatis-generator-core和mysql-connector-java!
指定配置文件地址:
1 2 <configurationFile > src/main/resources/generatorConfig.xml</configurationFile >
点击生成覆盖旧文件:
1 2 <overwrite > true</overwrite >
1 2 3 4 5 6 7 8 9 10 11 12 13 14 15 16 17 18 19 20 21 22 23 24 25 26 27 28 29 30 31 32 33 34 35 36 37 38 39 40 41 42 43 <build > <plugins > <plugin > <groupId > org.mybatis.generator</groupId > <artifactId > mybatis-generator-maven-plugin</artifactId > <version > 1.4.0</version > <configuration > <configurationFile > src/main/resources/generatorConfig.xml</configurationFile > <verbose > true</verbose > <overwrite > true</overwrite > </configuration > <executions > <execution > <id > Generate MyBatis Artifacts</id > <goals > <goal > generate</goal > </goals > </execution > </executions > <dependencies > <dependency > <groupId > org.mybatis.generator</groupId > <artifactId > mybatis-generator-core</artifactId > <version > 1.4.0</version > </dependency > <dependency > <groupId > mysql</groupId > <artifactId > mysql-connector-java</artifactId > <version > 8.0.23</version > </dependency > </dependencies > </plugin > </plugins > </build >
2、generatorConfig.xml配置
配置插件详细配置,文件名和pom.xml配置相符即可!
更详细配置参考官方文档!
1 2 3 4 5 6 7 8 9 10 11 12 13 14 15 16 17 18 19 20 21 22 23 24 25 26 27 28 29 30 31 32 33 34 35 36 37 38 39 40 41 42 43 44 <!DOCTYPE generatorConfiguration PUBLIC "-//mybatis.org//DTD MyBatis Generator Configuration 1.0//EN" "http://mybatis.org/dtd/mybatis-generator-config_1_0.dtd" > <generatorConfiguration > <context id ="simple" targetRuntime ="MyBatis3" > <javaModelGenerator targetPackage ="com.itnxd.bean" targetProject ="./src/main/java" /> <sqlMapGenerator targetPackage ="com.itnxd.dao" targetProject ="src/main/resources" /> <javaClientGenerator type ="XMLMAPPER" targetPackage ="com.itnxd.dao" targetProject ="src/main/java" /> <table tableName ="t_teacher" domainObjectName ="Teacher" /> <table tableName ="t_cat" domainObjectName ="Cat" /> <table tableName ="t_employee" domainObjectName ="Employee" /> </context > </generatorConfiguration >
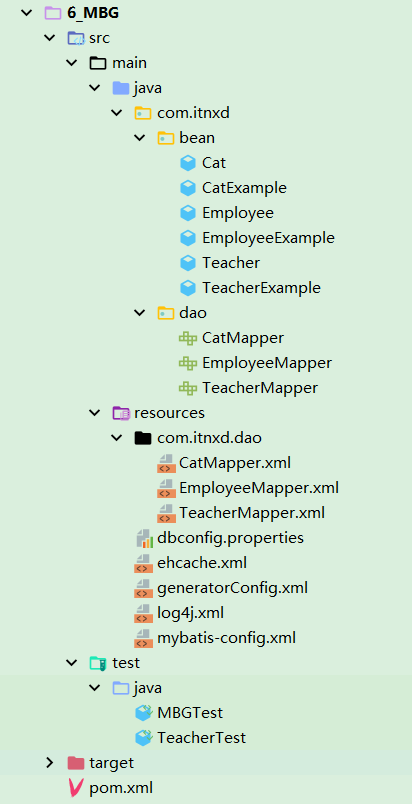
3、生成所有文件
可以生成Bean,Dao,mapper.xml映射文件!
双击命令即可!
生成文件展示:
4、测试
xxxExample用来封装查询条件,null查询所有,没有条件!
详细看下方代码!
1 2 3 4 5 6 7 8 9 10 11 12 13 14 15 16 17 18 19 20 21 22 23 24 25 26 27 28 29 30 31 32 33 34 35 36 37 38 39 40 41 42 43 44 45 46 @Test public void test1 () throws IOException "mybatis-config.xml" ;new SqlSessionFactoryBuilder().build(inputStream);try (SqlSession session = sqlSessionFactory.openSession()) {1 );null );new CatExample();"%猫%" );3 );1 );"id" );"id desc" );
八、SSM整合
整合完成项目结构图:
1、pom.xml导包
1.1、Spring-IOC模块
1 2 3 4 5 6 7 8 9 10 11 12 13 14 15 16 17 18 19 20 21 22 23 24 25 26 27 28 29 30 31 32 33 34 35 36 37 38 <dependency > <groupId > org.springframework</groupId > <artifactId > spring-aop</artifactId > <version > ${spring.version}</version > </dependency > <dependency > <groupId > org.springframework</groupId > <artifactId > spring-beans</artifactId > <version > ${spring.version}</version > </dependency > <dependency > <groupId > org.springframework</groupId > <artifactId > spring-context</artifactId > <version > ${spring.version}</version > </dependency > <dependency > <groupId > org.springframework</groupId > <artifactId > spring-core</artifactId > <version > ${spring.version}</version > </dependency > <dependency > <groupId > org.springframework</groupId > <artifactId > spring-expression</artifactId > <version > ${spring.version}</version > </dependency > <dependency > <groupId > commons-logging</groupId > <artifactId > commons-logging</artifactId > <version > 1.2</version > </dependency >
1.2、Jdbc和事务模块
1 2 3 4 5 6 7 8 9 10 11 12 13 14 15 16 17 18 19 <dependency > <groupId > org.springframework</groupId > <artifactId > spring-jdbc</artifactId > <version > ${spring.version}</version > </dependency > <dependency > <groupId > org.springframework</groupId > <artifactId > spring-tx</artifactId > <version > ${spring.version}</version > </dependency > <dependency > <groupId > org.springframework</groupId > <artifactId > spring-orm</artifactId > <version > ${spring.version}</version > </dependency >
1.3、测试模块
1 2 3 4 5 6 7 8 9 10 11 12 13 14 15 16 <dependency > <groupId > org.springframework</groupId > <artifactId > spring-test</artifactId > <version > ${spring.version}</version > <scope > test</scope > </dependency > <dependency > <groupId > org.junit.jupiter</groupId > <artifactId > junit-jupiter-api</artifactId > <version > 5.8.0-M1</version > <scope > test</scope > </dependency >
1.4、AOP及动态代理模块
1 2 3 4 5 6 7 8 9 10 11 12 13 14 15 16 17 18 19 20 21 22 23 24 25 <dependency > <groupId > org.springframework</groupId > <artifactId > spring-aspects</artifactId > <version > ${spring.version}</version > </dependency > <dependency > <groupId > org.aspectj</groupId > <artifactId > aspectjweaver</artifactId > <version > 1.9.6</version > </dependency > <dependency > <groupId > org.aopalliance</groupId > <artifactId > com.springsource.org.aopalliance</artifactId > <version > 1.0.0</version > </dependency > <dependency > <groupId > cglib</groupId > <artifactId > cglib</artifactId > <version > 3.3.0</version > </dependency >
1.5、SpringMvc模块
1 2 3 4 5 6 7 8 9 10 11 12 13 14 15 16 17 18 <dependency > <groupId > org.springframework</groupId > <artifactId > spring-web</artifactId > <version > ${spring.version}</version > </dependency > <dependency > <groupId > org.springframework</groupId > <artifactId > spring-webmvc</artifactId > <version > ${spring.version}</version > </dependency > <dependency > <groupId > javax.servlet</groupId > <artifactId > javax.servlet-api</artifactId > <version > 4.0.1</version > </dependency >
1.6、JSTL标签库
1 2 3 4 5 6 7 8 9 10 11 12 13 14 15 16 17 18 19 <dependency > <groupId > javax.servlet.jsp.jstl</groupId > <artifactId > jstl</artifactId > <version > 1.2</version > </dependency > <dependency > <groupId > javax.servlet.jsp.jstl</groupId > <artifactId > jstl-api</artifactId > <version > 1.2</version > </dependency > <dependency > <groupId > org.glassfish.web</groupId > <artifactId > jstl-impl</artifactId > <version > 1.2</version > </dependency >
1.7、文件上传模块
1 2 3 4 5 6 7 <dependency > <groupId > commons-fileupload</groupId > <artifactId > commons-fileupload</artifactId > <version > 1.4</version > </dependency >
1.8、Hibernate的数据校验模块
1 2 3 4 5 6 7 8 9 10 11 12 13 <dependency > <groupId > org.hibernate.validator</groupId > <artifactId > hibernate-validator</artifactId > <version > 6.0.0.Final</version > </dependency > <dependency > <groupId > org.hibernate.validator</groupId > <artifactId > hibernate-validator-annotation-processor</artifactId > <version > 6.0.0.Final</version > </dependency >
1.9、SpringMvc-Json-Ajax支持模块
1 2 3 4 5 6 7 8 9 10 11 12 13 14 15 16 17 18 19 <dependency > <groupId > com.fasterxml.jackson.core</groupId > <artifactId > jackson-databind</artifactId > <version > 2.12.2</version > </dependency > <dependency > <groupId > com.fasterxml.jackson.core</groupId > <artifactId > jackson-core</artifactId > <version > 2.12.2</version > </dependency > <dependency > <groupId > com.fasterxml.jackson.core</groupId > <artifactId > jackson-annotations</artifactId > <version > 2.12.2</version > </dependency >
1.10、谷歌验证码模块
由于谷歌官方并没有上传到Maven仓库,但是有人上传了,我们可以使用下面这个!
1 2 3 4 5 6 7 <dependency > <groupId > com.github.penggle</groupId > <artifactId > kaptcha</artifactId > <version > 2.3.2</version > </dependency >
1.11、MyBatis核心即整合Spring模块
1 2 3 4 5 6 7 8 9 10 11 12 13 14 <dependency > <groupId > org.mybatis</groupId > <artifactId > mybatis</artifactId > <version > 3.5.6</version > </dependency > <dependency > <groupId > org.mybatis</groupId > <artifactId > mybatis-spring</artifactId > <version > 2.0.6</version > </dependency >
1.12、数据库驱动即连接池模块
1 2 3 4 5 6 7 8 9 10 11 12 13 14 <dependency > <groupId > mysql</groupId > <artifactId > mysql-connector-java</artifactId > <version > 8.0.23</version > </dependency > <dependency > <groupId > com.mchange</groupId > <artifactId > c3p0</artifactId > <version > 0.9.5.5</version > </dependency >
1.13、log4j日志模块
1 2 3 4 5 6 7 <dependency > <groupId > log4j</groupId > <artifactId > log4j</artifactId > <version > 1.2.17</version > </dependency >
1.14、EhCache缓存模块
1 2 3 4 5 6 7 8 9 10 11 12 13 14 15 16 17 18 19 20 21 22 23 24 25 26 <dependency > <groupId > org.ehcache</groupId > <artifactId > ehcache</artifactId > <version > 3.9.2</version > </dependency > <dependency > <groupId > org.mybatis.caches</groupId > <artifactId > mybatis-ehcache</artifactId > <version > 1.2.1</version > </dependency > <dependency > <groupId > org.slf4j</groupId > <artifactId > slf4j-log4j12</artifactId > <version > 2.0.0-alpha1</version > </dependency > <dependency > <groupId > org.slf4j</groupId > <artifactId > slf4j-api</artifactId > <version > 2.0.0-alpha1</version > </dependency >
1.15、PageHelper分页插件模块
1 2 3 4 5 6 7 <dependency > <groupId > com.github.pagehelper</groupId > <artifactId > pagehelper</artifactId > <version > 5.2.0</version > </dependency >
1.16、配置Maven打包resources下的xml到类路径
1 2 3 4 5 6 7 8 9 10 11 12 13 14 15 16 17 18 19 20 21 <build > <resources > <resource > <directory > src/main/java</directory > <includes > <include > **/*.properties</include > <include > **/*.xml</include > </includes > <filtering > false</filtering > </resource > <resource > <directory > src/main/resources</directory > <includes > <include > **/*.properties</include > <include > **/*.xml</include > </includes > <filtering > true</filtering > </resource > </resources > </build >
2、web.xml配置
1 2 3 4 5 6 7 8 9 10 11 12 13 14 15 16 17 18 19 20 21 22 23 24 25 26 27 28 29 30 31 32 33 34 35 36 37 38 39 40 41 42 43 44 45 46 47 48 49 50 51 52 53 54 55 56 57 58 59 60 61 62 63 64 65 66 67 68 <?xml version="1.0" encoding="UTF-8"?> <web-app xmlns ="http://xmlns.jcp.org/xml/ns/javaee" xmlns:xsi ="http://www.w3.org/2001/XMLSchema-instance" xsi:schemaLocation ="http://xmlns.jcp.org/xml/ns/javaee http://xmlns.jcp.org/xml/ns/javaee/web-app_4_0.xsd" version ="4.0" > <context-param > <param-name > contextConfigLocation</param-name > <param-value > classpath:spring/applicationContext.xml</param-value > </context-param > <listener > <listener-class > org.springframework.web.context.ContextLoaderListener</listener-class > </listener > <servlet > <servlet-name > springDispatcherServlet</servlet-name > <servlet-class > org.springframework.web.servlet.DispatcherServlet</servlet-class > <init-param > <param-name > contextConfigLocation</param-name > <param-value > classpath:spring/applicationContext-mvc.xml</param-value > </init-param > <load-on-startup > 1</load-on-startup > </servlet > <servlet-mapping > <servlet-name > springDispatcherServlet</servlet-name > <url-pattern > /</url-pattern > </servlet-mapping > <filter > <filter-name > CharacterEncodingFilter</filter-name > <filter-class > org.springframework.web.filter.CharacterEncodingFilter</filter-class > <init-param > <param-name > encoding</param-name > <param-value > UTF-8</param-value > </init-param > <init-param > <param-name > forceRequestEncoding</param-name > <param-value > true</param-value > </init-param > <init-param > <param-name > forceResponseEncoding</param-name > <param-value > true</param-value > </init-param > </filter > <filter-mapping > <filter-name > CharacterEncodingFilter</filter-name > <url-pattern > /*</url-pattern > </filter-mapping > <filter > <filter-name > HiddenHttpMethodFilter</filter-name > <filter-class > org.springframework.web.filter.HiddenHttpMethodFilter</filter-class > </filter > <filter-mapping > <filter-name > HiddenHttpMethodFilter</filter-name > <url-pattern > /*</url-pattern > </filter-mapping > </web-app >
3、Spring.xml配置
1 2 3 4 5 6 7 8 9 10 11 12 13 14 15 16 17 18 19 20 21 22 23 24 25 26 27 28 29 30 31 32 33 34 35 36 37 38 39 40 41 42 43 44 45 46 47 48 49 50 51 52 53 54 55 56 57 58 59 60 61 62 63 64 65 66 67 68 69 70 71 72 73 74 75 76 77 78 <?xml version="1.0" encoding="UTF-8"?> <beans xmlns ="http://www.springframework.org/schema/beans" xmlns:xsi ="http://www.w3.org/2001/XMLSchema-instance" xmlns:context ="http://www.springframework.org/schema/context" xmlns:aop ="http://www.springframework.org/schema/aop" xmlns:tx ="http://www.springframework.org/schema/tx" xmlns:mybatis-spring ="http://mybatis.org/schema/mybatis-spring" xsi:schemaLocation ="http://www.springframework.org/schema/beans http://www.springframework.org/schema/beans/spring-beans.xsd http://www.springframework.org/schema/context https://www.springframework.org/schema/context/spring-context.xsd http://www.springframework.org/schema/aop https://www.springframework.org/schema/aop/spring-aop.xsd http://www.springframework.org/schema/tx http://www.springframework.org/schema/tx/spring-tx.xsd http://mybatis.org/schema/mybatis-spring http://mybatis.org/schema/mybatis-spring.xsd" > <context:component-scan base-package ="com.itnxd" > <context:exclude-filter type ="annotation" expression ="org.springframework.stereotype.Controller" /> </context:component-scan > <context:property-placeholder location ="classpath:dbconfig.properties" /> <bean id ="ds" class ="com.mchange.v2.c3p0.ComboPooledDataSource" > <property name ="user" value ="${jdbc.user}" /> <property name ="password" value ="${jdbc.password}" /> <property name ="jdbcUrl" value ="${jdbc.jdbcUrl}" /> <property name ="driverClass" value ="${jdbc.driverClass}" /> <property name ="maxPoolSize" value ="${jdbc.maxPoolSize}" /> <property name ="minPoolSize" value ="${jdbc.minPoolSize}" /> </bean > <bean id ="sqlSessionFactory" class ="org.mybatis.spring.SqlSessionFactoryBean" > <property name ="configLocation" value ="classpath:mybatis/mybatis-config.xml" /> <property name ="dataSource" ref ="ds" /> <property name ="mapperLocations" value ="classpath:mybatis/mapper/*.xml" /> </bean > <bean id ="mapperScannerConfigurer" class ="org.mybatis.spring.mapper.MapperScannerConfigurer" > <property name ="basePackage" value ="com.itnxd.dao" /> </bean > <bean id ="tm" class ="org.springframework.jdbc.datasource.DataSourceTransactionManager" > <property name ="dataSource" ref ="ds" /> </bean > <aop:config > <aop:pointcut id ="txPoint" expression ="execution(* com.itnxd.service.*.*(..))" /> <aop:advisor advice-ref ="myTx" pointcut-ref ="txPoint" /> </aop:config > <tx:advice id ="myTx" transaction-manager ="tm" > <tx:attributes > <tx:method name ="*" rollback-for ="java.lang.Exception" /> <tx:method name ="get*" read-only ="true" /> </tx:attributes > </tx:advice > </beans >
4、SpringMvc.xml配置
1 2 3 4 5 6 7 8 9 10 11 12 13 14 15 16 17 18 19 20 21 22 23 24 25 26 27 28 29 30 31 32 33 34 35 36 37 <?xml version="1.0" encoding="UTF-8"?> <beans xmlns ="http://www.springframework.org/schema/beans" xmlns:xsi ="http://www.w3.org/2001/XMLSchema-instance" xmlns:context ="http://www.springframework.org/schema/context" xmlns:mvc ="http://www.springframework.org/schema/mvc" xsi:schemaLocation ="http://www.springframework.org/schema/beans http://www.springframework.org/schema/beans/spring-beans.xsd http://www.springframework.org/schema/context https://www.springframework.org/schema/context/spring-context.xsd http://www.springframework.org/schema/mvc https://www.springframework.org/schema/mvc/spring-mvc.xsd" > <context:component-scan base-package ="com.itnxd" use-default-filters ="false" > <context:include-filter type ="annotation" expression ="org.springframework.stereotype.Controller" /> </context:component-scan > <bean class ="org.springframework.web.servlet.view.InternalResourceViewResolver" > <property name ="prefix" value ="/WEB-INF/pages/" /> <property name ="suffix" value =".jsp" /> </bean > <bean id ="multipartResolver" class ="org.springframework.web.multipart.commons.CommonsMultipartResolver" > <property name ="maxUploadSize" value ="#{1024*1024*20}" /> <property name ="defaultEncoding" value ="utf-8" /> </bean > <mvc:default-servlet-handler /> <mvc:annotation-driven /> </beans >
5、MyBatis.xml配置
1 2 3 4 5 6 7 8 9 10 11 12 13 14 15 16 17 18 19 20 21 22 23 24 25 26 27 28 29 30 31 32 33 34 <?xml version="1.0" encoding="UTF-8" ?> <!DOCTYPE configuration PUBLIC "-//mybatis.org//DTD Config 3.0//EN" "http://mybatis.org/dtd/mybatis-3-config.dtd" > <configuration > <settings > <setting name ="logImpl" value ="LOG4J" /> <setting name ="mapUnderscoreToCamelCase" value ="true" /> <setting name ="lazyLoadingEnabled" value ="true" /> <setting name ="aggressiveLazyLoading" value ="false" /> <setting name ="cacheEnabled" value ="true" /> </settings > <plugins > <plugin interceptor ="com.github.pagehelper.PageInterceptor" /> </plugins > </configuration >
6、其他配置
6.1、EhCache.xml配置
1 2 3 4 5 6 7 8 9 10 11 12 13 14 15 16 17 18 19 20 21 22 23 24 25 26 27 28 29 30 31 32 33 34 35 36 37 <?xml version="1.0" encoding="UTF-8"?> <ehcache xmlns:xsi ="http://www.w3.org/2001/XMLSchema-instance" xsi:noNamespaceSchemaLocation ="../config/ehcache.xsd" > <diskStore path ="D:\ehcache" /> <defaultCache maxElementsInMemory ="100000" maxElementsOnDisk ="10000000" eternal ="false" overflowToDisk ="true" timeToIdleSeconds ="120" timeToLiveSeconds ="120" diskExpiryThreadIntervalSeconds ="120" memoryStoreEvictionPolicy ="LRU" > </defaultCache > </ehcache >
6.2、log4j.xml配置
1 2 3 4 5 6 7 8 9 10 11 12 13 14 15 16 17 18 19 20 21 22 <?xml version="1.0" encoding="UTF-8" ?> <!DOCTYPE log4j :configuration SYSTEM "log4j.dtd" > <log4j:configuration xmlns:log4j ="http://jakarta.apache.org/log4j/" > <appender name ="STDOUT" class ="org.apache.log4j.ConsoleAppender" > <param name ="Encoding" value ="UTF-8" /> <layout class ="org.apache.log4j.PatternLayout" > <param name ="ConversionPattern" value ="%-5p %d{MM-dd HH:mm:ss,SSS} %m (%F:%L) \n" /> </layout > </appender > <logger name ="java.sql" > <level value ="debug" /> </logger > <logger name ="org.apache.ibatis" > <level value ="info" /> </logger > <root > <level value ="debug" /> <appender-ref ref ="STDOUT" /> </root > </log4j:configuration >
6.3、dbconfig.properties配置
1 2 3 4 5 6 jdbc.user =root jdbc.password =xxx jdbc.driverClass =com.mysql.cj.jdbc.Driver jdbc.jdbcUrl =jdbc:mysql:///mybatis jdbc.maxPoolSize =20 jdbc.minPoolSize =5
7、测试
index.jsp页面:
1 2 3 4 5 6 7 8 9 10 11 12 13 14 15 16 17 18 19 <%@ taglib prefix="c" uri="http://java.sun.com/jsp/jstl/core" %>15890 2021 /4 /8 15 :32 this template use File | Settings | File Templates."text/html;charset=UTF-8" language="java" %>
Controller程序:
1 2 3 4 5 6 7 8 9 10 @Autowired @RequestMapping("/getTeacher") public String getTeacher (@RequestParam(value = "id", defaultValue = "1") Integer id, Model model) "teacher" , teacher);return "success" ;
九、PageHelper分页插件
PageHelper 是 MyBatis 中非常方便的第三方分页插件!
官方地址:官方项目地址!点击这里!
1、pom.xml导包
1 2 3 4 5 6 7 <dependency > <groupId > com.github.pagehelper</groupId > <artifactId > pagehelper</artifactId > <version > 5.2.0</version > </dependency >
2、MyBatis.xml配置
1 2 3 4 5 <plugins > <plugin interceptor ="com.github.pagehelper.PageInterceptor" /> </plugins >
3、测试
Controller程序:
1 2 3 4 5 6 7 8 9 10 11 12 13 14 15 16 17 18 19 20 21 22 23 24 25 26 @RequestMapping("/getAll") public String getAll (@RequestParam(value = "p", defaultValue = "1") Integer p, Model model) 10 );new PageInfo<>(list, 5 );"当前页码:" + pageInfo.getPageNum());"总页码:" + pageInfo.getPages());"总记录数:" + pageInfo.getTotal());"总记录数:" + pageInfo.getTotal());"当前页记录条数:" + pageInfo.getSize());"每页记录数" + pageInfo.getPageSize());"前一页:" + pageInfo.getPrePage());"取出pageInfo信息:" + pageInfo.getList());int [] nums = pageInfo.getNavigatepageNums();"pageInfo" , pageInfo);return "success" ;
index.jsp页面:
1 2 3 4 5 6 7 8 9 10 11 12 <%@ taglib prefix="c" uri="http://java.sun.com/jsp/jstl/core" %>"text/html;charset=UTF-8" language="java" %>
success.jsp页面:
取出从Model中传过来的pageInfo使用即可!
1 2 3 4 5 6 7 8 9 10 11 12 13 14 15 16 17 18 19 20 21 22 23 24 25 26 27 28 29 30 31 32 33 34 35 36 37 38 39 40 41 42 43 44 45 46 47 48 49 50 51 <%@ taglib prefix="c" uri="http://java.sun.com/jsp/jstl/core" %>"text/html;charset=UTF-8" language="java" %>"0" border="1" cellpadding="5" >"${teachers}" var ="teacher" >--%>"${pageInfo.list}" var ="teacher" >"4" >"${pageInfo.navigatepageNums}" var ="pageNum" >if test="${pageInfo.pageNum == pageNum}" >if test="${pageInfo.pageNum != pageNum}" >


 微信
微信 支付宝
支付宝